Note: This article refers only to dedicated servers with a proxmox host system.
VM and CT are named vServer in the following.
Table of Contents
Explanation
There are two ways to set up Internet access on a VM or CT. Here, setting up an additional IP is the simplest and most recommended method.
- additional IP
- NAT
1. additional IP
To be able to set up an additional IP on the vServer, proceed as follows:
1.1. order additional IP
1.2. switch IP to virtualization
1.3. Setting up the additional IP on the vServer
1.1. order additional IP
You can order an additional IP address via the central customer management (CCM). To do this, navigate to "Dedicated Root Server".
Now select the corresponding server contract. You can now order additional IP addresses via the "Add IP address" button.
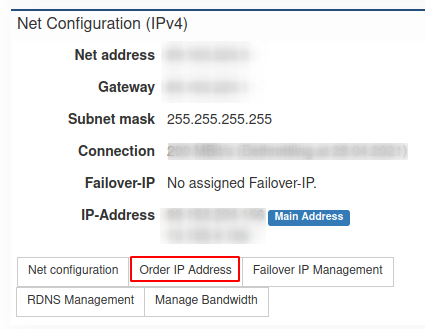
You can use the slider to set the number of IP addresses you need. You will be shown the price before ordering the IP addresses. Via the button "Order IP address" the additional IP addresses are ordered with costs.
Note: If you need more additional IP addresses than you can select, please contact support.

1.2. Switch IP to virtualization
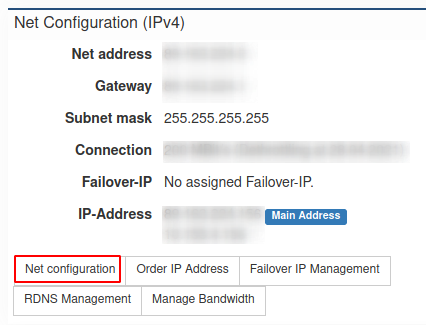
In order to be able to set up the additional IP on the vServer, this must be changed to "Virtualization" in the ZKM. To do this, navigate to the server contract and select the configuration of the IP addresses there via the "Configuration" button.
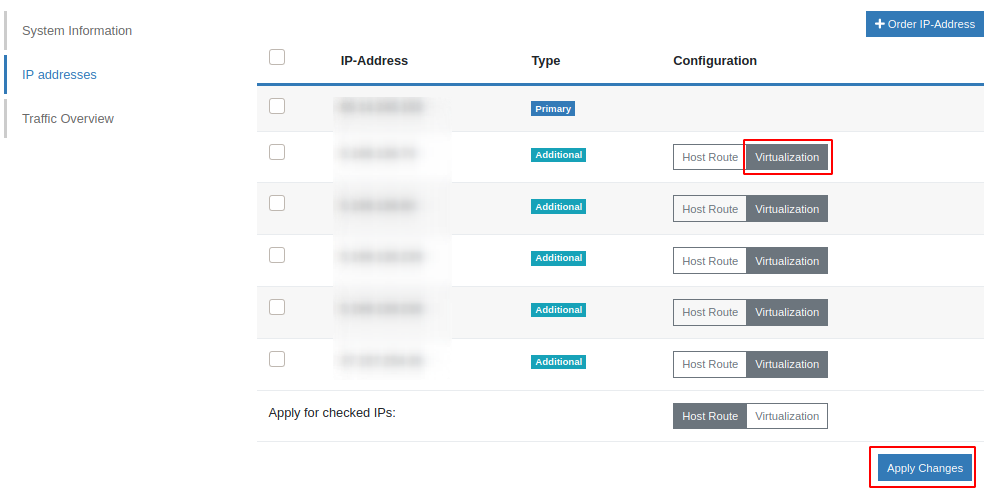
Now set the configuration of "Host route" to "Virtualization" for the additional IP address and save the setting via the "Apply changes" button.
Note: If the configuration is already set to virtualization, change this to host route, save the setting, and change the configuration back to virtualization.
1.3. Setting up the IP on the vServer
Debian / Ubuntu < 20.04
Important:
Please enter the correct network interface here. In the example, we use the network interface "eth0" here. The network interface of your server can be named differently.
The following settings are made directly in the vServer. Use the console via Proxmox to connect to the vServer.
The currently used default network interface can be read out with the following command:
ip r s | grep default
default via 192.168.178.1 dev eth0 proto static metric 100
eth0 -> network interface, this may vary with your server. Use your network interface in the following.
Now open the network configuration file. Usually this is stored under "/etc/network/interfaces". The network configuration must look like this:
auto eth0
iface eth0 inet static
   address <additional IP-Adresse>
   netmask 255.255.255.255
   gateway <Gateway of the host system>
   pointopoint <Gateway of the host system>
After the settings have been made, the network service is restarted.
service networking restart
CentOS
Important:
Please enter the correct network interface here. In the example, we use the network interface "eth0" here. The network interface of your server can be named differently.
The following settings are made directly in the vServer. Use the console via Proxmox to connect to the vServer.
The currently used default network interface can be read out with the following command:
ip r s | grep default
default via 192.168.178.1 dev eth0 proto static metric 100
eth0 -> network interface, this may vary with your server. Use your network interface in the following.
Now call the file "/etc/sysconfig/network-scripts/ifcfg-<network-interface>:0.
example: /etc/sysconfig/network-scripts/ifcfg-eth0:0
The network configuration must look like this:
TYPE=Ethernet
DEVICE=eth0
BOOTPROTO=static
NAME=eth0
ONBOOT=yes
IPADDR=<additional IP-Adresse>
GATEWAY=<Gateway of the host system>
Now the network service is restarted:
/etc/init.d/network/restart
Windows
You can make the network settings in Windows via the graphical interface. To do this, navigate to: Network Card Properties -> Internet Protocol, Version 4 (TCP/IPv4) -> Properties.
Here you can now make the IP settings graphically.
Alternatively, this can also be done via the CMD (Windows key +r, enter "cmd" in the search).
In the CMD, run the following command to set the network settings.
netsh interface ipv4 set address name="Ethernet" static <additional IP-Adresse> 255.255.255.255 <Gateway of the host system>
To set the DNS servers, the following commands can be used:
netsh interface ip set dns "LAN-connection" static 62.141.32.5
netsh interface ip set dns "LAN-connection" static 62.141.32.4
Note: The commands and configurations on the operating systems were tested under Debian 8, CentOS 7, as well as Windows 2012 R2 Standard.
2. NAT
2.1 Create internal bridge
In order to use NAT, another internal bridge must be added to the previously created bridge. For this the file "/etc/network/interfaces" adapted accordingly. (On the Proxmox host)
example: /etc/network/interfaces
auto vmbr1
iface vmbr1 inet static
      address <private IP-Adresse>
      netmask <Netmask of the IP network>
      bridge-ports none
      bridge_stp off
      bridge_fd 0
      post-up echo 1 > /proc/sys/net/ipv4/ip_forward
This bridge is used by the vServers to connect to the host system.
Now when you create a vServer, the bridge (vmbr1) must be specified.
Last but not least, the required port shares for the vServer are configured on the host system.
Example: The vServer is to be reached via SSH. Here the SSH service on the vServer runs over the default port 22. We now change the forwarding over port 1024.
To do this, edit the "/etc/network/interfaces" file of the host system (proxmox host) and add the following lines at the end:
post-up iptables -t nat -A PREROUTING -i vmbr0 -p tcp --dport 1024 -j DNAT --to <private IP address of the vServer>:22
post-down iptables -t nat -D PREROUTING -i vmbr0 -p tcp --dport 1024 -j DNAT --to <private IP address of the vServer>:22
Note: All ports to be forwarded must be entered in this file.
Explanation of the two commands above:
-i vmbr0 = The interface with the main IP through which the vServer should be accessible.
-p tcp = The protocol to be used.
--dport 1024 = The port which is "received" by the host system.
--<private IP address of the vServer>:22 = To which internal IP this should be forwarded. After the ":" comes the port on which the service can be reached.
As an example, the internal bridge on the host system should now look like this:
auto vmbr1
iface vmbr1 inet static
      address <private IP-Adresse>
      netmask <Netmask of the IP network>
      bridge-ports none
      bridge_stp off
      bridge_fd 0
      post-up echo 1 > /proc/sys/net/ipv4/ip_forward
      post-up iptables -t nat -A PREROUTING -i vmbr0 -p tcp --dport 1024 -j DNAT --to <private IP address of the vServer>:22
      post-down iptables -t nat -D PREROUTING -i vmbr0 -p tcp --dport 1024 -j DNAT --to <private IP address of the vServer>:22
The network service is then restarted.
As a result, you should now be able to reach the host system via SSH at <main IP>:22 and the vServer at <main IP>:1024.