If you have found the right product for you on our website, you can order it directly via the order button. To do this, create a customer account for the ZKM. We are looking forward to your order.
Websites:
MyLoc
Webtropia
Servdiscount
If you have found the right product for you on our website, you can order it directly via the order button. To do this, create a customer account for the ZKM. We are looking forward to your order.
Websites:
MyLoc
Webtropia
Servdiscount
Author: Bettina Brauer
Last update: 17.11.2022 10:24
myLoc operates ISO 27001 certified data centers in Düsseldorf with space for over 30,000 servers. In the world's largest Lampertz high-security cell, sensitive systems of major customers, including banks, insurance companies and ISPs, are protected from external influences. myLoc offers products under the brands myLoc managed IT AG (RZ services, racks, server hosting and cloud hosting), webtropia.com (virtual servers, dedicated servers and cloud hosting) and servdiscount.com (dedicated servers, virtual servers).
More about our data centre can be found here.
Author: Bettina Brauer
Last update: 31.03.2021 10:06
All our servers offer the possibility to choose an operating system on which the server will be based. Both the VD servers, dedicated servers, and the cloud VPS offer Windows Server as the operating system.
Information about the selectable operating systems:
Author: Bettina Brauer
Last update: 17.11.2022 10:23
Should you experience any problems related to our services or support, please don't hesitate to contact our Customer Relationship Management at crm@myloc.de
Please always provide your customer ID and brief description of the incident.
Together with our CRM we will do everything possible to resolve any issues or complaints your might have. We would appreciate your feedback at any time.
Author: Bettina Brauer
Last update: 31.03.2021 10:13
You are more than welcome to visit and comment on our social media pages, however we do not provide technical support through those channels.
Should you require technical assistance with your server, please contact our Support Team at support@myloc.de or open a ticket via your customer control panel.
Author: Bettina Brauer
Last update: 31.03.2021 10:19
You would like to actively market our hosting products? With our new reseller program, you as a reseller will be personally supported by our sales department and will have a personal contact to whom you can turn at any time with any concerns. The reseller program allows providers, resellers and website operators to purchase myLoc products at discounted prices and resell them. In addition, you can find all the information at the official website: https://reseller.myloc.de/en.html.
For any inquiries regarding our Reseller Program feel free to email us at: reseller@myloc.de
Author: Bettina Brauer
Last update: 17.11.2022 10:21
Unfortunately, we are not able to set up a free test server for you. However, if necessary, we can refund you the money within the German legal right of revocation the money within 2 weeks.
In addition, we offer a 30 day money back guarantee on our Webtropia and Servdiscount products.
Please contact us via ticket or e-mail to support@myloc.de.
Author: Bettina Brauer
Last update: 31.03.2021 11:10
myLoc managed IT AG offers a wide range of products. Besides the brand myloc we also offer the brands webtropia and servdiscount.
In the area of colocation you have the possibility to rent racks for your hardware and to operate them with the excellent infrastructure of the ISO-certified data centers of myLoc.
In the area of colocation you have the possibility to rent racks for your hardware and to operate them with the excellent infrastructure of the ISO-certified data centers of myLoc.
Furthermore, myLoc managed IT AG offers you innovative cloud and SAP solutions with which you can create your own virtual data center or simply secure your data in the German cloud.
You can find all our products on myloc.de
Through webtropia you can rent dedicated, virtual dedicated as well as cloud VPS. We also offer cloud solutions such as Backup, Office 365 and Acronis Cyber Protect.
You can find all our products on webtropia.com
Through servdiscount you can rent pre-configured dedicated servers, as well as vServers. Here the configuration of the individual servers cannot be adjusted during the order, which is possible with our other two brands myloc and webtropia.
All our products you can find on servdiscount.com
Author: Bettina Brauer
Last update: 17.11.2022 10:18
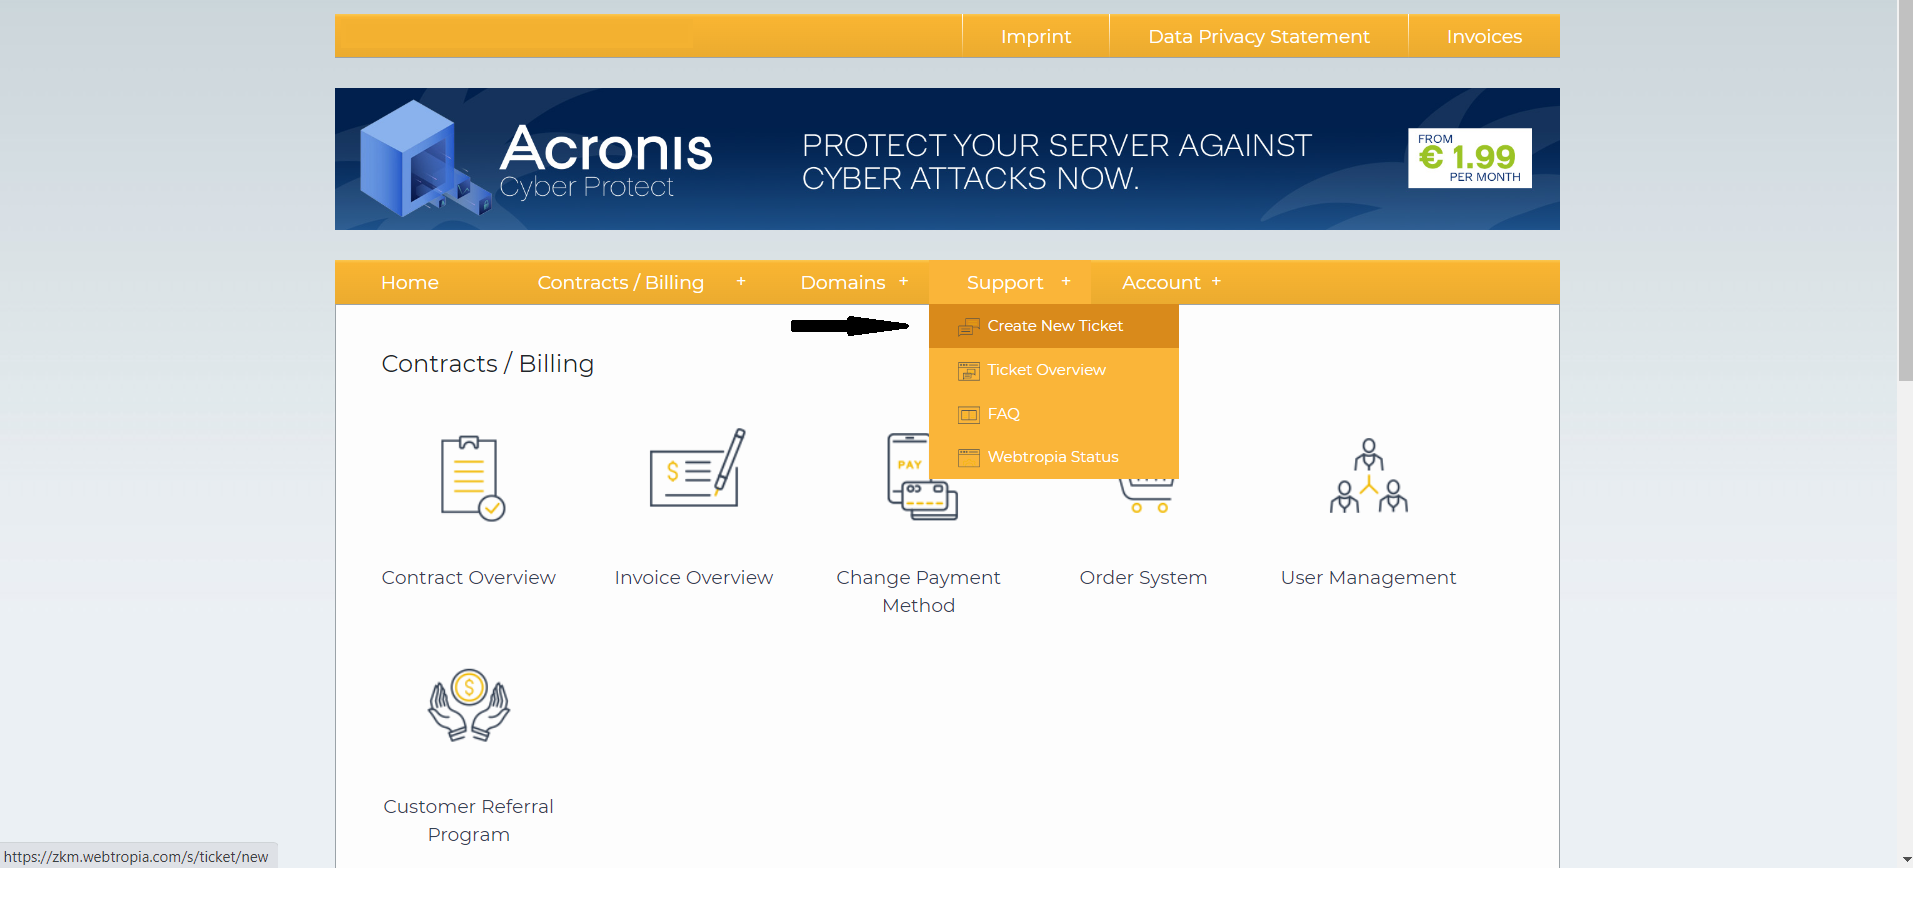
Should you ever have a support request, you can conveniently open a ticket in the central customer interface. To do this, go to the main page and then under "Support" -> " create new support ticket". You can also freely choose the subject and content of the ticket.
If you need comprehensive support, you can easily reach us 24/7 via email:
support@myloc.de
support@webtropia.com
support@servdiscount.com
Alternatively, we are also available by telephone for general questions from Mo-Fr. 08:00 to 16:30:
MyLoc: +49 (0) 211 - 61708 0
Webtropia: +49 211 – 545 957 - 330
Servdiscount: +49 211 – 749 547 - 90
Author: Bettina Brauer
Last update: 17.11.2022 10:12
Unfortunately, we do not offer direct sponsorship. However, if you see a high number of visitors or marketing opportunities, you can send your inquiry to info@myloc.de. We will then consider.
Author: Bettina Brauer
Last update: 31.03.2021 11:14
You can find our General Terms & Conditions in english and german under agb.myloc.de.
Author: Bettina Brauer
Last update: 31.03.2021 11:16
All products of myLoc managed IT AG are exclusively rented and are not available for sale. This also applies to the brands Servdiscount and Webtropia.
Author: Bettina Brauer
Last update: 31.03.2021 11:17
Depending on which of our hosting solutions you would like to order, you have a certain amount of leeway when it comes to configuration options. You can configure our Cloud VPS individually up to a certain degree, depending on your preferences. For example, the CPU, RAM and storage are freely scalable. for additional charge, you can also configure your backup space or additional IPs (including IP subnets) individually.
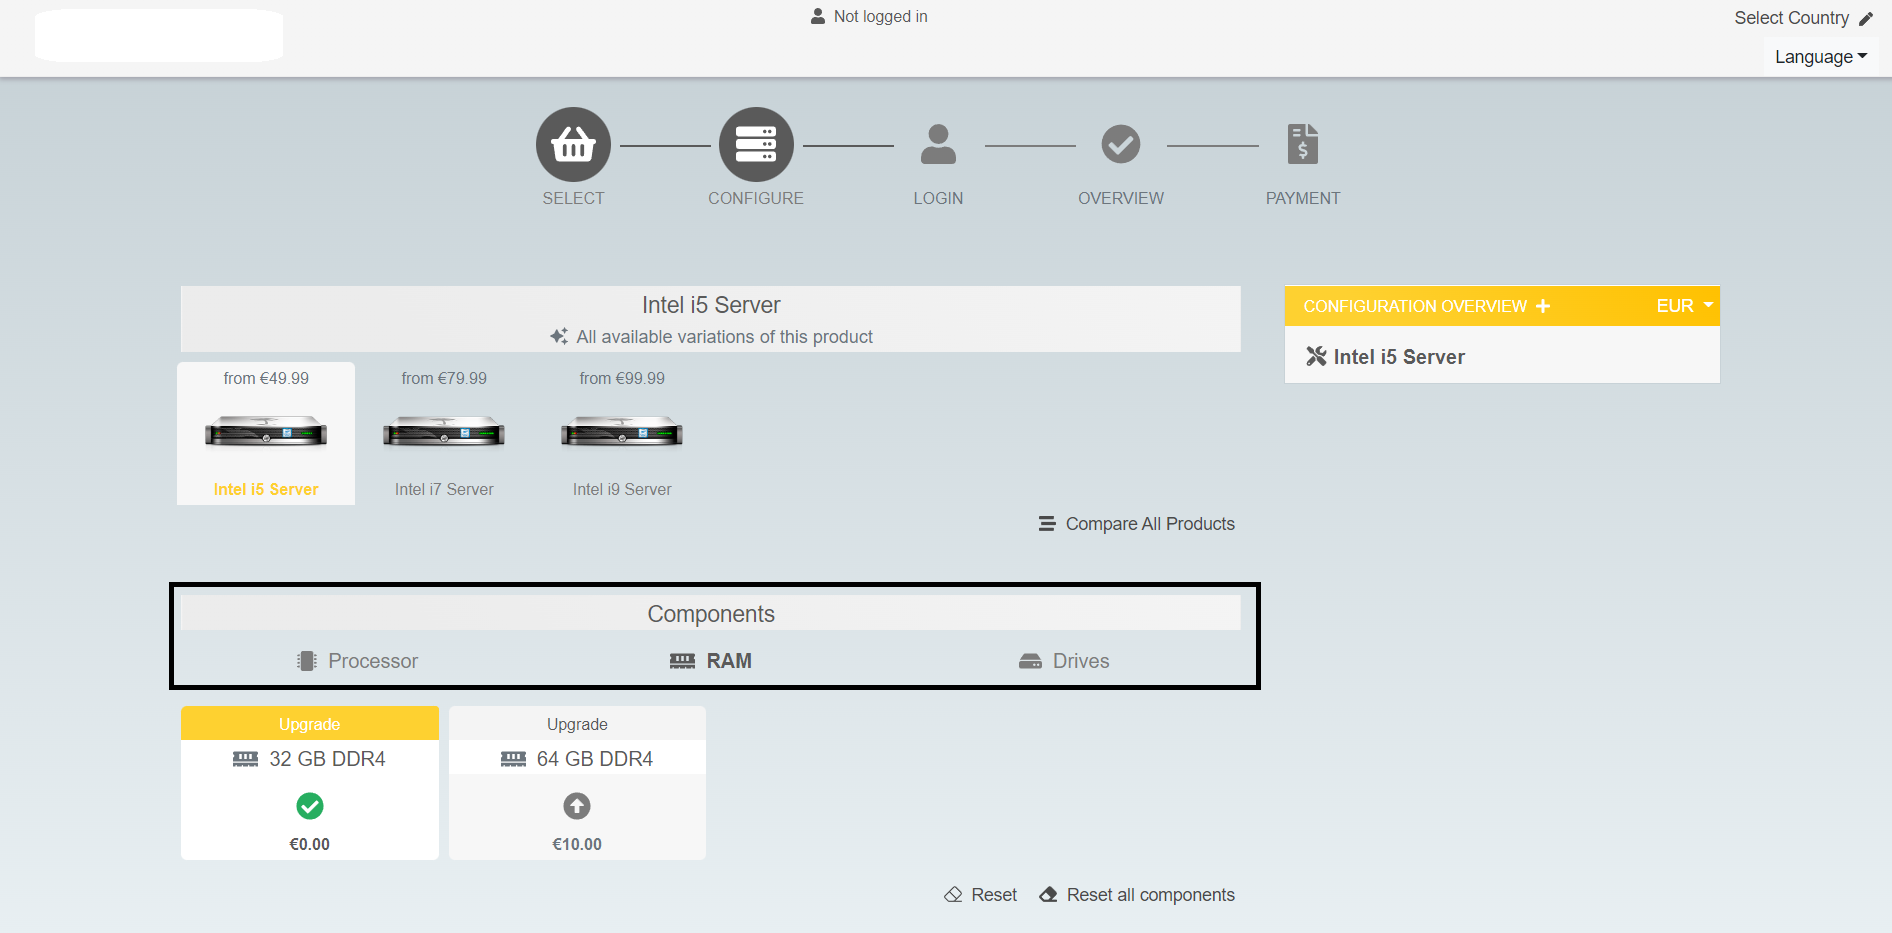
You have the possibility of an individual configuration for Dedicated, Managed and Root Servers during the order process. This includes e.g. RAM, storage or a 2nd CPU. However, a completely individual configuration is unfortunately not possible.
Author: Bettina Brauer
Last update: 17.11.2022 10:05
We offer a wide range of products, if you require a server with full administration please take a look at our Managed Hosting plans. All other services are unmanaged and we cannot provide custom configurations or third party softare installations.
Nevertheless, our Technical Support Engineers will be happy to advise and offer the perfect hosting solutions for your individual needs.
You may contact our Support Team at support@myloc.de , open a ticket through your customer control panel or call us directly at +49-211-617080 (Mon-Fri 10am > 6pm CEST / UTC +2).
Author: Wolfram Heinen
Last update: 03.02.2021 14:39
Author: Bettina Brauer
Last update: 31.03.2021 09:06
Author: Mesut Oysal
Last update: 18.11.2022 11:29
Author: Mesut Oysal
Last update: 01.02.2023 11:11
Author: Mesut Oysal
Last update: 18.11.2022 12:37
Author: Mesut Oysal
Last update: 18.11.2022 12:43
Author: Mesut Oysal
Last update: 18.11.2022 12:46
The duration of the installation depends on various components.
For example, a minimal Debian installation is completed in about 30 minutes. An installation of Windows, however, may take two hours or more, depending on the hardware used. On average, an installation is completed after one to two hours.
If the installation takes significantly longer, a technician will proactively view this to eliminate any problems.
Author: Bettina Brauer
Last update: 31.03.2021 11:38
Author: Bettina Brauer
Last update: 11.08.2023 14:52
Author: Denis Kastner
Last update: 11.08.2023 14:56
In the following table you will find the bandwidth as well as the guaranteed peak bandwidth of your server:
| Product | Bandwidth | Guaranteed Bandwidth |
| VPS Server | 100 MBit | |
| Root Server | 200 MBit | |
| Dedicated Server | 300 MBit |
| Product | Bandwidth | Guaranteed Bandwidth |
| VPS Server | 100 MBit | |
| Root Server | 200 MBit | |
| Dedicated Server | 300 MBit |
| Product | Bandwidth | Guaranteed Bandwidth |
| VPS Server | 100 MBit | |
| Dedicated Server | 200 MBit | |
Author: Bettina Brauer
Last update: 28.06.2021 03:58
Author: Bettina Brauer
Last update: 11.08.2023 14:47
Author: Bettina Brauer
Last update: 11.08.2023 15:01
Author: Bettina Brauer
Last update: 11.08.2023 15:04
This article describes how to mount the iSCSI storage of a moonshot in rescue mode.
Note: Information about IP, user name as well as password of the iSCSI storage, can be found in the ZKM under the item "Network hard disk".
auto eth0:0
iface eth0:0 inet static
address
netmask 255.255.252.0
ifup eth0:0
apt-get install open-iscsi -y
The following entries are checked in the file:
node.startup = automatic
node.session.auth.authmethod = CHAP
node.session.auth.username =
node.session.auth.password =
ping -c 3
/etc/init.d/open-iscsi restart
iscsiadm -m discovery -t sendtargets -p
iscsiadm -m node --login
You should now be able to see the storage with fdisk -l .
mount /dev/sdb1 /storage
If no sda was displayed with "fdisk -l", the specification in the mount command is not "sdb1" but "sda1".
Author: Bettina Brauer
Last update: 28.06.2021 04:35
You can reach our resolving nameservers at the following addresses:
IPv4 Adresse: 62.141.32.3
IPv6 Adresse: 2001:4ba0::53:1
IPv4 Adresse: 62.141.32.4
IPv6 Adresse: 2001:4ba0::53:2
IPv4 Adresse: 62.141.32.5
IPv6 Adresse: 2001:4ba0::53:3
Author: Bettina Brauer
Last update: 31.03.2021 12:17
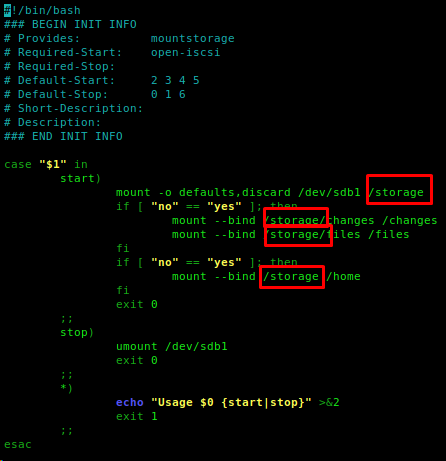
Moonshot Storage is based on the iSCSI protocol.
The script that integrates the Moonshot storage is located in /etc/init.d/mountstorage
/etc/init.d/mountstorage stop
Example: In our example, the "test" directory is created in the home directory.
mkdir /home/test
To change the mount point in the script, first open the file /etc/init.d/mountstorage with an editor of your choice. In our case we use "nano".
nano /etc/init.d/mountstorage
There you replace /storage with your desired directory.
/etc/init.d/mountstorage start
Author: Bettina Brauer
Last update: 28.06.2021 04:42
For Linux you can upload SSH Keys in the customer panel. This allows automatic deployment of keys on servers. Today this only is possible for Dedicated and Virtual Dedicated Server, not VPS.
For Authentification via Public-Key you need to create a key pair locally. This creates a private and public key. The private key remains secret and nobody else should get it. It stays on the local computer. The public key is being transferred to the server and is saved in the user account. After installation you can login onto the server without a password. Only the private key is needed and if given, a password for the private key.
If you already generated a key pair, please skip to how to manage keys in the customer panel.
root@computer:~$ ssh-keygen -t rsaGenerating public/private rsa key pair.
Enter file in which to save the key (/root/.ssh/id_rsa):(Can be left empty, id_rsa is the default key which is used if no extra key is specified for the server you trying to connect.
See .ssh/config under https://wiki.ubuntuusers.de/SSH/#ssh-config
Enter passphrase (empty for no passphrase):(Can be left empty, if you don't want to give the key an protective extra password.
Enter same passphrase again:
Your identification has been saved in /root/.ssh/id_rsa.pub.
The key fingerprint is:
SHA256:hnr78vw478RsdihHGFd98489vcxbkjcfdk benutzer@laptop
The key's randomart image is:
+---[RSA 2048]----+
|                 |
|       . o .     |
|                 |
|    .O . O . o   |
|                 |
|      .O . O . o |
|                 |
|                 |
|                 |
+----[SHA256]-----+
The contents which is relevant are being saved under /root/.ssh/id_rsa.pub
Download Putty:
Putty Download
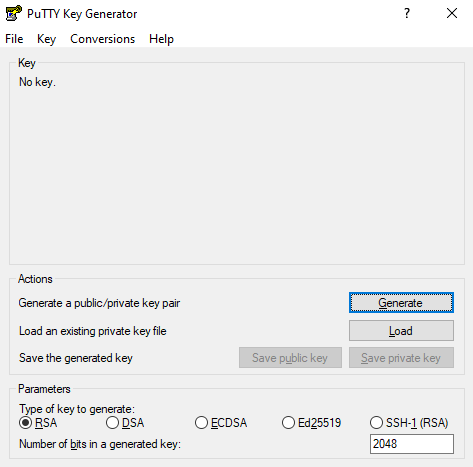
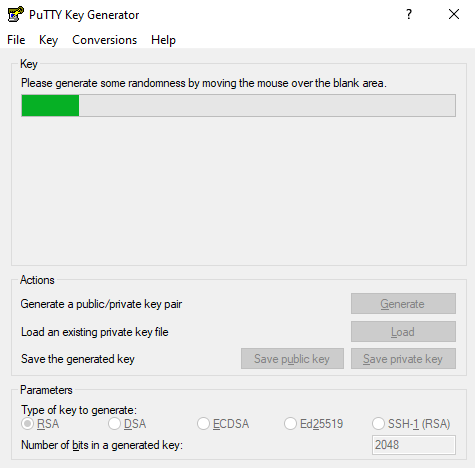
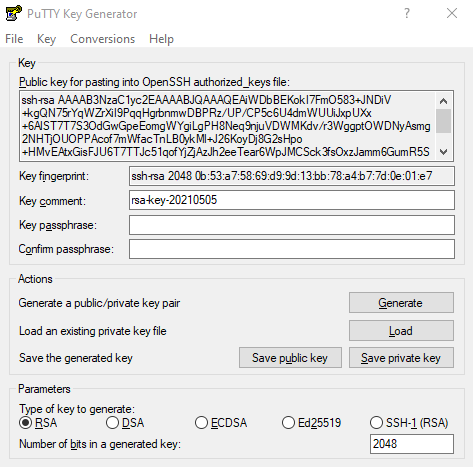
The important part is the public key. You can find it in the top there it says "Public key for pasting into OpenSSH authorized_keys file:"
Copy the block (important: more lines than you can see without scrolling). This block is important for the customer panel.
Saving via the button "Save public key" is not meant for linux, it is a format only for putty itself.
Now there are two important formats.
To save the private key in OpenSSH format(compatible with linux clients), click at the top on Conversions and then "Export OpenSSH Key"
To generate the private key for the use with Putty with a windows client, click at "Save private key" in the bottom. It saves a .ppk file. This is for putty.
On how to connect follow this how to:
myLoc managed IT AG - FAQ - How do I connect to my Linux server ?
You can find the feature under personal data, SSH Keys: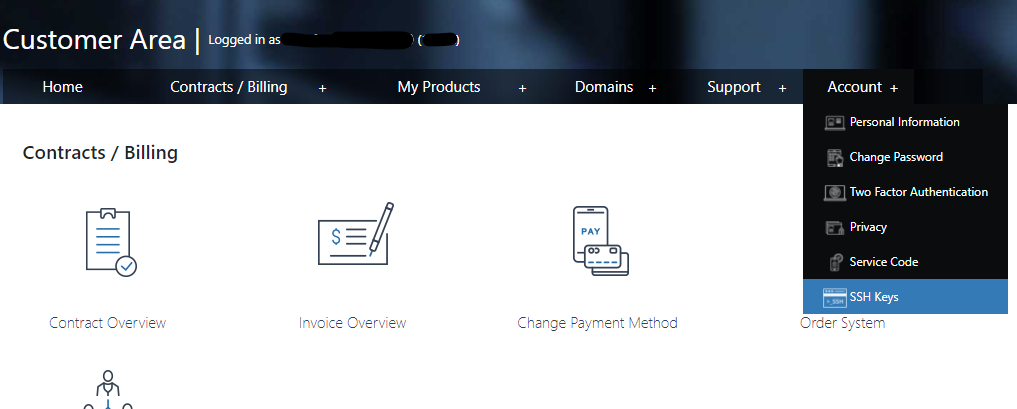
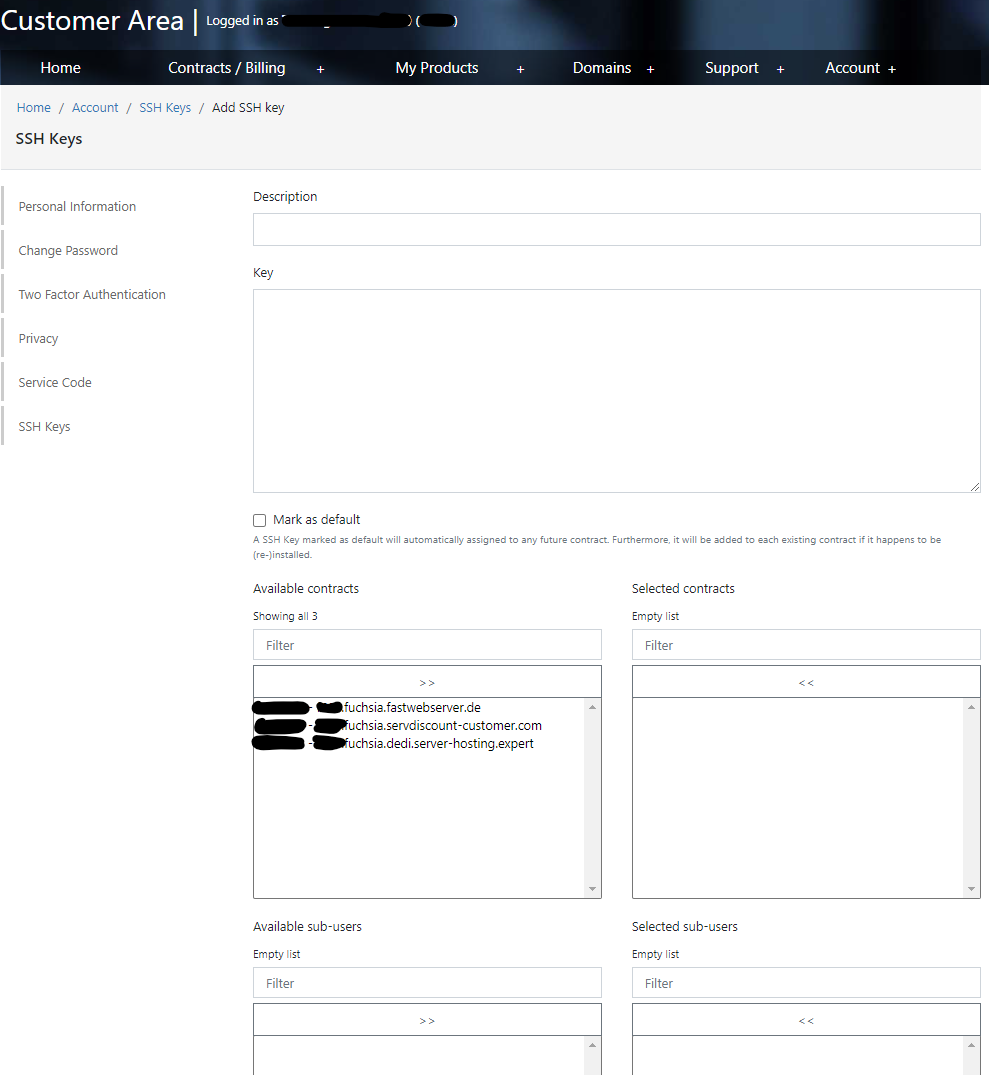
In the beginning it is empty. First click on Add SSH Key:
They keys can be "standard"-key, this means that default every contract or single contracts get the key.
You can also add keys to sub-user.
Sub-user also have the opportunity to manage keys, but they can not add this key as "default" key or add them for other sub-users.
Sub-user also can only add keys to the contracts they got access to.
Sub-user Sub-User can create keys but you as the direct customer can completely manage the keys of your sub-users.
Author: Patrick Krämer
Last update: 19.11.2021 09:22
In the following table you will find the bandwidth as well as the guaranteed peak bandwidth of your server:
| Product | Bandwidth | Guaranteed Bandwidth |
| VPS Server | 100 MBit | |
| Root Server | 200 MBit | |
| Dedicated Server | 300 MBit |
| Product | Bandwidth | Guaranteed Bandwidth |
| VPS Server | 100 MBit | |
| Root Server | 200 MBit | |
| Dedicated Server | 300 MBit |
| Product | Bandwidth | Guaranteed Bandwidth |
| VPS Server | 100 MBit | |
| Dedicated Server | 200 MBit | |
Author: Bettina Brauer
Last update: 28.06.2021 03:58
The system time is synchronized automatically every hour via NTP on all host systems. Should there nevertheless be significant deviations in the system time of your vServer, please contact our support team via the ticket system, stating your server name.
Author: Bettina Brauer
Last update: 31.03.2021 12:21
This article describes how to disable and enable IPv6 on a VPS (vServer) running Windows.
To disable IPv6 on the VPS, a change must be made to the registry.
Start the command line (CMD) as administrator (Start -> run -> cmd).
Enter the following command to make the change to the registry.
reg add HKLM\SYSTEM\CurrentControlSet\Services\Tcpip6\Parameters /v DisabledComponents /t REG_DWORD /d 0xff /f
You can use the following command to check if the setting was set correctly.
reg query HKEY_LOCAL_MACHINE\SYSTEM\CurrentControlSet\Services\Tcpip6\Parameters /v DisabledComponents
You should get "0xff" as output here. IPv6 is then disabled.
To enable IPv6 on the VPS, a change must be made to the registry.
Start the command line (CMD) as administrator (Start -> run -> cmd).
Enter the following command to make the change to the registry.
reg add HKLM\SYSTEM\CurrentControlSet\Services\Tcpip6\Parameters /v DisabledComponents /t REG_DWORD /d 0x00 /f
Use the following command to check if the setting has been set correctly.
reg query HKEY_LOCAL_MACHINE\SYSTEM\CurrentControlSet\Services\Tcpip6\Parameters /v DisabledComponents
You should get "0x0" as output here. IPv6 is then enabled.
Author: Bettina Brauer
Last update: 28.06.2021 04:48
If your VPS (vServer) is not reachable from outside you have two possibilities.
To start the VNC console of the VPS, navigate to the affected server contract via the vServer Management.
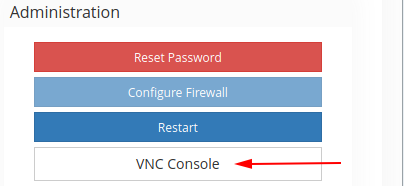
On the right side under the item "Administration" you will find the button to start the VNC console.
Now a new window opens where you can connect to your server. In our example, the server is currently in the Windows login screen.
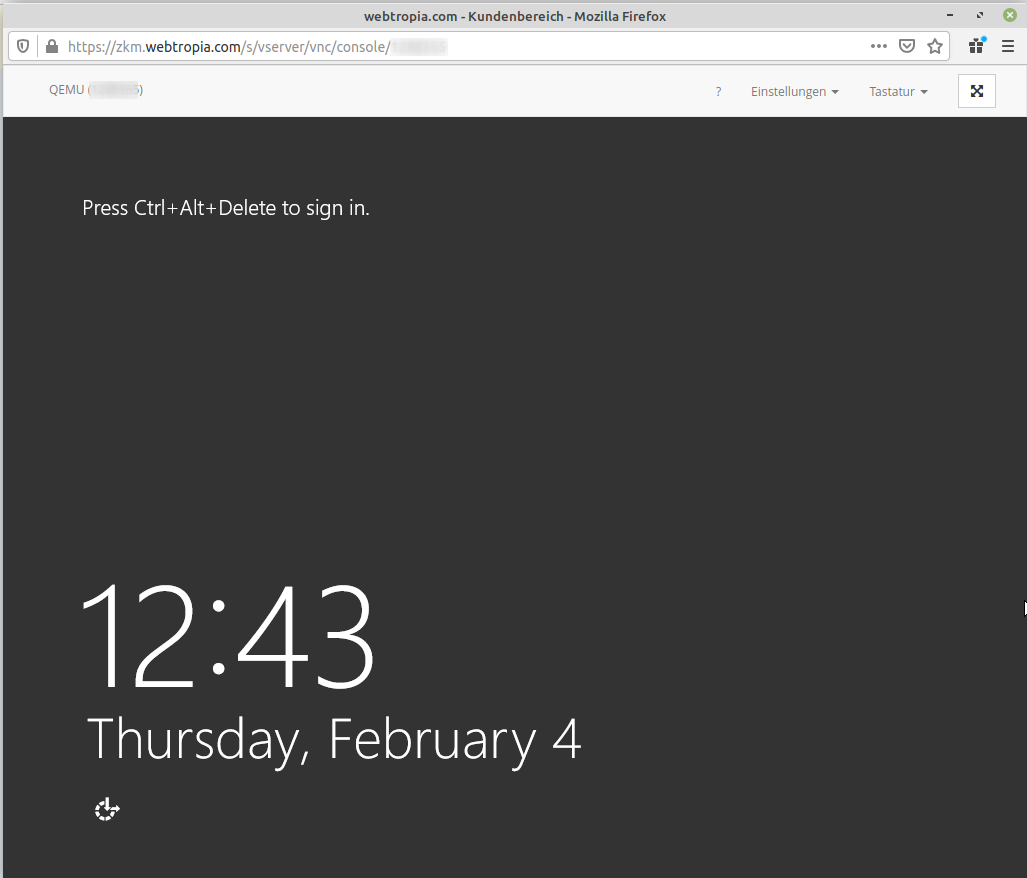
After you have started the VNC console, you can log in locally to your server, even if your server is not accessible from the outside.
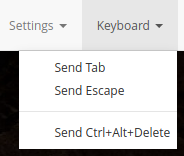
On Windows, the key combination "Ctrl + Alt + Del" is often required to log in. Here you can select the key combination via the "Keyboard" tab and have it executed.
Please note that copy & paste to the VNC console is not possible.
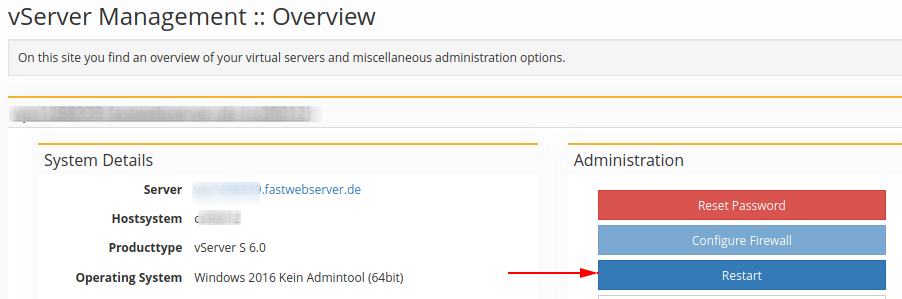
In addition to the VNC console variant, you also have the option of restarting your server via the ZKM.
To do this, navigate to the relevant server contract and find the "Restart" button on the right-hand side above the VNC console button.
Your server will then be restarted.
Note: Please note that a restart can take several minutes depending on the operating system and processes.
Author: Bettina Brauer
Last update: 28.06.2021 04:57
Device Manager occasionally lists warnings and unknown devices on Windows vServern because the virtualization technology we use does not work with hardware emulation and proprietary system drivers.
However, the warnings do not affect the stability and functionality of your vServer in any way. They also can not be removed or hidden from the Device Manager.
Author: Bettina Brauer
Last update: 31.03.2021 12:23
You can reach our resolving nameservers at the following addresses:
IPv4 Adresse: 62.141.32.3
IPv6 Adresse: 2001:4ba0::53:1
IPv4 Adresse: 62.141.32.4
IPv6 Adresse: 2001:4ba0::53:2
IPv4 Adresse: 62.141.32.5
IPv6 Adresse: 2001:4ba0::53:3
Author: Bettina Brauer
Last update: 31.03.2021 12:17
With the help of a cron job, tasks can be executed automatically on a system.
Each cron job consists of three components:
In our example, we create a cron job that automatically loads the network configuration for root servers (VDServer) on restart.
The following commands are used to install the required package.
apt-get update & apt-get -y upgrade
apt-get install cron
yum -y update
yum install vixie-cron
To create a cron job, the file /etc/crontab must be modified. For this purpose, the file can be called via editor or alternatively via the command "crontab -e".
When you call this file for the first time, you will be asked for an editor that you want to use for the adjustments. Here, nano is usually already preselected. You can use an editor of your choice here and select it by entering the corresponding number.
crontab -e

select an editor. To change later, run 'select-editor'.
1. /bin/nano <---- easiest
2. /usr/bin/vim.tiny
3. /bin/ed

Choose 1-3 [1]:
The file /etc/crontab
 GNU nano 4.8 /tmp/crontab.cyfsyk/crontab
# Edit this file to introduce tasks to be run by cron.
#
# Each task to run has to be defined through a single line
# indicating with different fields when the task will be run
# and what command to run for the task
#
# To define the time you can provide concrete values for
# minute (m), hour (h), day of month (dom), month (mon),
# and day of week (dow) or use '*' in these fields (for 'any').
#
# Notice that tasks will be started based on the cron's system
# daemon's notion of time and timezones.
#
# Output of the crontab jobs (including errors) is sent through
# email to the user the crontab file belongs to (unless redirected).
#
# For example, you can run a backup of all your user accounts
# at 5 a.m every week with:
# 0 5 * * 1 tar -zcf /var/backups/home.tgz /home/
#
# For more information see the manual pages of crontab(5) and cron(8)
SHELL=/bin/sh
PATH=/usr/local/sbin:/usr/local/bin:/sbin:/bin:/usr/sbin:/usr/bin:/home/Tim/Skript/IP_Change
# /home/Tim/Skript/IP_Change definiert den Speicherort des Skripts

# m h dom mon dow user  command
 17 *  *   *   *  root  cd / && run-parts --report /etc/cron.hourly
 25 6  *   *   *  root  test -x /usr/sbin/anacron || ( cd / && run-parts --report /etc/cron.daily )
 47 6  *   *   7  root  test -x /usr/sbin/anacron || ( cd / && run-parts --report /etc/cron.weekly )
 52 6  1   *   *  root  test -x /usr/sbin/anacron || ( cd / && run-parts --report /etc/cron.monthly )Datei
# : defines the line as a comment
m : specifies the minute in which a cron job should be executed (0-59)
h : specifies the hour in which a cron job should be executed (0-23)
dom (day of month) : specifies the day of the month (1-31)
mon (month) : specifies the month (1-12)
dow (day of week) : specifies the day of the week. (0-7) Please note that the numbers 0 and 7 represent Sunday. Monday would be 1 here.
* : any
Example:
17 * * * * root cd / && run-parts --report /etc/cron.hourly
Here the cron job is executed every minute 17. Since no day, month and hour are specified here, the cron job is executed every minute 17.
The following assumes that a copy of a working network configuration has been created under the following sample path:
/home/user/IP_Backup/IP_Konfiguration_Backup
For use without a script, the following line is added to the /etc/crontab file.
@reboot root sleep 15 && cat /home/user/IP_Backup/IP_Konfiguration_Backup >> /etc/network/interfaces/eth0
Note: Please check the designation of your network interface in advance. In our example we use eth0.
Following the change, the network service must be restarted. Here, depending on your system, select one of the following commands:
@reboot root sleep 25 && service network restart
@reboot root sleep 25 && systemctl restart network
The following assumes that a copy of a working network configuration has been created under the following sample path:
/home/user/IP_Backup/IP_Konfiguration_Backup
It is also assumed that the following script was created under /home/user/Script/IP_Change.
#!/bin/bash

cat /home/user/IP_Backup/IP_Konfiguration_Backup >> /etc/network/interfaces/eth0

#Depending on the system used, the network must be restarted using the service or systemctl command. Please delete the comment sign in front of the correct command:
#service network restart
#systemctl restart network
Now the script must be made executable:
chmod +x /home/user/Skript/IP_Change
To run the previously created script via a cronjob at every restart, the following line is added to the /etc/crontab file.
#Runs the script
@reboot root sleep 15 && /home/user/Skript/IP_Change
After successful setup, the script will be executed at every server restart.
Any error message is sent to the root user's mailbox on the system.
Also, these are stored within the log files /var/log/syslog and /var/log/messages respectively.
Author: Bettina Brauer
Last update: 18.07.2021 07:36
Author: Bettina Brauer
Last update: 11.08.2023 14:41
Sometimes it is necessary to change the hostname in the server settings. To change the hostname for a VPS (no dedicated server) we have a comfort function in the customer panel.
To set the hostname, which is controlled by the hostsystem in a VPS, you need to make a change in the customer panel. A simple change in windows or linux (/etc/hostname) does not work because changes are reverted after a restart.
Click on "Change Hostname" in the customer panel under the vps management.
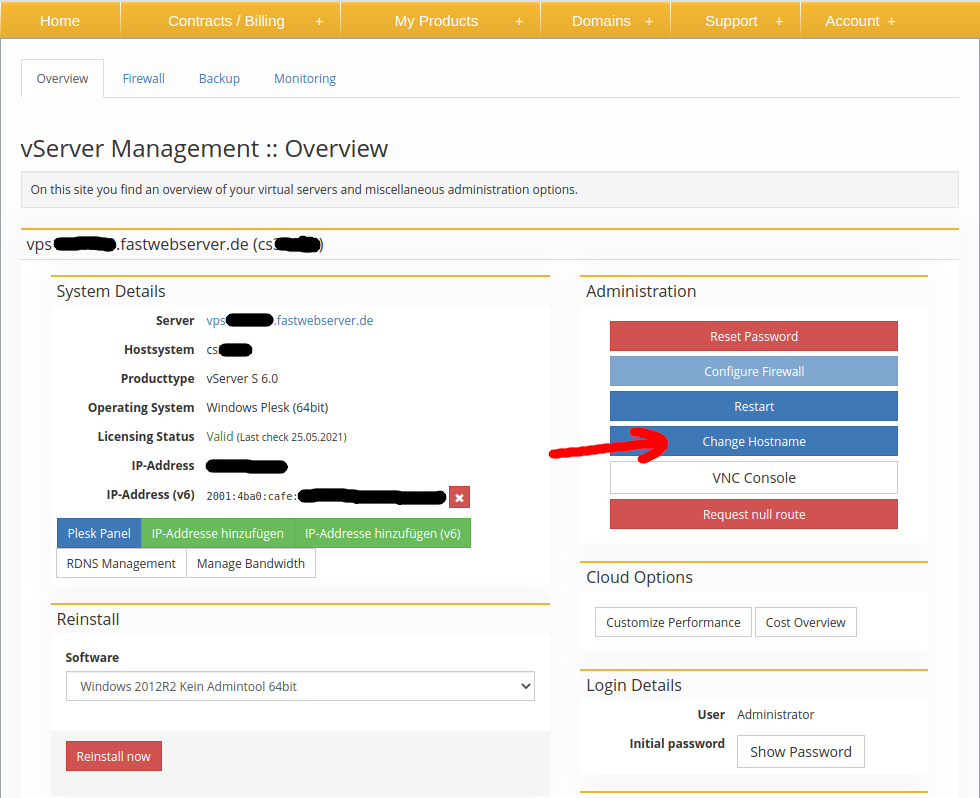
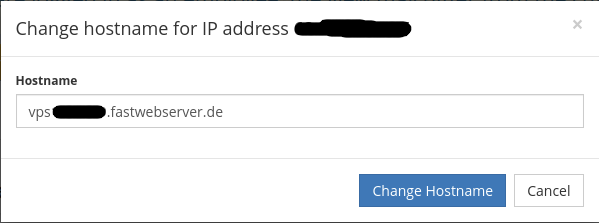
After that a dialog window opens. Here the correct hostname can be set.
Author: Patrick Krämer
Last update: 06.09.2021 16:32
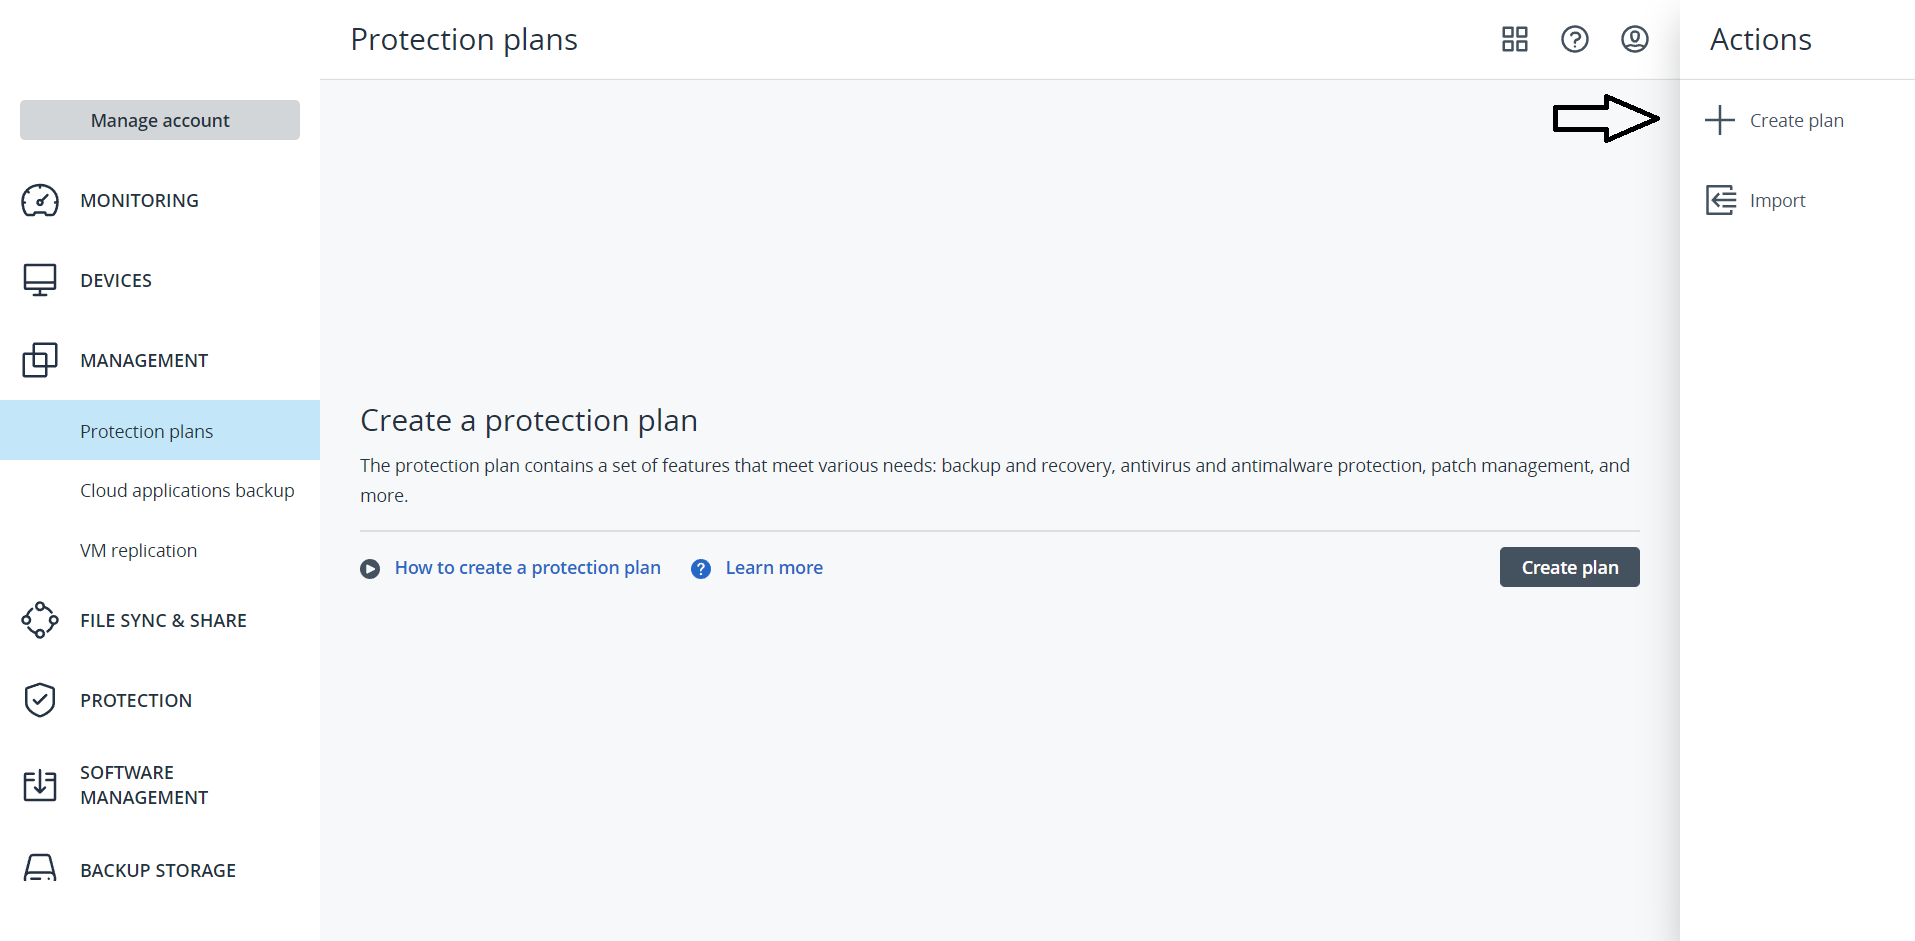
To create a protection plan, please go to the Acronis Cyber Protect management console. Under the 'Management' tab, you will find the subcategory 'Protection plans'. Click 'Protection plans' to start editing.
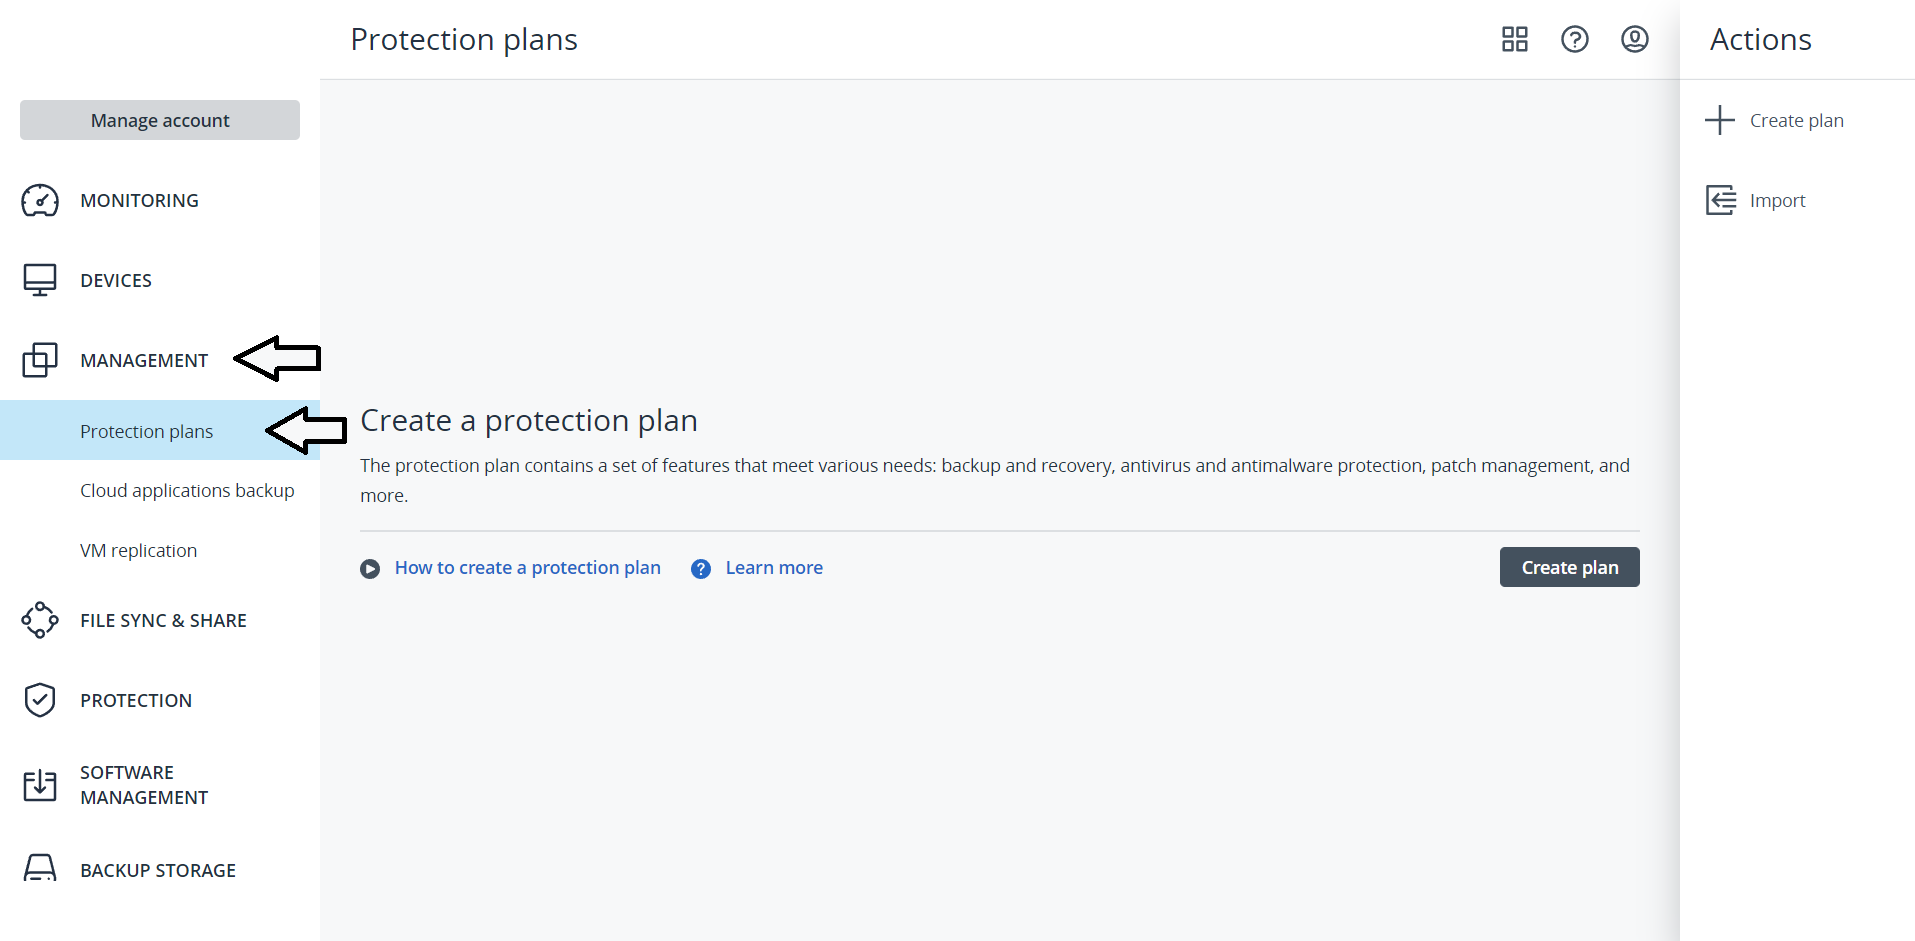
2. create a plan
Please continue with the creation of the plan. On the right-hand side, another tab appears under the name "Actions". There you will find the option "Create plan".
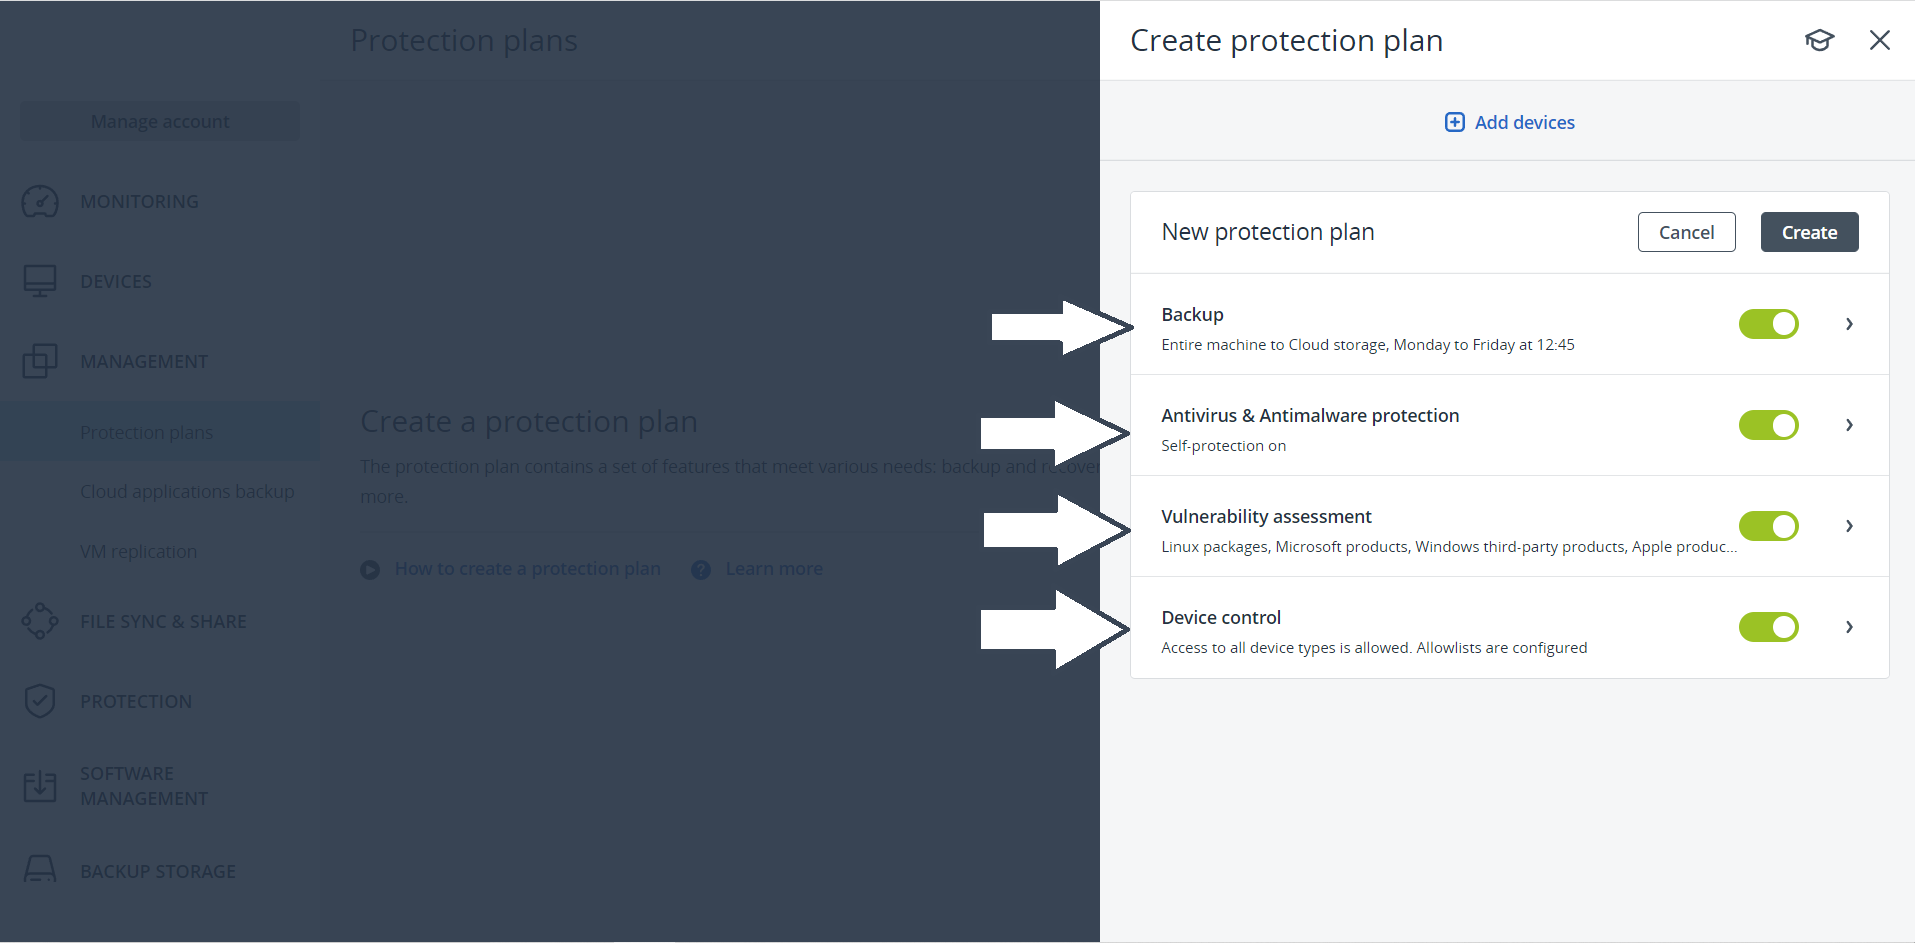
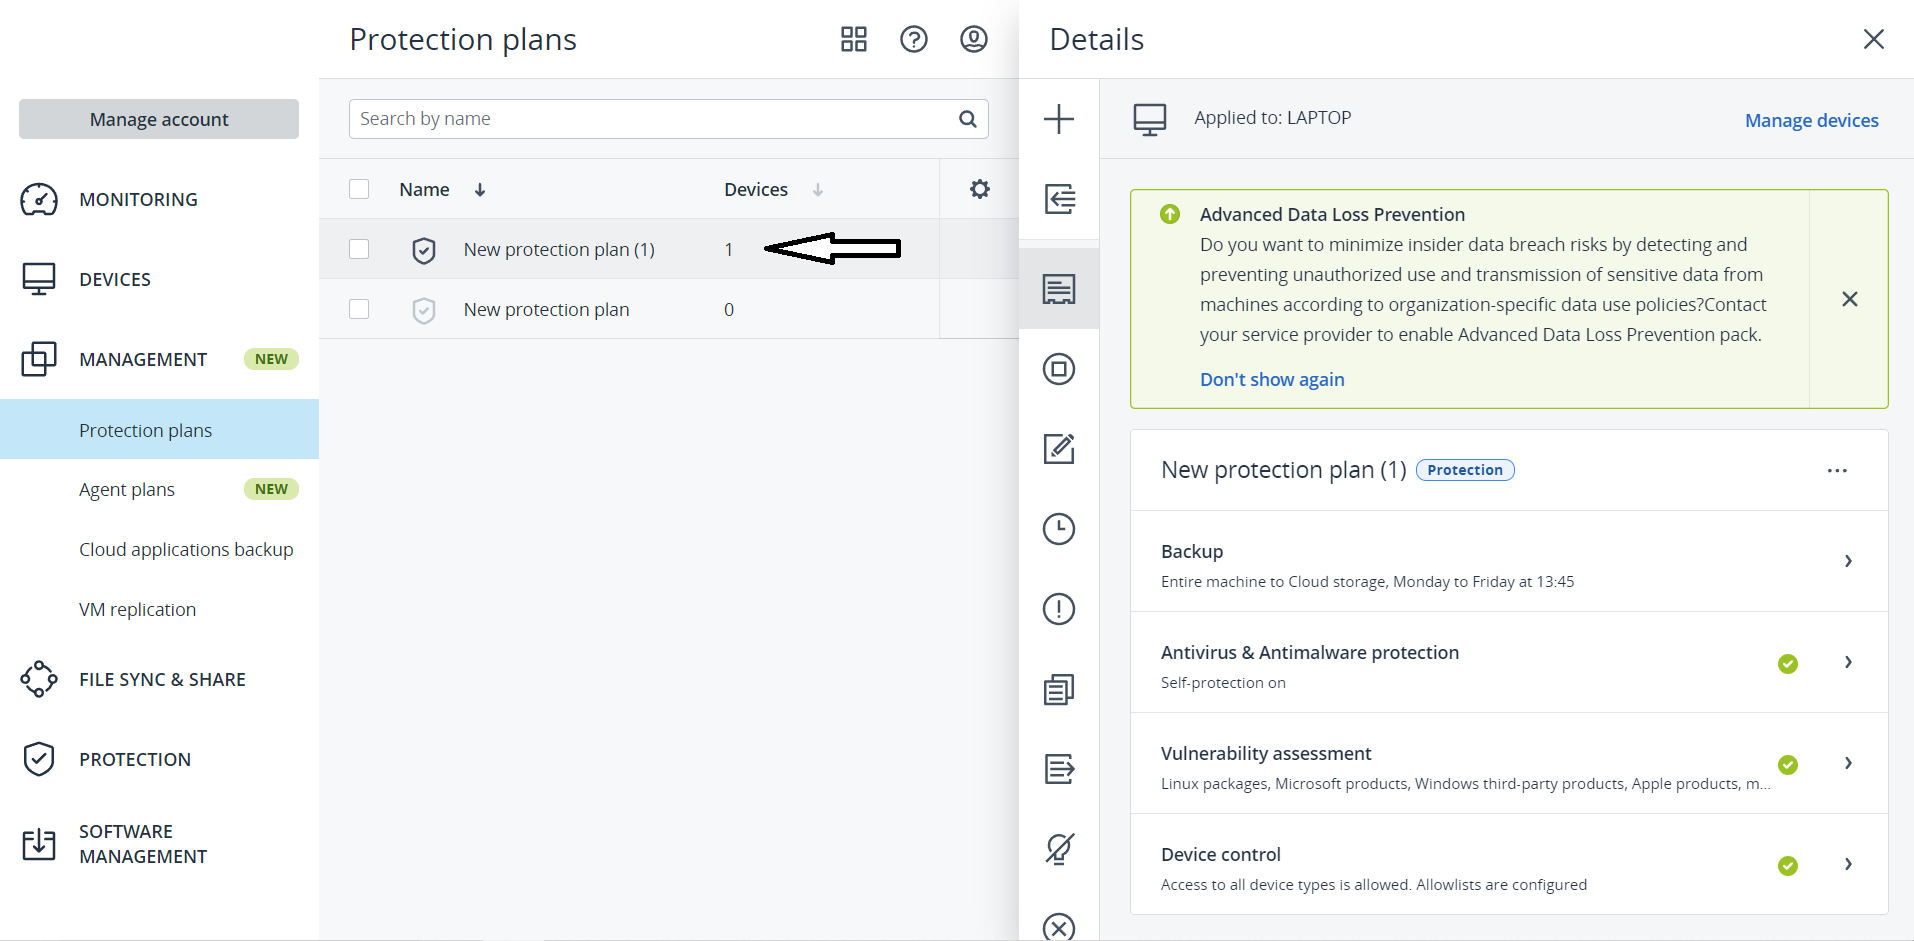
3. adapt protection plan
After you have initiated the creation of the protection plan, you can now customise how the protection plan should look. There are several options to choose from, including: Backup, Antivirus & Antimalware Protection, Vulnerability Assessment and Device Control. Now you can select modularly which features you would like to have configured on the device(s).
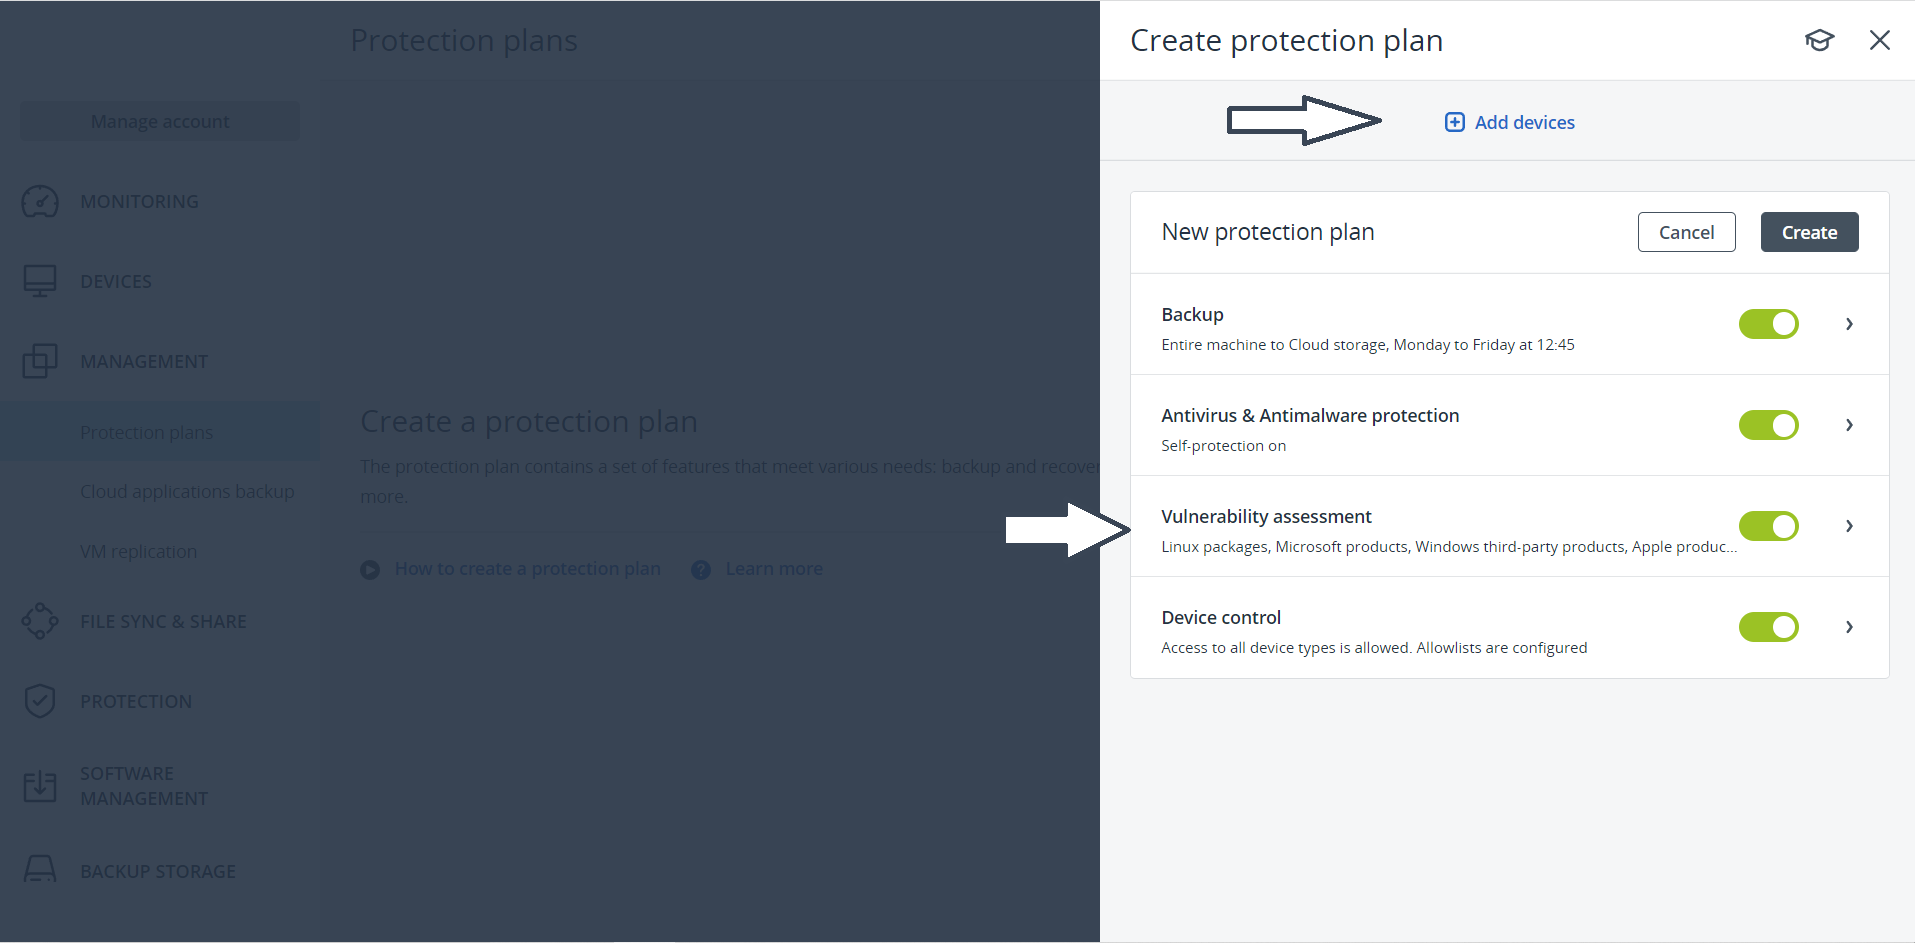
4. select options
After the features have been selected, the device(s) can now be added.
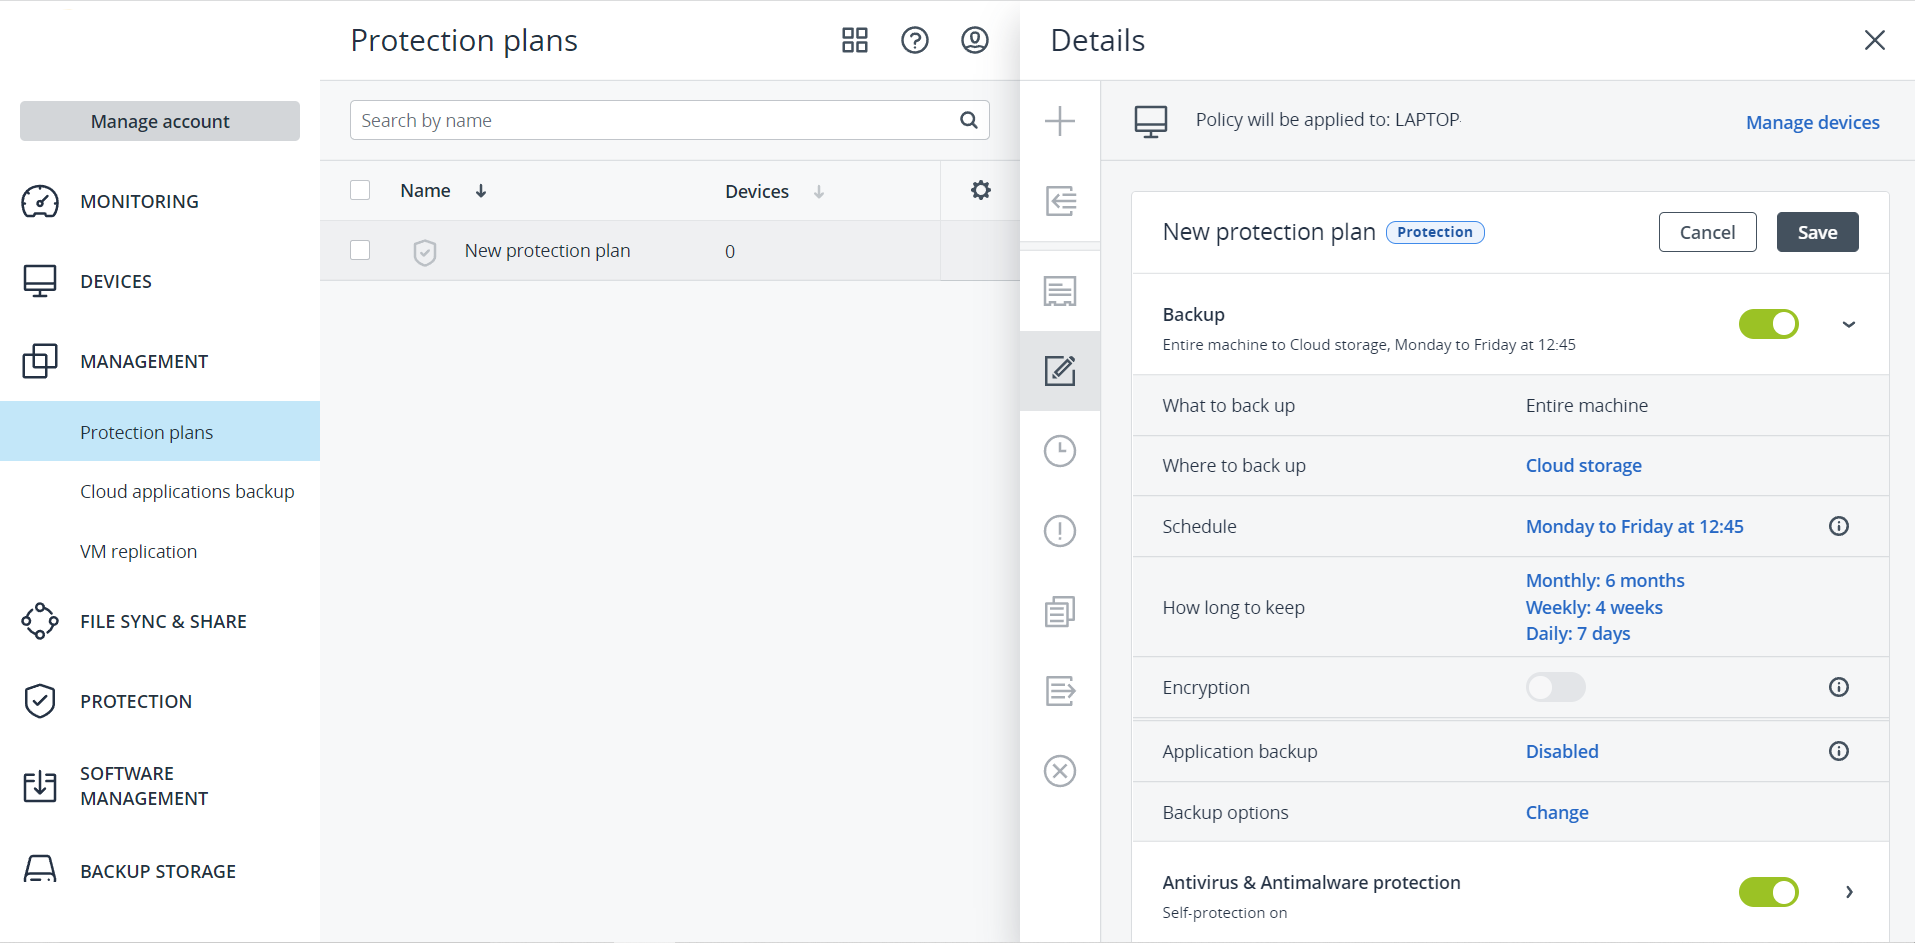
5. protection plan successfully created
Now the protection plan should appear in the administration and the configuration is complete.
Author: Mesut Oysal
Last update: 13.07.2023 14:08
Please click on the tab "Alerts". In the tab, please go to "Daily activities".
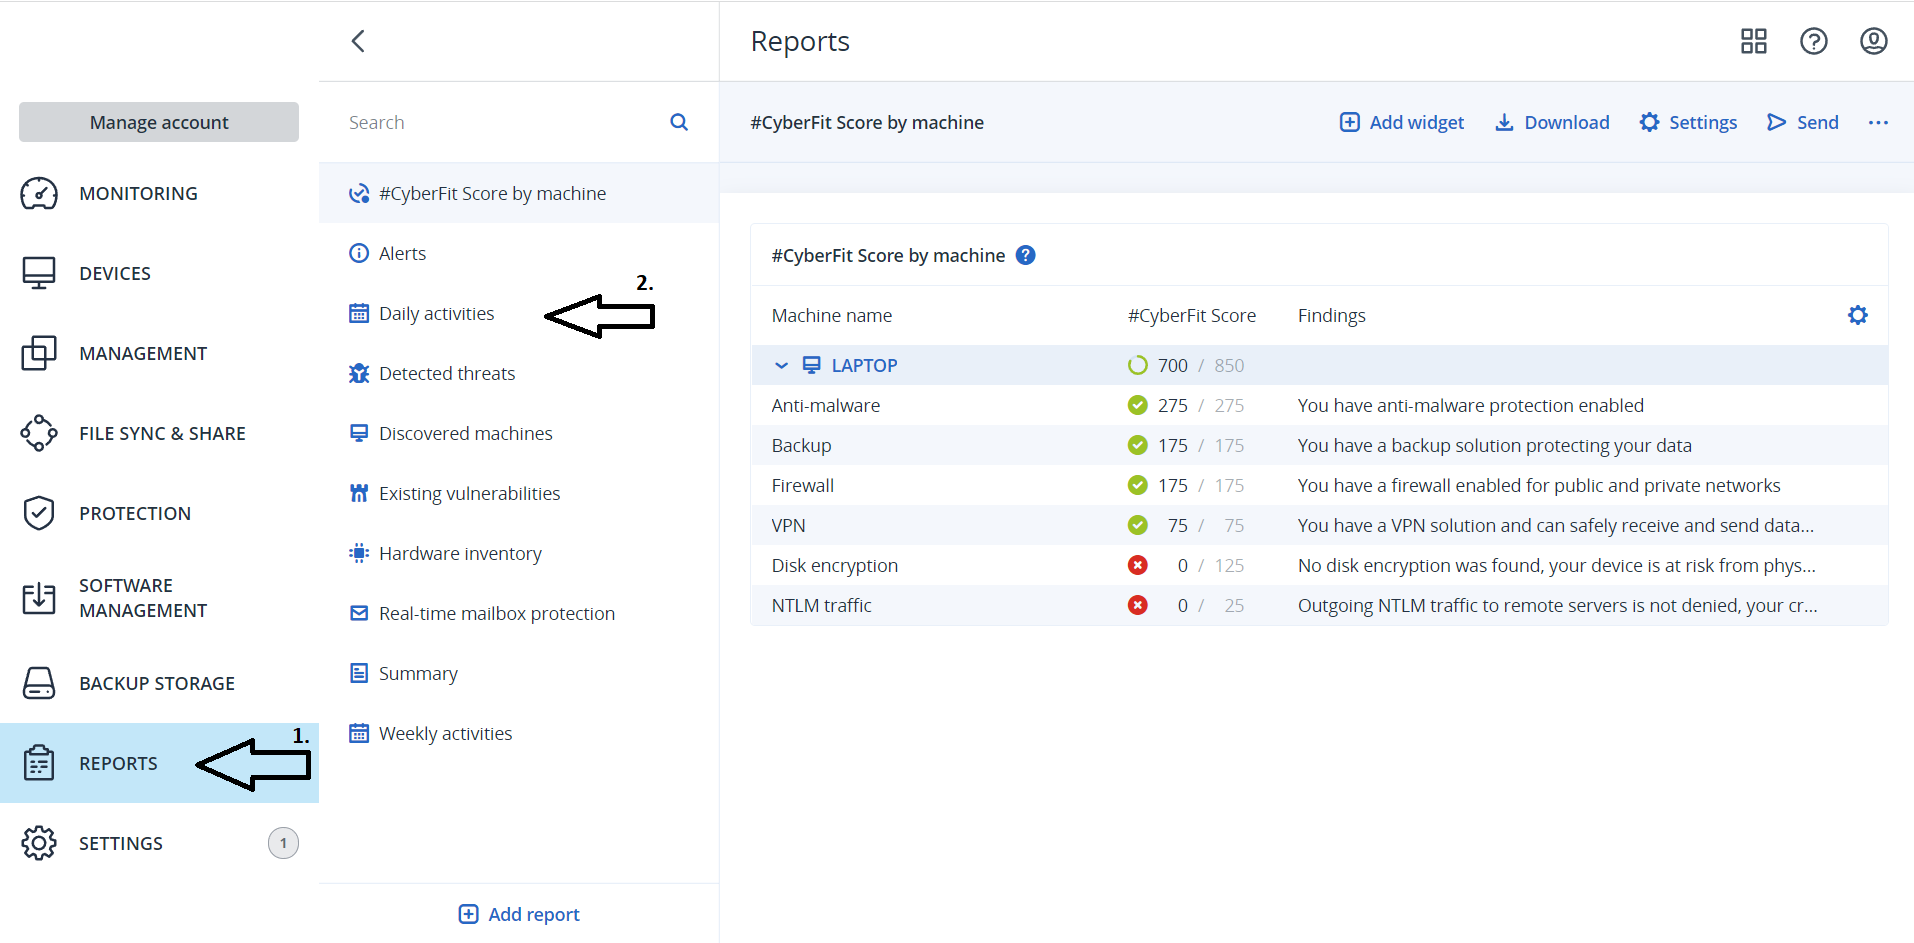
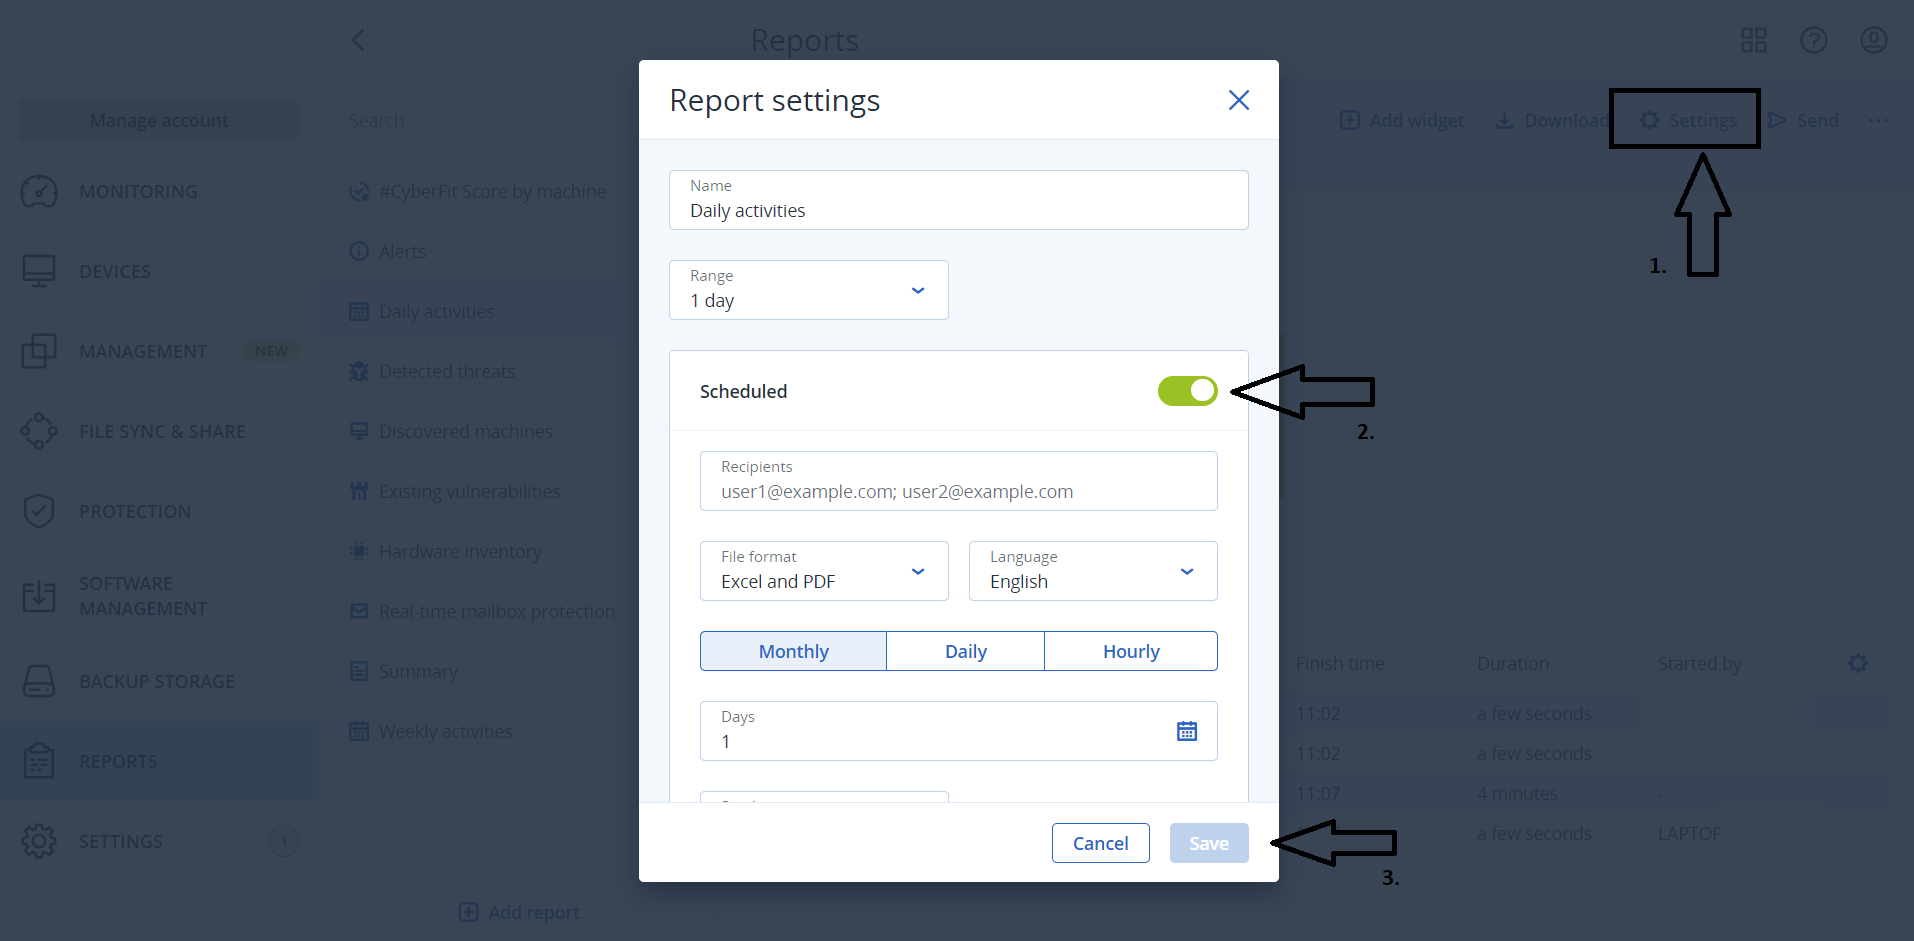
2. set or turn off time intervals
Once you have clicked on the settings, you have the option of setting the time intervals for your alerts or switching them off completely. To switch off reporting completely, please deactivate the "Sheduled" slider. Then click on "save" and the changes will be applied.
Author: Mesut Oysal
Last update: 13.07.2023 14:09
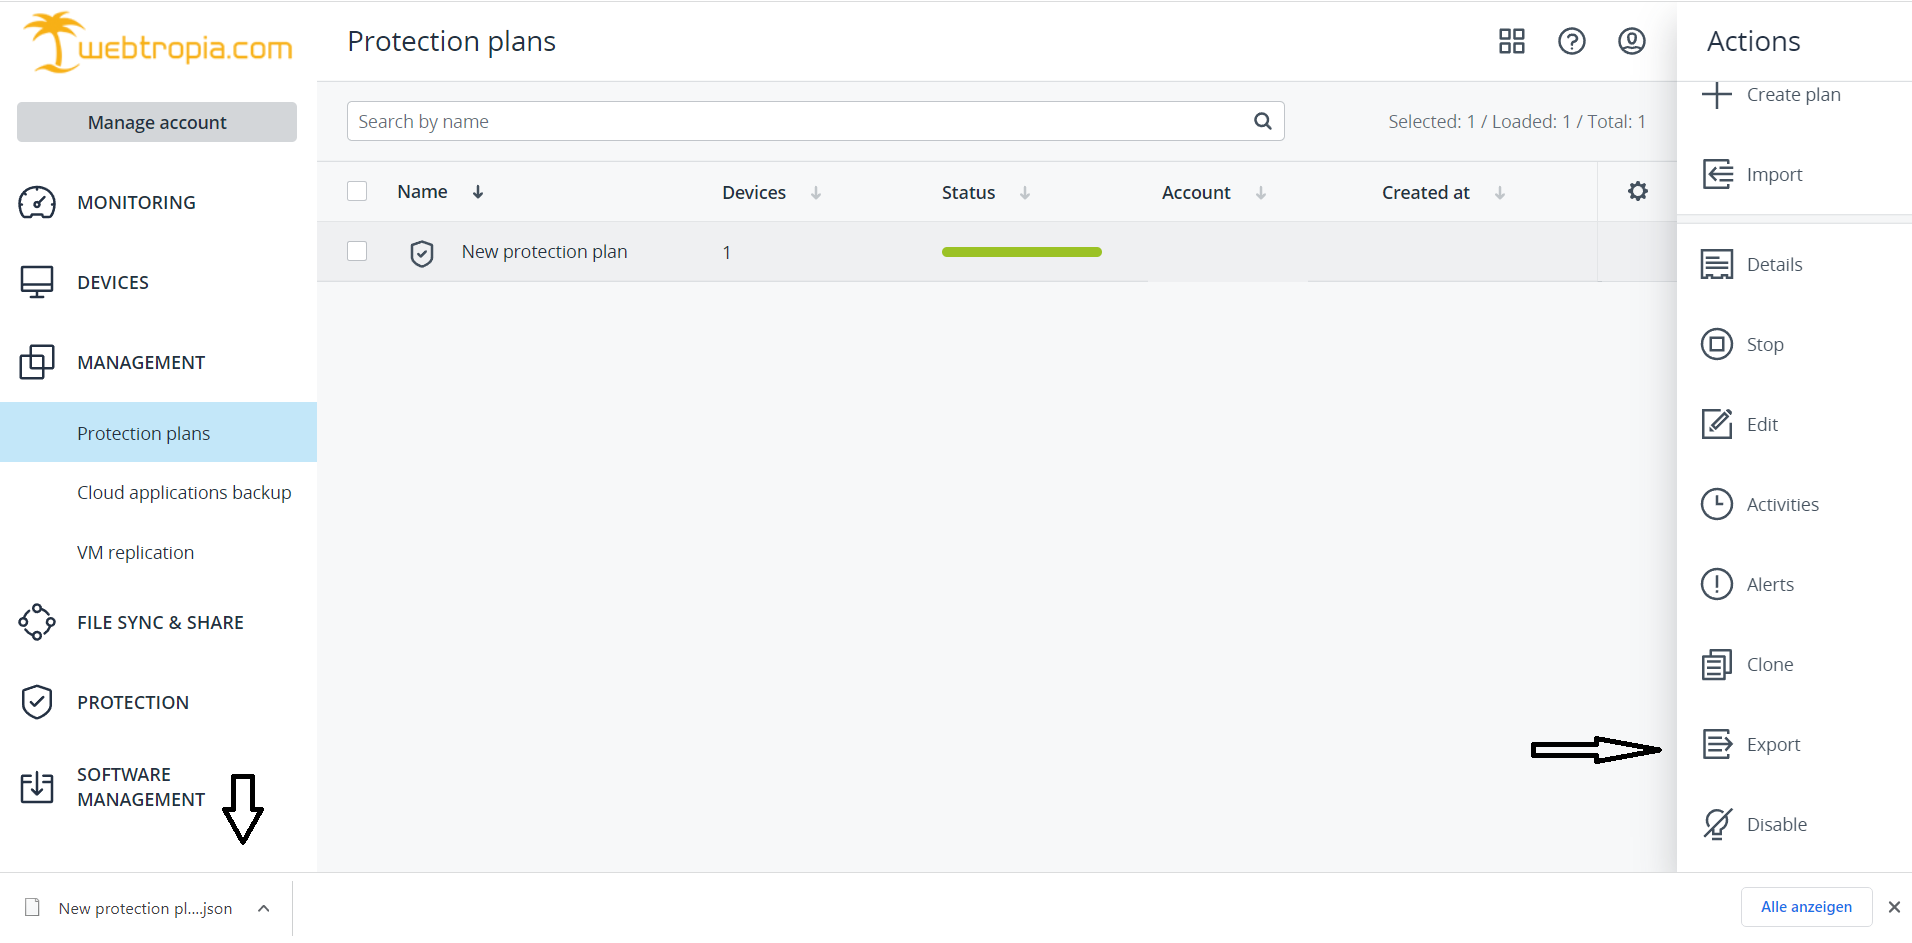
1. create and export a .json file
The export function in the Acronis Cyber Protect management tool allows you to export a .json file of your protection plan. This allows you to transfer your pre-configured protection plans to other devices. After pressing the export button, a download is initiated.
2. importing a .json file
To be able to import the .json file, go to the "Management" tab. In the drop-down menu, select the item "Protection plans". Here you will find an option for "import" in the menu on the right. After you have pressed "import", the file explorer appears. Select the previously exported (see step 1) or any .json file. The protection plan then appears in the directory and can be assigned to a device.
Author: Mesut Oysal
Last update: 13.07.2023 14:09
Author: Mesut Oysal
Last update: 13.07.2023 15:01
It is possible to upgrade your existing Cloud Backup product to a larger version. To proceed, you have to log in to the Customer Management and go to "My Products" -> "Cloud Products" -> "Cloud Backup". In the overview you will find the button "Upgrade" above the storage space in the upper right corner, which you have to click. In the following screen you will find the products that you can switch to.

Author: Bettina Brauer
Last update: 31.03.2021 12:29
This article describes how to set up the Cloud Storage product.
After your order has been activated and successfully provisioned by us, you can log in to Central Customer Management with your username and password previously set in the Store.
After successfully logging into our customer management, you must now create a new user.
To do this, click on "Cloud Storage".
Continue with "Create user" and fill in the required information.
Under Quota you can define how much storage space should be available to the user in the cloud.
When you have made all the entries, click on "Create".
The newly created user is now displayed as successfully created under the menu item Users.
It is automatically linked to the cloud storage product.
On this page, you can see all users to whom you have given access to your cloud storage environment, as well as the used storage per user.
Furthermore, here you can enable and disable users for the product by editing them accordingly. If you don't need it anymore you can also delete the user.
By creating the user, your cloud is now ready to be set up. Now please click on the link in the central customer management which will redirect you to login to your cloud storage. Log in with the user data you have created. You have successfully set up your cloud storage product.
Author: Bettina Brauer
Last update: 28.06.2021 05:19
Unfortunately, it is currently not possible to create an account directly either via the ZKM or via the web interface.
You can invite someone to a specific file or folder, in which case an additional account is set up for the invited user.
Author: Bettina Brauer
Last update: 31.03.2021 12:42
This article describes the programs that are available in Office 365.
Outlook is a normal email program that includes several features on the side. The following programs are included: Calendar, People, Tasks and Bookings.
Yammer is a social network designed primarily for businesses. You can create groups, upload and share files with colleagues, as well as make arrangements.
With Planner you can create plans, as well as tasks and assign them to individual users. With the charts, you can see how many or which tasks have been completed.
Sway is a presentation web application. It allows you to combine text and media content, such as images, audios, and videos, into a presentation.
With PowerApps, you can create your own apps and then share them with others so that you can share that app. The app you create can then be used either on the web or on your phone as an app. Once you have created an app, it can be connected to other Microsoft programs/apps.
Forms allows you to create online surveys. The data from the survey is automatically read out so that you have an exact overview of the result of the survey. Likewise, this data can be exported as an Excel file for further use.
With Power Automate you can automate recurring tasks. There is also connectivity to third-party providers.
Here you can create teams, but also have individual conversations. There is also a calendar where meetings can be entered or files can be saved.
Here you can download business apps.
Here you can download the usual apps from the Microsoft Store.
Newsfeed is a kind of blog. You can follow other people to read their news, but also post your own news for others to read.
Delve allows you to give other people access to data from other platforms. In doing so, other people can only access the public documents and your private ones can only be accessed by you.
In Sharepoint, you can create websites. You have the choice between Teamswebsite and Communicationwebsite. On the teams website, only specific teams that you have selected have access. On the communication site, the entire organization has access and can monitor your project.
The available programs depend on which version of Office 365 you order.
Author: Bettina Brauer
Last update: 08.07.2021 12:21
Author: Bettina Brauer
Last update: 31.03.2021 13:19
This article describes the procedure, after ordering Office 365.
After your order of Office 365 has been activated and successfully provisioned by us, you will receive an e-mail with login data for the central customer management. You can log in to central customer management with the specified user name and password.
Once you have logged into central customer management, you must now create a user for Office 365. To do this, please click on the "Office 365" icon. Continue with "Create user" and fill in all the details. Under License you can specify which license this user should get. After you have filled in all the details, please click on "Create".
In this section you can view all Office 365 users. For each user, you will see the email address and the license of the user. Above the users, you will see the licenses they have and how many are already distributed.
Once the user is created, please click on "Login". You will now be redirected to the Microsoft page. Here you have to log in on the right side with your given email and password. Once you have entered your details, please click on "Log in".
You have successfully logged in and are now on the Office 365 website.
Author: Bettina Brauer
Last update: 08.07.2021 14:14
For Office365 you can use any domain, regardless of where it is registered. You only need access to the DNS zone of the domain, because you have to make settings there.
Please log in to the admin panel of Office365 to configure your domain:

Then navigate on the left side to "Show all" -> "Setup" -> "Domains":
Now click on "Add domain" and follow the instructions listed there.
Author: Bettina Brauer
Last update: 08.07.2021 14:23
Unfortunately we are currently unable to offer the Office 365 product to our customers in all countries.
At this time, we can only deploy Office 365 in the countries listed below.
Andorra
Belgium
Bouvet Island
Bulgaria
Germany
Denmark
Estonia
Finland
France
Faroe Islands
Gibraltar
Greece
Greenland
Guernsey
Isle of Man
Ireland
Iceland
Italy
Jersey
Croatia
Latvia
Liechtenstein
Lithuania
Luxembourg
Malta
Monaco
Netherlands
Norway
Poland
Portugal
Romania
San Marino
Sweden
Switzerland
Slovakia
Slovenia
Spain
Svalbard
Czech Republic
Hungary
Vatican City
United Kingdom
Cyprus
Åland
Austria
Unfortunately we do not offer this product for all other countries.
Author: Bettina Brauer
Last update: 31.03.2021 13:24
You can request your access key from our sales team. The access key will then be handed over to you upon completion and you can use it without any problems. In addition, you will receive a key handover form on which your key number is noted so that you can provide us with accurate information in the event of loss. Defective access keys can also be replaced in the same way. To request new access keys or to report defective keys, please contact vertrieb@myloc.de.
Author: Bettina Brauer
Last update: 31.03.2021 13:48
Via your central customer management (ZKM), you can grant access to employees or one-time visitors, both permanently and on a one-time basis.
If you need help setting this up, feel free to contact us at vertrieb@myloc.de.
Author: Bettina Brauer
Last update: 31.03.2021 14:18
If you need tools for installation, or screws for your rack, or even cables, we can help you within a short time. You have only to contact our welcome desk or our support and we can lend you tools or other missing things.
Author: Bettina Brauer
Last update: 31.03.2021 14:21
Unfortunately it is not possible to do this without a downtime. The reason is, that our racks are physically separated from another and we cannot remove doors or something. So it is not possible to make a bigger rack out of a small one. You can make the move by yourself or let us do it for a small fee.
Author: Bettina Brauer
Last update: 31.03.2021 14:23
Our staff will open the first door for you. Afterwards you can move freely in the data center up to your rack.
The outer gate to the premises is closed from 10:00 p.m. to 6:00 a.m.. Please call our support team using the telephone number on the gate.
The employee will then open the gate for you accordingly.
Please notify us of your visit in advance by email to pforte@myloc.de.
Please be sure to observe the current Corona regulations for your visit to our data center: Corona-Info
Author: Bettina Brauer
Last update: 31.03.2021 14:26
The datacenter is also staffed 24/7 outside our business hours. You can ring the doorbell and will then be admitted. Please have your ID card ready if you have left a key with us so that the staff can help you quickly. The outside gate to the company premises is closed between 10:00 pm and 6:00 am. In this case, please call the number on the gate. An employee will then open the gate for you.
Please register your visit in advance by emailing pforte@myloc.de.
Please be sure to observe the current Corona regulations for your visit to our data center: Corona-Info
Author: Bettina Brauer
Last update: 31.03.2021 14:28
If you need it, we can offer you an individual price for a higher power supply or an additional port. Therefore you can contact our sales-team (vertrieb@myloc.de). Please note, that it will take some time, until the changes will be ready and usable.
Author: Bettina Brauer
Last update: 31.03.2021 14:31
In the following table you will find the bandwidth as well as the guaranteed peak bandwidth of your server:
| Product | Bandwidth | Guaranteed Bandwidth |
| VPS Server | 100 MBit | |
| Root Server | 200 MBit | |
| Dedicated Server | 300 MBit |
| Product | Bandwidth | Guaranteed Bandwidth |
| VPS Server | 100 MBit | |
| Root Server | 200 MBit | |
| Dedicated Server | 300 MBit |
| Product | Bandwidth | Guaranteed Bandwidth |
| VPS Server | 100 MBit | |
| Dedicated Server | 200 MBit | |
Author: Bettina Brauer
Last update: 28.06.2021 03:58
Please note that the statistics under Confixx / Plesk only add up the traffic of the individual customers and do not measure the total traffic caused by your server. For example, an online update performed by you cannot be assigned to a user although it causes traffic.
If you want to measure the total traffic you can use the software ipac. Available from: http://www.daneben.de/ipac.html
Author: Bettina Brauer
Last update: 15.04.2021 10:10
Up to 31 additional IPv4 addresses can be ordered per server via the customer central management. These IP addresses are available immediately after ordering. If you need further IPv4 addresses and have stating a reason, this limit can be increased by our support team. In addition, it is also possible to order IPv4 networks. In this case you also need some reasons for the increased demand of IPv4 addresses. A reason for raising the limit or applying for a separate network should have the following content:
In particular, the intended use is not accepted:
Please also note that the deployment of IPv4 networks may take up to 5 working days to complete after successful verification.
| Description | Setup / One time fee | Price / month |
|---|---|---|
| Additional single IPv4 address (up to 31 possible) | 5,00 € | 2,00 € |
| Global Failover IPv4 address (up to 31 possible) can be used for Dedicated Server | 0,00 € | 3,00 € |
| /24 Subnet - 256 usable IPv4 Adressen | 1280,00 € | 512,00 € |
| /25 Subnet - 128 usable IPv4 Adressen | 640,00 € | 256,00 € |
| /26 Subnet - 64 usable IPv4 Adressen | 320,00 € | 128,00 € |
| /27 Subnet - 32 usable IPv4 Adressen | 160,00 € | 64,00 € |
| /28 Subnet - 16 usable IPv4 Adressen | 80,00 € | 32,00 € |
| /29 Subnet - 8 usable IPv4 Adressen | 75,00 € | 16,00 € |
| Routing of an own IP network (/24 or larger) | 75,00 € | 25,00 € |
To order your own subnet, please open a support ticket.
Author: Bettina Brauer
Last update: 16.11.2021 08:49
An additionally ordered IP address must be set up on your server so that it can be reached. This article is only valid for Dedicated and Virtual Dedicated Server. With a VPS the network configuration is automatically configured. Proceed as follows:
Add the following entry to the file /etc/network/interfaces:
auto eth0:1iface eth0:1 inet staticaddress <additional IP-Address>
netmask 255.255.255.255
<additional IP-Adresse> The corresponding IP address is inserted here. The network service is then restarted using the following command:
service networking restart
In the file /etc/netplan/01-netcfg.yaml adapt the following line:
addresses: [ "<Haupt-IP-Adresse>/32", "<additional-IP-Adresse>/32"]
<additional-IP-Adresse> The corresponding IP address is inserted here. The network service is then restarted using the following command
netplan apply
If an error should have crept into the YAML file, it is immediately displayed and can then be directly edited again.
Note: When using Netplan, you must work with spaces. The use of "Tab" is not possible.
A permanent configuration is only possible by default via alias interfaces (eth0:1, eth0:2 etc.). For this purpose, a file must be created for each IP address.
Note: The network interface is called eth0 in the example. This may differ from your network interface. You can read out the currently used network interface with the following command:
ip r s | grep default
default via 192.168.178.1 dev eth0 proto static metric 100
eth0 -> the network interface used. The main IP of your server is also configured here.
/etc/sysconfig/network-scripts/ifcfg-eth0:1
These files must each contain the following information:
DEVICE=eth0:1


BOOTPROTO=none


ONBOOT=yes
IPADDR=<additional IP-Adresse>


NETMASK=255.255.255.255
Setting up an additional IP address can be done via the graphical user interface or via the CMD.
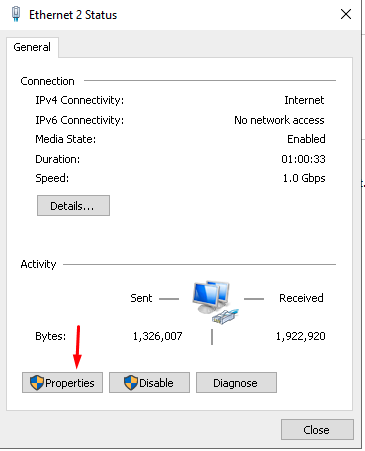
Switch to the properties of the network card:
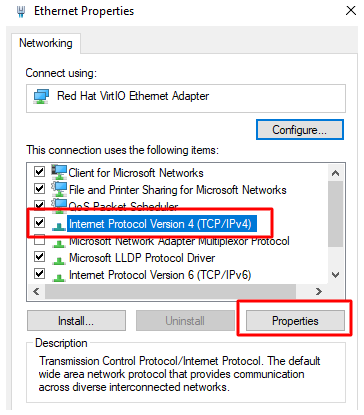
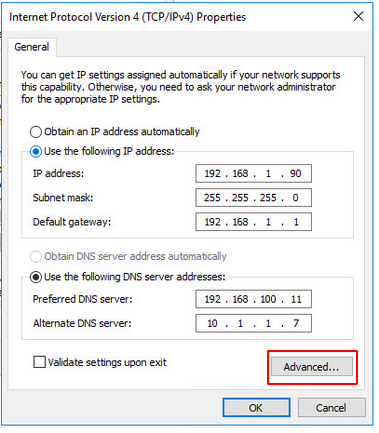
Open the advanced settings and add the additional IP-address.
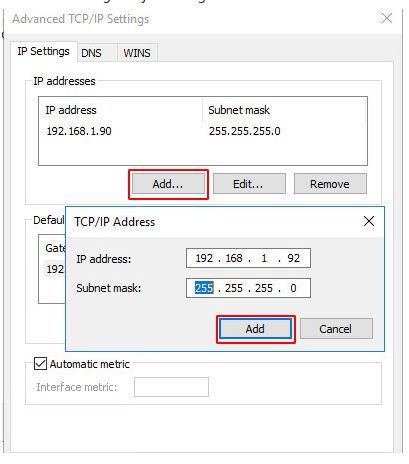
Important: The subnet mask of the additional IP is basically: 255.255.255.255
netsh interface ipv4 add address name="Ethernet" <zusätzliche IP-Adresse> 255.255.255.255
In order for the additional IP address to be used, the IP configuration in the ZKM must be adjusted and set to "host route". "Virtualisation" is used for virtualisation purposes.
To do this, log into the ZKM and navigate to the corresponding server contract. Now select "Configuration".
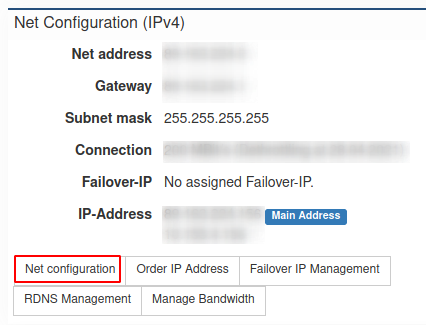
Now set the additional IP addresses to "Host-Route".
Author: Bettina Brauer
Last update: 25.07.2021 05:21
Up to 31 additional IP addresses can be ordered via the customer interface.
Up to 7 additional IP addresses can be ordered via the customer interface.
If you need more than 31 IP's, please have a look at the FAQ article How do I request additional IP addresses?
Author: Bettina Brauer
Last update: 15.04.2021 10:25
The use of failover IP requires that you keep your data synchronous between both servers. There are basically different procedures for this, but this article deals only with the correct use of the failover IP.
All services that should be accessible via the failover IP must be configured to listen on the failover IP.
The failover IP is to be used as a so-called "Routed-IP". In Central Customer Management (ZKM), you can select a destination that corresponds to a server for each failover IP. The failover IP is routed so that the main IP of the selected server is the router responsible for this IP. This means that the failover IPs cannot be used for V servers operating in bridged mode (e.g. VMware). If the main IP of a server is not booted, the failover IP packets will not arrive.
In order to avoid an IP conflict when you run two servers in one segment, it is important that the IP is always booted on only one machine. In the event of an error, the IP can first be taken over by the new system and then booted. Ideally, the failed system is switched off via hardware KVM so that it does not restart and the IP restarts, which would then lead to an IP conflict.
Author: Bettina Brauer
Last update: 15.04.2021 10:33
To set up Ipv6 on your server, you need the IPv6 information from your ZKM:
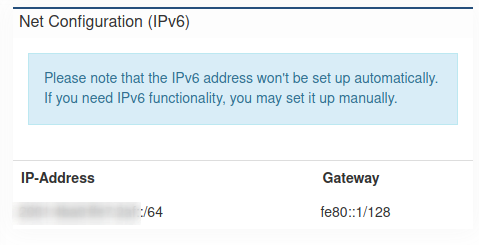
Attention: Please use only the IPv6 fe80::1 as gateway!
Log in on the server as user root and open the network configuration with:
nano /etc/netplan/config.yaml
Add the following line under "addresses" if your IPs are listed seperately:
- <IPv6 address>/64 # An address from your /64 IPv6 subnet
Add the the IP like this if your IPs are listed in square brackets:
addresses: [ 127.0.0.1/32, 2001:cccc:ffff:dddd::1/64 ]
Log in on the server as user root and open the network configuration with:
nano /etc/network/interfaces
Add the following lines there:
iface enp1s0f0 inet6 static
   address <Eine IP aus Ihrem /64 Subnetz>
   netmask 64
   gateway fe80::1
*** Important ***
Please change the name of the network device (enp1s0f0) if necessary. This is already in the configuration. You can find an example in the screenshot: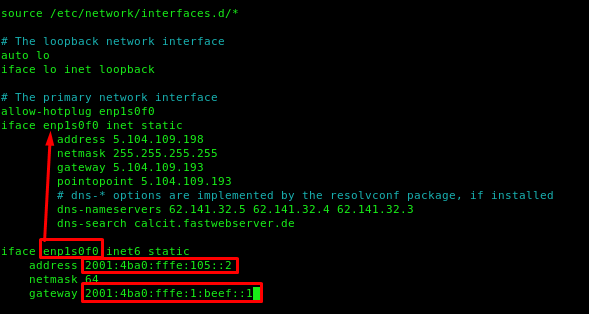
Save with CTRL + O and close nano with CTRL + X.
It is best to restart the entire server. If this is not possible, you can also restart only the network with the following command:
service networking restart
Log in to the server as root user and open the network configuration:
nano /etc/sysconfig/network-scripts/ifcfg-eth0
*** Important: The name of the device eth0 can be different, please check this with "ip addr" ***
There you compare all the already preset settings with the ones below and adjust them if necessary. All missing lines must be added and others that start with IPV6 can be removed.
IPV6INIT=yes

IPV6ADDR=<IPV6 Adresse><Prefix z.B. /64>

IPV6_DEFAULTGW= fe80::1

IPV6_DEFAULTDEV=<Interface z.B. enp5s0 oder eth0>
Save with CTRL + O, close with CTRL + X
It is best to restart the entire server afterwards, or at least the network if this is not possible:
service network restart
The configuration can be checked with the command ifconfig.
Log in to the server as user administrator.
Please press START at the bottom left of your task bar. There you will find the item "Run". Enter cmd there.
A black window with white text opens (command prompt or also called Windows shell). Enter the following commands there:
netsh interface ipv6 add address store=persistent

			netsh interface ipv6 add route ::/0 fe80::1 store=persistent
Check the setting with the following command:
ipconfig -all
To test if the IP address is correctly reachable you can proceed as follows:
1. ping the configured IP address on your server. If the server cannot reach the address configured on it, something is wrong. A ping on the IP v6 address can be done with the console command:
ping -6 <IP address>
2. ping the IP address of the gateway from the server, as this is usually outside of your own network, so you can see if there is a problem with the routing.
3. ping an external address e.g. 2a00:1450:4001:814::200e this is an address from Google that was set up exactly for this test purpose.
4. try to reach your server from outside via IPv6 If your computer does not have an IPv6 address at home, you can use an online ping service such as www.subnetonline.com/pages/ipv6-network-tools/online-ipv6-ping.php.
Author: Bettina Brauer
Last update: 25.07.2021 05:02
When a virtual machine is created on the host system, the network configuration of the VM is always as follows:
IP: <Additionally ordered IP address>
Netmask: 255.255.255.255
Gateway: <Same gateway as the host system such as: 192.168.0.1>
An additional IP can be ordered from ZKM. See more information here.
Author: Bettina Brauer
Last update: 15.04.2021 10:35
Short interruptions in online games or radio streams are not always due to network problems. These dropouts are often caused by an overload of the server.
So please check first whether any services not needed here consume resources unnecessarily.
Especially a possibly installed administration tool can lead to unwanted dropouts due to the resource-hungry MySQL database server.
One tool that has proven to be particularly useful for this check is "atop", where you can see all workloads (including hard disks) and detect problems directly.
You can stop services within Linux via the console command:
/etc/init.d/<service name> stop
Use the following command to restart services:
/etc/init.d/<service name> start
Under Windows this is done in the Task Manager under the item Details.
In addition, it is always useful to check the log files of the server in case of problems on the server. Under Linux you can find it in the directory /var/log. The /var/log/messages and /var/log/syslog should be of particular interest there.
Under Windows, please examine the event display entries.
If this also does not provide any usable causes, you should perform an MTR on your server as you proceed is described in our FAQ under the point "What to do with network problems".
Author: Bettina Brauer
Last update: 15.04.2021 10:37
To see the current network connection of your server, you must display the adapter settings of your network adapter under Windows. To do this, navigate to the Control Panel and open the "Network and Sharing Center" menu.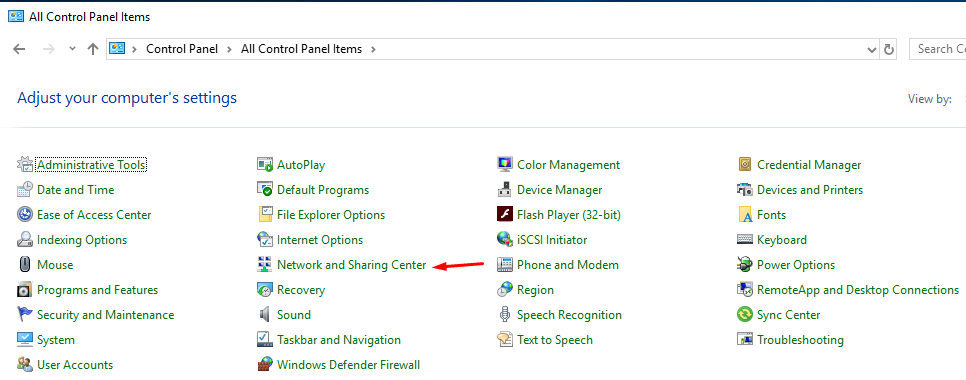
Click on the "Change Adapter Settings" button on the left.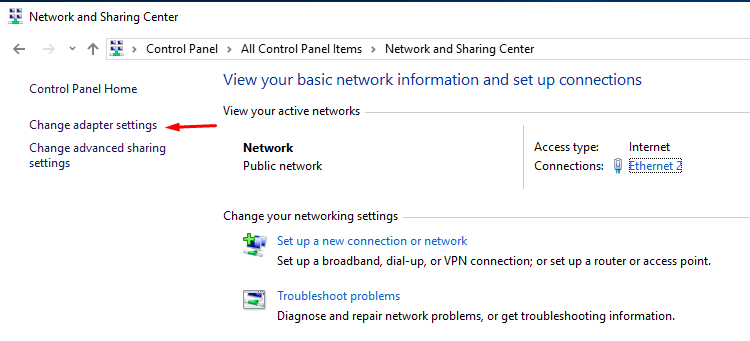
Then right-click the network adapter and select Status. There you will see the current connection of your server under "Transfer rate".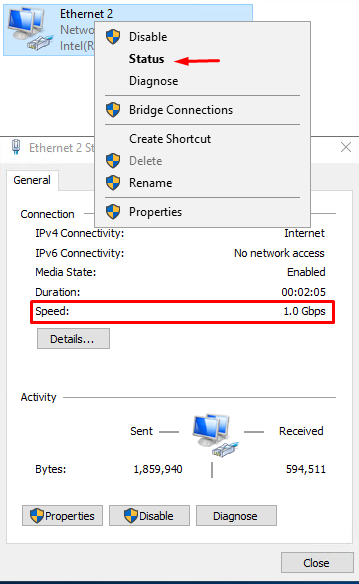
Under Linux use the command "ip link show", there you can see the connection next to "qlen". This should normally be 1000 for 1,000 Mbit.

If this is not set to "1000", please contact our support.
Author: Bettina Brauer
Last update: 15.04.2021 10:38
If network issues occur, for example high latency, less bandwidth or packet loss an analysis is necessary. You must check both directions of the connection ( client => server & server => client ).
With MTR you can create a route analysis, like with traceroute, but over time. This analysis shows if there is an issue with a router and which router is probably affected. This is a necessary information to be able to know who is responsible and has to be informed.
The packet can be installed with the packet manager of your distribution.
apt-get update && apt-get install mtr
zypper refresh && zypper install mtr
yum install mtr
The command to check the connections is the same on all distributions.
mtr -n --raw --report -c 900 [IP]
[IP] has to be replaced with the receiving stations ip address.
| Option | Description |
| -n | Disable reverse name resolution |
| --report | Do not show live, create report |
| -c 900 | Send 900 packets ( 1pps ) |
On Windows you can use the tool WinMTR. It can be downloaded at http://winmtr.net/ . Unpack the application ( for example on your desktop ). Execute the binary, select "options", remove the selection of "resolv names" and confirm with "OK". Enter the ip address or host name to the "host"-field. Start the check and let it run for at least 15 minutes to receive a usable result.
When you gathered the data for both connection directions ( client => server & server => client ), please send the result to our support. The best way is to create a txt-file and attach it to your mail to Support@myLoc.de .
Author: Bettina Brauer
Last update: 15.04.2021 10:40
If you have issues with the network speed (Download/Upload) of your server, please perform the following while the server is booted in rescue, and send us the output so that we can check this thank you:
Install the package "iperf3": under Ubuntu or Debian it would be this command:
apt-get -y install iperf3
Once the installation is complete, start your test by following these instructions: https://speedtest.myloc.de/
Author: Bettina Brauer
Last update: 15.04.2021 10:52
You will find the correct network configuration in the ZKM, with your respective contract: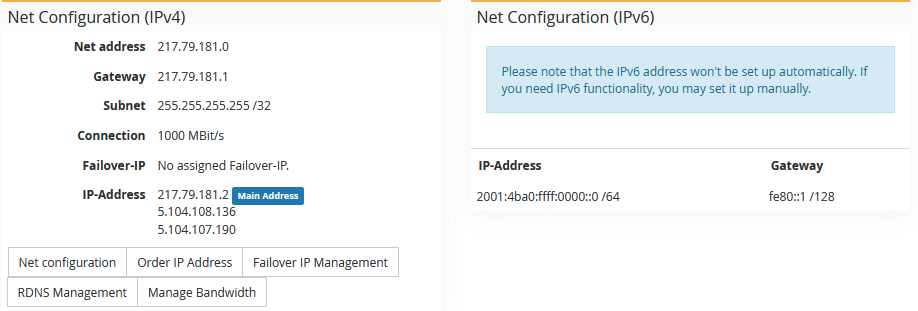
Configuration examples
*** Important ***
For the sake of simplicity, we always call the interface "eth" or "eth0" in our example. Before changing your network configuration, please check the correct name, e.g. "ip a", before you change it.
*** Important ***
Ubuntu/Debian
# /etc/network/inerfaces

auto eth0
iface eth0 inet static
    address <IPv4 Adresse>
    netmask <Netmask>
    gateway <Ipv4 Gateway>
    pointopoint <Ipv4 Gateway>

iface eth0 inet6 static
   address <An IP from your /64 subnet>
   netmask 64
   gateway <IPv6 Gateway>
After the configuration has been adjusted, "/etc/init.d/networking restart" must be executed again to save the changes.
Netplan example:
# /etc/netplan/config.yaml

network:
  version: 2
  renderer: networkd
  ethernets:
    eth0: #Interface-Name
      addresses:
        - <IPv4 address>/32 #Other as in the example possible
        - <IPv6 address>/64 # An address from your /64 IPv6 subnet
      gateway6: <IPv6 gateway> #IPv6 gateway
      nameservers:
          search: [ fuchsia.fastwebserver.de ]
          addresses:
              - "62.141.32.5" # Resolver 1
              - "62.141.32.4" # Resolver 2
              - "62.141.32.3" # Resolver 3
      routes:
      - to: 0.0.0.0/0
        via: <IPv4 Gateway> #Ipv4 Gateway
        on-link: true
Please note that the netplan only works if the spacing is correct, only spaces are allowed, no "tabs".
After the configuration has been adjusted, "sudo netplan apply" must be run again to save the changes.
CentOS
# /etc/sysconfig/network-scripts/ifcfg-eth0
# The following must be included for IPv4:

DEVICE=eth0
BOOTPROTO=none
ONBOOT=yes
IPADDR=<IP-Adresse>
NETMASK=<Netmaske>
GATEWAY=<IPv4 Gateway>

# For IPv6 the following must still be present:
IPV6_DEFAULTDEV=eth0
IPV6INIT=yes
IPV6ADDR=<IPV6 Adresse><Prefix z.B. /64>
IPV6_DEFAULTGW=<IPV6 Gateway>
Windows
to make the graphical settings in Windows, go to the following items:
IPv4: Network card properties => Internet Protocol, Version 4 (TCP/IPv4) => Properties
IPv6: Network card properties => Internet Protocol, Version 6 (TCP/IPv6) => Properties
There you can specify the IP address, netmask, gateway and DNS addresses. Under "Advanced" you can then specify additional IP addresses for the server, for example.
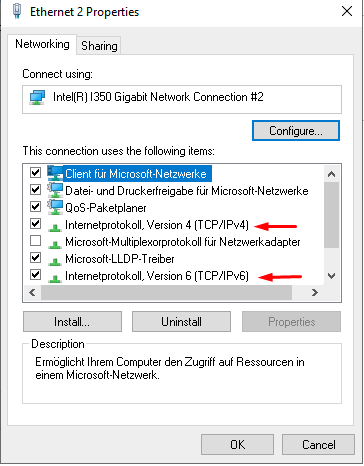
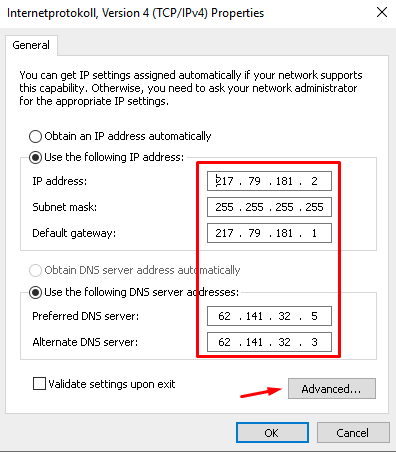
To use IPv6 you have to click on "Use the following IPv6 address:" and enter the IPv6 address, subnet prefix length (64) and the gateway.
You can use our following servers as DNS servers:
Resolver 3: 2001:4ba0::53:3
Resolver 2: 2001:4ba0::53:2
Alternatively, it can also be set via the CMD (Windows key + r and enter "cmd" there):
IPv4:
netsh interface ipv4 add address name="Ethernet" <IP-Adresse> <Netmaske> <Gateway>IPv6:
netsh interface ipv6 add address "Ethernet" <IPv6 Adresse> store=persistent
netsh interface ipv6 add route ::/0 [IPv6-Gateway] store=persistent
*** Note ***
We always recommend restarting the server after changes to the network configuration to make sure that all settings have been changed as desired.
*** Note ***
Author: Bettina Brauer
Last update: 15.04.2021 11:14
The following strict requirements need to be fulfilled prior to the announcement via our AS24961:
Contact information at some foreign IRRs:
ARIN: https://account.arin.net/public/whoisinaccuracy/report
NTT: db-admin@rr.ntt.net
RADB: support@radb.net
APNIC: helpdesk@apnic.net
Please also check all of the above with the IRR Explorer at http://irrexplorer.nlnog.net
Additionally, there is a monthly fee of 25€ per announcement and a one time fee of 75€ involved.
Check all of the above requirements BEFORE opening a ticket to request the announcement. The tickets need to contain the subnet you want to announce, the proof point on the ownership, the acknowledgement on costs and the desired destination server and routing type. We insist on all of the above requirements and there are no exceptions from it. Normally we handle announcements requests within 5 working days.
ATTENTION: If any of the above requirements are not fulfilled while prefix is announced the visibility might be decreased or we may remove the announcement at any given time.
Author: Marie Burggraf
Last update: 21.04.2021 13:17
For IPv4 we support routing on /32 granularity among all dedicated server and all root server products within the same customer account as self-service within ZKM. Routing to VPS is currently not supported.
For IPv6 we are currently only supporting static routing without self-service. Please open a ticket in the customer panel if routing should be changed.
Author: Marie Burggraf
Last update: 15.04.2021 11:26
if you get a (small) DDoS attack, you can already block it using iptables (Linux) or the Windows firewall.
If this does not help, please open a support ticket with the following content:
1. since when does the problem occur? It is helpful to specify the exact time and the respective time zone (e.g. UTC).
2. are you still able to login to his server via SSH or RDP?
3. which service/website/destination port is affected?
Author: Bettina Brauer
Last update: 15.04.2021 11:28
unfortunately not all IP's can be transferred from all servers:
vServer <-> Dedicated server - Not possible
vServer <-> Root-Server - Not possible
Root server <-> Dedicated server - Possible
Among each other transfer is not a problem, such as:
Dedicated server <-> Dedicated server - Possible
Root server <-> Root server - Possible
vServer <-> vServer - Possible
Author: Bettina Brauer
Last update: 15.04.2021 11:30
Author: Bettina Brauer
Last update: 15.04.2021 11:32
Internal traffic is not billed on the data volume. If the bandwidth is reduced due to exceeding the data volume, the internal connection is also affected by this limitation here. In the event of a bandwidth reduction, you have the option of ordering additional traffic via your customer account. The limitation will then be lifted for the server.
Author: Bettina Brauer
Last update: 15.04.2021 11:33
Yes, this is possible for our Co-Location customers. We will provide
you with a full-table BGP session through our three multi-hop BGP
route-servers.
Please take care to use all three route-servers for your announcement,
as single route-servers can be taken offline at any time for
maintenance purposes. This way the sessions will continue to be fully
redundant even during times of maintenance.
In order to setup your BGP session, we will need the following
information from you:
- Autonomous System Numer (ASN)
- AS-SET
- IP Address of your Router(s)
Please contact us through the ticket system to start this process.
Author: Marie Burggraf
Last update: 08.01.2021 11:37
Before you follow this FAQ article, please read our FAQ article about
how to get an BGP session. This is supported for our Co-Location
customers. FAQ-article.
We accept the following BGP communities:
24961:666 - Public Blackhole - map to 65535:666 and Peer-specific community
24961:1XZZZ - Announcement control
X value definition
0 do not announce
1 prepend once
2 prepend twice
3 prepend thrice
Z value definition
000 All peers
001 All upstreams
002 All peerings
003 All public peerings
004 All private peerings
In this FAQ article you can find example configuration snippets for
Arista, FreeRangeRouting and Juniper routers.
As a general rule, you will need to set static /32 or /128 Routes to
the multihop BGP Routeservers with the nexthop being your normal
default gateway for IPv4 or IPv6.
Additionally you will need to configure import/export filters for the
BGP session. While we (myLoc) filter the BGP session from our side as
well, this is good practice to do from both sides.
Lastly, you will need to configure the actual BGP session to the
Routeservers with the following IPs and the BGP session password that
we gave you when provisioning your session:
IPv4:
- 62.141.40.144
- 62.141.40.145
- 62.141.40.146
- 62.141.40.147
IPv6:
- 2001:4ba0:1336::1
- 2001:4ba0:1336::2
- 2001:4ba0:1336::3
- 2001:4ba0:1336::4
myLoc ASN: 24961
Keep in mind that the default BGP timeout is 300 seconds. This means that if you are announcing prefixes from more than one location, the prefix might be available for up to 300 seconds after a problem occured.
In this case it might be advisable to either change the BGP timeout to less than 300 seconds, or enable BFD, which we also support with our routeservers.
Please take care to replace the default gateway for the static routes
in the following examples to the IPs applicable to you. As well as any
import/export filters you might want to apply. Generally, these
snippets are mostly provided as examples. It is quite possible that you
need additional configuration to support your use-case.
This example will only export prefixes that originate from your router,
if you have customers yourself, you will need to adjust the filters.
Arista Config:ip as-path access-list NULL-AS permit ^$ anyip prefix-list ALLOW_ALL seq 5 permit 0.0.0.0/0 le 24ip prefix-list ANNOUNCEv4 seq 5 permit YOUR-PREFIX(es)!ipv6 prefix-list ALLOW_ALL seq 10 permit ::/0 le 48!ipv6 prefix-list ANNOUNCEv6 seq 10 permit YOUR-PREFIX(es)!ip route 62.141.40.144/32 YOUR-Default-GWip route 62.141.40.145/32 YOUR-Default-GWip route 62.141.40.146/32 YOUR-Default-GW
ip route 62.141.40.147/32 YOUR-Default-GW!ipv6 route 2001:4ba0:1336::1/128 YOUR-Default-GWipv6 route 2001:4ba0:1336::2/128 YOUR-Default-GWipv6 route 2001:4ba0:1336::3/128 YOUR-Default-GW
ipv6 route 2001:4ba0:1336::4/128 YOUR-Default-GW!route-map to_MYLOCv4 permit 10 match ip address prefix-list ANNOUNCEv4 match as-path NULL-ASroute-map to_MYLOCv6 permit 10 match ip address prefix-list ANNOUNCEv6 match as-path NULL-AS!router bgp YOUR_ASN router-id YOUR_ROUTER_ID neighbor MYLOC4 peer group neighbor MYLOC4 remote-as 24961 neighbor MYLOC4 ebgp-multihop neighbor MYLOC4 password 7 YOUR_BGP_PASSWORD neighbor MYLOC4 maximum-routes 0 neighbor MYLOC6 peer group neighbor MYLOC6 remote-as 24961 neighbor MYLOC6 ebgp-multihop neighbor MYLOC6 password 7 YOUR_BGP_PASSWORD neighbor MYLOC6 maximum-routes 0 neighbor 62.141.40.144 peer group MYLOC4 neighbor 62.141.40.145 peer group MYLOC4 neighbor 62.141.40.146 peer group MYLOC4
neighbor 62.141.40.147 peer group MYLOC4 neighbor 2001:4ba0:1336::1 peer group MYLOC6 neighbor 2001:4ba0:1336::2 peer group MYLOC6 neighbor 2001:4ba0:1336::3 peer group MYLOC6
neighbor 2001:4ba0:1336::4 peer group MYLOC6 ! address-family ipv4 neighbor MYLOC4 prefix-list ALLOW_ALL in neighbor MYLOC4 route-map to_MYLOCv4 out network YOUR-PREFIX(es) ! address-family ipv6 neighbor MYLOC6 activate neighbor MYLOC6 prefix-list ALLOW_ALL in neighbor MYLOC6 route-map to_MYLOCv6 out network YOUR-PREFIX(es)!
FreeRangeRouting Config:ip route 62.141.40.144/32 YOUR-Default-GWip route 62.141.40.145/32 YOUR-Default-GWip route 62.141.40.146/32 YOUR-Default-GW
ip route 62.141.40.147/32 YOUR-Default-GWipv6 route 2001:4ba0:1336::1/128 YOUR-Default-GWipv6 route 2001:4ba0:1336::2/128 YOUR-Default-GWipv6 route 2001:4ba0:1336::3/128 YOUR-Default-GW
ipv6 route 2001:4ba0:1336::4/128 YOUR-Default-GWrouter bgp YOUR-ASNbgp router-id YOUR-ROUTER-IDneighbor MYLOC peer-groupneighbor MYLOC remote-as 24961neighbor MYLOC password YOUR-BGP-PASSWORDneighbor MYLOC ebgp-multihop 255neighbor MYLOC disable-connected-checkneighbor MYLOC6 peer-groupneighbor MYLOC6 remote-as 24961neighbor MYLOC6 password YOUR-BGP-PASSWORDneighbor MYLOC6 ebgp-multihop 255neighbor MYLOC6 disable-connected-checkneighbor 62.141.40.144 peer-group MYLOCneighbor 62.141.40.145 peer-group MYLOCneighbor 62.141.40.146 peer-group MYLOC
neighbor 62.141.40.147 peer-group MYLOCneighbor 2001:4ba0:1336::1 peer-group MYLOC6neighbor 2001:4ba0:1336::2 peer-group MYLOC6neighbor 2001:4ba0:1336::3 peer-group MYLOC6
neighbor 2001:4ba0:1336::4 peer-group MYLOC6!address-family ipv4 unicast network YOUR-PREFIX(es) neighbor MYLOC prefix-list ALLOW_ALL in neighbor MYLOC route-map to_MYLOCv4 outexit-address-family!address-family ipv6 unicast network YOUR-PREFIX(es) neighbor MYLOC6 activate neighbor MYLOC6 prefix-list ALLOW_ALL in neighbor MYLOC6 route-map to_MYLOCv6 outexit-address-family!ip prefix-list ANNOUNCEv4 seq 100 deny anyip prefix-list ANNOUNCEv4 seq 5 permit YOUR-PREFIX(es)ip prefix-list ALLOW_ALL seq 5 permit 0.0.0.0/0 le 24!ipv6 prefix-list ANNOUNCEv6 seq 100 deny anyipv6 prefix-list ANNOUNCEv6 seq 5 permit YOUR-PREFIX(es)ipv6 prefix-list ALLOW_ALL seq 5 permit ::/0 le 48!bgp as-path access-list AS-NULL permit ^$!route-map to_MYLOCv4 permit 5match as-path AS-NULLmatch ip address prefix-list ANNOUNCEv4!route-map to_MYLOCv6 permit 5match as-path AS-NULLmatch ip address prefix-list ANNOUNCEv6!
Juniper Config:protocols { bgp { group myloc-routeserver { type external; multihop { ttl 10; } local-preference 200; log-updown; import from-myloc-route; authentication-key /* SECRET-DATA */; ## BGP Password export Exp2MyLoc; peer-as 24961; neighbor 62.141.40.144 neighbor 62.141.40.145 neighbor 62.141.40.146
neighbor 62.141.40.147 neighbor 2001:4ba0:1336::1 neighbor 2001:4ba0:1336::2 neighbor 2001:4ba0:1336::3
neighbor 2001:4ba0:1336::4 } }}routing-options { rib inet6.0 { static { /* myLoc Routeserver 1 static route */ route 2001:4ba0:1336::1/128 next-hop /* default IPv6 GW */; /* myLoc Routeserver 2 static route */ route 2001:4ba0:1336::2/128 next-hop /* default IPv6 GW */; /* myLoc Routeserver 3 static route */ route 2001:4ba0:1336::3/128 next-hop /* default IPv6 GW */;
/* myLoc Routeserver 4 static route */
route 2001:4ba0:1336::4/128 next-hop /* default IPv6 GW */; } } static { /* myLoc Routeserver 1 static route */ route 62.141.40.144/32 next-hop /* default IPv4 GW */; /* myLoc Routeserver 2 static route */ route 62.141.40.145/32 next-hop /* default IPv4 GW */; /* myLoc Routeserver 3 static route */ route 62.141.40.146/32 next-hop /* default IPv4 GW */;
/* myLoc Routeserver 4 static route */
route 62.141.40.147/32 next-hop /* default IPv4 GW */; } autonomous-system YOUR_ASN;}null-as "()";policy-statement from-myloc-route { term 1 { from { route-filter 0.0.0.0/0 upto /24; } then accept; } term 2 { then reject; }}policy-statement Exp2MyLoc { term 1 { from { route-filter YOUR_PREFIX(es) exact; as-path null-as; } then accept; } term 2 { then reject; }}
Author: Bettina Brauer
Last update: 17.04.2023 12:23
In principle, up to 31 additional IPv4 addresses per server - for vServers the maximum possible number is 7 IPs - can be ordered via the customer panel. These IP addresses are available immediately after ordering. If additional IPv4 addresses are required, this limit can be increased by the support team by stating a reason. It is also possible to order IPv4 networks (i.e. a contiguous IPv4 address range). In this case, too, a reason must be given for the additional IPv4 requirement. A reason for increasing the limit or requesting a separate network must have the following contents:
In particular, the following will not be accepted as intended use
Please also note that the provisioning of IPv4 networks after successful verification may take up to 5 business days due to manual provisioning.
Author: Bettina Brauer
Last update: 15.04.2021 10:23
For customer address space announced via our AS24961 it is possible to have RDNS functionality within the customer panel. We will automatically create RDNS zones on our dns servers ns1.ntdns.de, ns2.ntdns.de and ns3.ntdns.de for your address space after announcement has been completed.
If you announce address space via BGP we do not support hosting of the RDNS zones. Please set up own DNS servers or use 3rd party services.
Author: Bettina Brauer
Last update: 10.03.2021 11:36
This change in the network does not affect the Internet connection, but only the connectivity of your
of your server with the local network segment.
As an example, the following IP configuration has been used in this article:
| Main-IP-Addresse: | 192.0.2.43/24 |
| Gateway: | 192.0.2.1 |
In Windows, perform the adjustment as follows:
1)First, open the network connections.
2) In the selection of available network adapters, select the adapter which is connected to the
public network:
3) In the status window that opens, select the "Properties" button. In the
following window select "Internet Protocol (TCP/IP)" and click again on the "Properties" button.
"Properties".
You should now see the current network configuration:
4) Now change the subnet mask of the IP address to 255.255.255.255:
The customization has been completed. If you still have any questions, our support team will be
at your disposal.
Author: Bettina Brauer
Last update: 15.04.2021 11:40
To ensure the quality of service of our network, we have made changes that require you to also make changes to your network configuration if you want to continue to reach other servers in your network segment.
This change in the network does not affect the Internet connection, but only the connectivity of your server with the local network segment.
There are two different configuration variants:
As an example, the following IP configuration has been used in this article:
| networkinterface: | p5p1 |
| Main-IP-Addresse: | 192.0.2.42/24 |
| Gateway: | 192.0.2.1 |
Before you make the changes according to one of the two variants, you should check how the network is currently configured, this is done in Linux as follows:
$ ip addr
1: lo: <loopback,up,lower_up> mtu 65536 qdisc noqueue state UNKNOWN group default</loopback,up,lower_up>
    link/loopback 00:00:00:00:00:00 brd 00:00:00:00:00:00
    inet 127.0.0.1/8 scope host lo
       valid_lft forever preferred_lft forever
    inet6 ::1/128 scope host
       valid_lft forever preferred_lft forever
2: p5p1: <broadcast,multicast,up,lower_up> mtu 1500 qdisc pfifo_fast state UP group default qlen 1000
    link/ether 6c:62:6d:xx:xx:xx brd ff:ff:ff:ff:ff:ff
    inet 192.0.2.42/24 brd 192.0.2.255 scope global p5p1
       valid_lft forever preferred_lft forever
    inet6 fe80::6e62:6dff:fexx:xxxx/64 scope link
       valid_lft forever preferred_lft forever
3: eth1: <no-carrier,broadcast,multicast,up> mtu 1500 qdisc pfifo_fast state DOWN group default qlen 1000
    link/ether 00:0a:5e:xx:xx:xx brd ff:ff:ff:ff:ff:ff</no-carrier,broadcast,multicast,up></broadcast,multicast,up,lower_up>
$ ip route
default via 192.0.2.1 dev p5p1 proto static
192.0.2.0/24 dev p5p1 proto kernel scope link src 192.0.2.42 metric 1
The output should not differ greatly from your output.
The network interface names may vary depending on the Linux distribution you are using. Identify the network interface that is the connection to the public network. In this case, it is p5p1.
If you want to use the /32 IP configuration, proceed as follows:
Please note that if the configuration is incorrect, the server will become inaccessible and will remain so after a reboot! In this case you have to boot the server into the rescue system and correct the configuration manually!
We recommend, if iLO/IPMI/RMM is available, the configuration via the integrated KVM, instead of via SSH!
For this variant, under Debian (or related distribution), you need to change /etc/network/interfaces
as follows:
auto p5p1
iface p5p1 inet static
        address 192.0.2.42
        netmask 255.255.255.255
        broadcast 192.0.2.42
        pointopoint 192.0.2.1
        gateway 192.0.2.1
On CentOS6, modify /etc/sysconfig/network-scripts/ifcfg-p5p1 as follows:
DEVICE=p5p1
BOOTPROTO=static
ONBOOT=yes
NETMASK=255.255.255.255
IPADDR=192.0.2.42
USERCTL=no
SCOPE="peer 192.0.2.1"
GATEWAY=192.0.2.1
Und die Datei /etc/sysconfig/network-scripts/route-p5p1
ADDRESS0=0.0.0.0
NETMASK0=0.0.0.0
GATEWAY0=192.0.2.1
If you want to configure the variant in which only the route to the local network is set manually
and the actual IP configuration remains untouched, proceed as follows:
Switch to the root user:
$ sudo -i
[sudo] password for user:
Add a route to the gateway via the interface:
# ip route add 192.0.2.1 dev p5p1
Delete the route to the local network segment:
# ip route del 192.0.2.0/24 dev p5p1
Now you can reach all servers in your segment again. To reapply the settings on reboot, if you are using Debian (or related distribution), modify /etc/network/interfaces as follows:
auto p5p1
iface p5p1 inet static
        address 192.0.2.42
        netmask 255.255.255.255
        broadcast 192.0.2.42
        pointopoint 192.0.2.1
        gateway 192.0.2.1
Author: Bettina Brauer
Last update: 15.04.2021 11:44
IPv6 configuration via SLAAC is not possible for our dedicated servers. For each dedicated server, we provide a /64 IPv6 subnet for free.
How to set up IPv6 can be found in the article "How to set up IPv6 on my server?"
Author: Bettina Brauer
Last update: 15.04.2021 11:45
The licenses are managed by us centrally via the point "Licenses" within the central customer management (ZKM)
Depending on the administration tool installed on your server, a suitable license key will be displayed here.
If the server has been reassigned or the administration tool has been changed, it may have to be created beforehand via the button "Generate Key".
Author: Wolfram Heinen
Last update: 01.04.2021 10:22
Our rescue system is similar to the system you might know from the SuSE / Debian installation CDs. Here you have basic Linux commands at your disposal.
You can start the rescue mode via the central customer management (ZKM).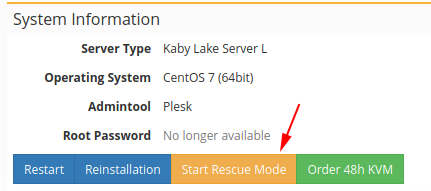
After that, your server restarts and boots the rescue mode over the network.
If the rescue mode was started successfully, a password is displayed.
With this password you can connect to your server and the started rescue mode via SSH.
More information on how to connect via SSH can be found here.
Author: Bettina Brauer
Last update: 12.07.2021 08:23
To perform a file system check, please proceed as follows:
fdisk -l
Disk /dev/sda: 15 heads, 57 sectors, 790 cylinders
Units = cylinders of 855 * 512 bytes
Device Boot Begin Start End Blocks Id System
/dev/sda1 1 1 24 10231+ 82 Linux swap
/dev/sda2 25 25 48 10260 83 Linux native
fsck -y /dev/sda2
Author: Bettina Brauer
Last update: 01.04.2021 09:48
If you want to run programs from the hard disk within the rescue environment, you must chroot the disk in addition to mounting it. This procedure only works with Linux systems.
The procedure is as follows:
Befehl: mount /dev/sda2 /mntBefehl: mount -t proc proc /mnt/proc && mount -obind /dev /mnt/devBefehl: chroot /mnt/ /bin/bashexitBefehl: umount /mnt/proc && umount /mnt/devBefehl: umount /mntAuthor: Bettina Brauer
Last update: 01.04.2021 10:01
This article describes how to mount the iSCSI storage of a moonshot in rescue mode.
Note: Information about IP, user name as well as password of the iSCSI storage, can be found in the ZKM under the item "Network hard disk".
auto eth0:0
iface eth0:0 inet static
address
netmask 255.255.252.0
ifup eth0:0
apt-get install open-iscsi -y
The following entries are checked in the file:
node.startup = automatic
node.session.auth.authmethod = CHAP
node.session.auth.username =
node.session.auth.password =
ping -c 3
/etc/init.d/open-iscsi restart
iscsiadm -m discovery -t sendtargets -p
iscsiadm -m node --login
You should now be able to see the storage with fdisk -l .
mount /dev/sdb1 /storage
If no sda was displayed with "fdisk -l", the specification in the mount command is not "sdb1" but "sda1".
Author: Bettina Brauer
Last update: 28.06.2021 04:35
If you have forgotten or lost your root password and want to reset it via the Rescue System, please follow these instructions:
1.) Start your server in Rescue Mode and go to the Dedicated Server Management. There you trigger the function "Start rescue mode". After the rescue system has been started successfully, the root password for the rescue mode is displayed at this point in the central customer management (ZKM). You can find more informations about "How to start the rescue mode" here.
2.) Use this password to establish an SSH connection with the Rescue System (under Windows you can use the client "Putty").
3.) Once you are connected via SSH, enter one of the following commands to find out your root partition (the largest partition is usually the desired root partition):fdisk -l
orparted -l
Once you have identified the system partition, mount it:
Without software RAID (/dev/sda1 may vary):mount /dev/sda1 /mnt
With software RAID (/dev/md0 may vary):mount /dev/md0 /mnt
4) Now that you have mounted your disk, mount "procfs" and "devfs":
mount -o bind /dev /mnt/dev


mount -t proc /proc /mnt/proc
5.) Use the "chroot" command to enter your system and change the password:chroot /mnt /bin/bash
6.) Now you should be in your system. Now you can change the password with passwd:
passwd
Note: You will now be asked 2 times to enter the new password, while entering the password Linux typically nothing is displayed
7.) Now that the password has been successfully changed, remove the mounted disks and exit your system with the command:
exit
Return to the root directory with:cd /
Now remove the included directories one by one again:umount /mnt/proc
umount /mnt/dev
umount /mnt
8.) Now reset the rescue mode in the central customer management (ZKM) and restart the system with reboot.
9.) You can now use the newly set password to log in via SSH.
Author: Bettina Brauer
Last update: 01.04.2021 10:16
The Rescue Mode was started before. More information about starting the Rescue Mode can be found here.
Note: Hard disks are not automatically mounted in rescue mode. To access the data on the hard disks, they must be mounted beforehand.
With the command "fdisk -l" you can display the hard disks available in the system and their partitions. The output probably varies with your server to our example, depending on the installed hard disks and their number. In our example, two hard disks are installed in the system.
fdisk -l

Disk /dev/sda: 15 heads, 57 sectors, 790 cylinders
Units = cylinders of 855 * 512 bytes

Device    Boot Begin Start End Blocks Id System
/dev/sda1   1    1     24  10231+     82 Linux swap
/dev/sda2  25    25    48  10260      83 Linux native

Disk /dev/sdb: 15 heads, 57 sectors, 790 cylinders
Units = cylinders of 885 * 512 bytes

Device    Boot Begin Start End Blocks Id System
/dev/sdb1   1    1     48  10260      83 Linux native
You can see here that two hard drives are installed:
/dev/sda -> first hard disk in the system
/dev/sda1 and /dev/sda2 -> two partitions
/dev/sdb -> second hard disk in the system
/dev/sdb1 -> Partition
In addition, the "System" item shows what type the partition is.
Linux Swap
Linux swap refers to the swap partition in which the operating system can swap data.
Linux nativ / Linux
These partitions usually contain a Linux file system with data that can be mounted.
Linux raid federation
These partitions are part of a Raid network. This will be discussed in more detail below.
To mount a partition, the command "mount" is used: (In the example the partition /dev/sda2 is mounted Linux native).
mount /dev/sda2 /mnt
Here the partition is now mounted in the directory /mnt. Afterwards you can change into the directory and display data, as well as copy.
The procedure for mounting the hard disks differs for a raid group.
The command "fdisk -l" reads out the hard disks and their partitions: (Raid 1 from two hard disks)
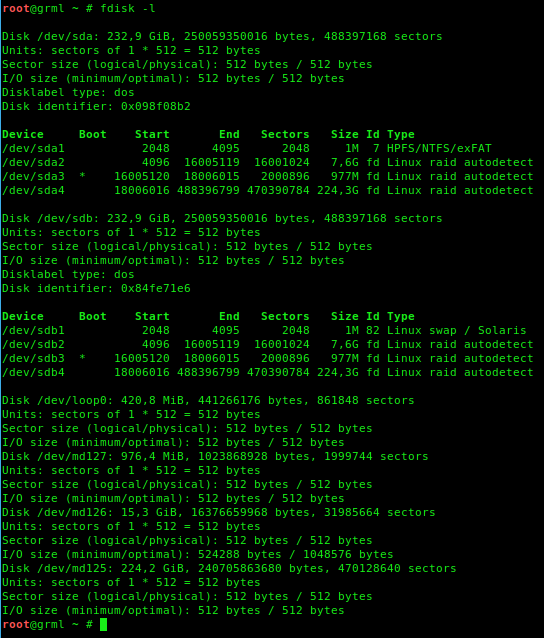
Both hard disks /dev/sda and /dev/sdb, as well as their partitions are now visible here.
Now the raid must be reassembled with, for example, the following command mdadm --assemble --scan .
After entering the command, you should see the raid sets listed.
/dev/md127
/dev/md126
/dev/md125
Here we are dealing with the raid partitions. Since /dev/md125 is the largest raid in the array and most likely contains the data, this is mounted to /mnt :
mount /dev/md125 /mnt
The contents of the hard disk are then accessible under /mnt. You can now perform work on the system or make a backup via SCP.
Please note that the rescue system remains active until you deactivate it in the customer interface and restart the server.
Author: Bettina Brauer
Last update: 10.01.2024 14:18
If a hard disk in a Raid network has failed, this can be remedied by means of the command:
cat /proc/mdstat
An example output in which the hard disk sdb (second hard disk in the system) has failed looks as follows:
cat /proc/mdstat
Personalities : [raid1]

md125 : active raid1 sda3[0] sdb3 [1](F)
        1073740664 blocks super 1.2 [2/1] [U_]

md126 : active raid1 sda5[0] sdb5[1](F)
        524276 blocks super 1.2 [2/1] [U_]

md127 : active raid1 sda4[0] sdb4[1](F)
        33553336 blocks super 1.2 [2/1] [U_]
As soon as the defective hard disk has been replaced by our support, the Raid must be restored.
To do this, the first step is to copy the partitions from the non-defective hard disk (sda in the example).
sfdisk -d /dev/sda | sfdisk /dev/sdb
You can use the following command to check whether the partitions have been created on sdb:
fdisk -l
Disk /dev/sdb: 1,8 TiB, 2000398934016 bytes, 3907029168 sectors
Units: sectors of 1 * 512 = 512 bytes
Sector size (logical/physical): 512 bytes / 4096 bytes
I/O size (minimum/optimal): 4096 bytes / 4096 bytes
Disklabel type: gpt
Disk identifier: A0FA7428-8E95-4683-AF1E-D6E8B75D1619

Device Start End Sectors Size Type
/dev/sdb1 2048 4095 2048 1M BIOS boot
/dev/sdb2 4096 1003519 999424 488M EFI System
/dev/sdb3 1003520 17004543 16001024 7,6G Linux RAID
/dev/sdb4 17004544 19005439 2000896 977M Linux RAID
/dev/sdb5 19005440 3907028991 3888023552 1,8T Linux RAID

Disk /dev/sda: 1,8 TiB, 2000398934016 bytes, 3907029168 sectors
Units: sectors of 1 * 512 = 512 bytes
Sector size (logical/physical): 512 bytes / 4096 bytes
I/O size (minimum/optimal): 4096 bytes / 4096 bytes
Disklabel type: gpt
Disk identifier: 319B1206-243C-4DE8-9D01-C96448249BD9

Device Start End Sectors Size Type
/dev/sda1 2048 4095 2048 1M BIOS boot
/dev/sda2 4096 1003519 999424 488M EFI System
/dev/sda3 1003520 17004543 16001024 7,6G Linux RAID
/dev/sda4 17004544 19005439 2000896 977M Linux RAID
/dev/sda5 19005440 3907028991 3888023552 1,8T Linux RAID
Once the partitions have been created, the individual partitions can be added back to the raid group. This is done for each partition individually. In our example we have 3 partitions in the raid group.
mdadm --manage /dev/md125 --add /dev/sdb3
mdadm --manage /dev/md126 --add /dev/sdb5
mdadm --manage /dev/md127 --add /dev/sdb4
Now the raid is synchronised. You can monitor / view the sync process using the following command:
cat /proc/mdstat
An example output of a synchronisation looks like this:
Personalities : [linear] [multipath] [raid0] [raid1] [raid5] [raid4] [raid6] [raid10]
md125 : active raid1 sda3[0] sdb3[1]
        24418688 blocks [2/1] [U_]
        [=>...................] recovery = 9.9% (2423168/24418688) finish=2.8min speed=127535K/sec
During an installation via our installation system, the swap partition is created as Raid-0, even if Raid-1 was selected during the installation. If a hard disk fails, the Raid-0 is no longer repairable. In this case, Raid-0 must be deleted and then rebuilt.
In the following example, the hard disk "/dev/sda" has failed. The raid is named "md0". Please note that the names may differ from your system and use the correct name from your system here.
To remove a raid, the corresponding hard disk/partition must not be mounted. This is unmounted in the first step.
umount -l /dev/sda2
Now the Raid-0 is stopped.
mdadm --stop /dev/md0
mdadm: stopped /dev/md0 -> Das Raid wurde erfolgreich gestoppt.
Now the superblock of the hard disk must be removed. The superblock defines the hard disks or partitions as a raid device.
mdadm --zero-superblock /dev/sda2
Finally, a new Raid-0 is created.
mdadm --create /dev/md0 --level=0 --raid-devices=2 /dev/sda2 /dev/sdb2
The first step is to set up a chroot environment. For this, the corresponding partitions must be mounted. Here, md126 is the largest raid, which most likely contains the data. This is now mounted to /mnt:
mount /dev/md126 /mnt
Now the Proc and Dev file systems are mounted:
mount -t proc proc /mnt/proc
mount -obind /dev /mnt/dev
Now the chroot environment can be started:
chroot /mnt /bin/bash
Now we first regenerate the device map at Grub2:
grub-mkdevicemap -n
Grub2 can then be repaired using the following command:
grub-install /dev/sdb
Author: Bettina Brauer
Last update: 22.04.2021 06:41
A high frequent reason of data loss is, that your drive is producing more and more errors, but noone recognizes it until the drive fails. In the most cases it's too late for a backup, because of this we suggest to perform checks of your drive regularly. To check your drives, please set your server to the rescue mode. You can find this option in the central customer management under "Root-Server Functions".
Start the rescue mode (this can take a few minutes) and connect to your server via SSH. The password for the rescue mode can be viewed in the central customer management.
If your connection was established successful, view your drives:
fdisk -l
The output should create lines like this (The values are depending on the drive)
/dev/sda: 500.1 GByte, 500107862016 Byte
To perform a chekc of this drive please type this to your shell:
smartctl -s on -t short -a /dev/sda
After typing this line the output will tell you when the test is finished. Instead of „-t short“ you can use „-t long“ - this check is more accurate, but takes much more time to proceed. To see the values of the check after it is finished, type:
smartctl -a /dev/sda
Repeat this for all drives that were shown by fdisk.
If one of this values is CRITICAL / FAIL , please contact the support and paste the output to the ticket.
Author: Bettina Brauer
Last update: 01.04.2021 08:53
The second hard disk is only used for an installation with RAID. If you have ordered an installation without RAID, the second hard disk is not used. If you want to use it, you have to partition, format and integrate the hard disk into your system.
Partitioning the hard disk
fdisk /dev/sdb
within the command interface press the following keys:
create a new partition Key n
Partition number Key 1
Accept default of start cylinder Return
Accept default of the end cylinder Return
Write partitoning Key w
after successful partitioning the hard disk must be formatted
mkfs.ext4 /dev/sdb1
Now only the mount point of the hard disk (the directory where it should be accessible) has to be added to /etc/fstab. Please note that the directory must exist before. The entry could look like this:
/dev/sdb1 /second hard disk ext4 acl,user_xattr 1 2
Under Windows, you can partition and format using the dot:
Start => Administrative Tools => Computer Management => Disk Managment.
There you can select the Unallocated storage with a right click and create a simple volume.
Author: Bettina Brauer
Last update: 01.04.2021 08:54
If a hardware defect is detected in our dedicated servers, our technicians replace the defective hardware with other hardware free of charge within a very short time.
If a hardware defect is not detected by our pro-active monitoring, please inform us via the ticket system in Central Customer Management (ZKM) or send an e-mail directly to support@myloc.de
If you have already found the problem (e.g. a defective hard disk), please send us as much information as possible directly. For example, the following information would be important for us in case of a hard disk replacement and can significantly shorten the replacement time per ticket:
You will always be informed by our technicians about the complete process.
Author: Bettina Brauer
Last update: 01.04.2021 09:02
A server failure can have various causes.
First of all, you should try to restart your server via the central customer management (ZKM). If your server cannot be reached within 30 minutes after the reset order, it can be assumed that there is a permanent problem.
Please try to boot the server into the rescue system, mount the hard disk(s) and check the logs there.
Should this not be possible or not be successful, please inform us about the ticket system so that we can take a look at the case.
Author: Bettina Brauer
Last update: 01.04.2021 09:03
For a productive server it is senseful if you should always be aware of the health of your hard drives. On Linux you can configure Smartmontools to send you an e-mail if a drive error occurs.
You will have to write the following line to the configuration file /etc/smartd.conf , replace your@mail.adr with your e-mail address:
DEVICESCAN -H -l selftest -m your@mail.adrAfter this, restart Smartmontools:
/etc/init.d/smartmontools restartImportant! It is necessary that a mail server is configured to send outgoing mails. If there is no mail server or it is not correctly configured, you won't receive any mail.
Author: Bettina Brauer
Last update: 01.04.2021 09:04
The myLoc managed IT AG also offer other domains beside the usual domains .com, .net, .org, .info and .de. For example, other domains like .asia, .uk, .co.uk, .tv, .eu and by far more can always be booked via the myLoc Customer Control Panel.
You can find a overview with the most used domains here.
Author: Bettina Brauer
Last update: 01.04.2021 07:51
In case that you need more domains for you hosting project, you are able to order these over the myLoc Customer Control Panel (ZKM). Therefore you only need to click under the category "Domains" on "Register New Domain" to start with the registration.
Author: Bettina Brauer
Last update: 01.04.2021 07:54
A domain is resolved into an IP address using the Domain Name System (DNS). The principle can be compared to a phonebook in which names of persons can be resolved into telephone numbers.
The Domain Name System made sense with the growing number of IP addresses, as it is easier to remember a name than a combination of numbers. The principle still proves to be useful, as the IP version 6 has an even larger address range.
Basically, you establish a connection to a server via IP, which is why a query to a name server must be started before each request for a name (domain).
An example:
You enter the page www.google.com via your browser. In this scenario, the following happens:
Conclusion
Communication on the Internet takes place via IP. The Domain Name System makes it easier to remember IP addresses.
There are a number of different information that can be entered in the DNS. The most common are:
A-Record
Dieser Eintrag löst einen Namen in eine IPv4 Adresse auf.
(e.g. www.google.de → 123.123.123.123)
AAAA-Record
This entry resolves a name to an IPv6 address.
(e.g. www.google.de → ab:9eff:c532:7:ab:9eff:c532:7)
CNAME-Record
This entry resolves to another domain name. This is to be understood as a kind of "forwarding". Which IP resolves depends on the entry for the domain being resolved. (e.g., other-page.google.com → www.google.com)
MX-Record
This entry indicates which e-mail server is responsible for the e-mails of this domain. By priority, backup mail servers can be configured. The mail server with the highest priority (smaller number) will be dialed first. If this is not available, the server with the second highest priority is selected, etc.
Author: Bettina Brauer
Last update: 01.04.2021 07:56
Yes, this is correct if you have started a transfer for a .com, .net, .org, .info or .biz domain.
You must confirm this e-mail from InternetX in order to transfer your domain to us.
This email is always sent to the admin-C of the domain to be transferred. Please make sure that this email address is reachable and that the email is confirmed before starting the transfer. Otherwise the transfer will not work.
Author: Bettina Brauer
Last update: 01.04.2021 07:58
Yes, this is easily possible. Our Domain-Robot allows you to enter all contact details of the domain yourself.
As Admin-C the contact data of the administrator (usually you) must be deposited.
Author: Bettina Brauer
Last update: 01.04.2021 07:59
To transfer a domain to a new provider please first select the Domain Overview within ZKM. Select the transfer icon for the Domain you want to transfer. On the following page, click on the Domain zum Transfer freigeben button. The auth-code which you need to transfer the domain to your new provider will be generated automatically.
Author: Bettina Brauer
Last update: 01.04.2021 08:01
You can enter, change and manage DNS entries via our central customer management (ZKM) under the menu item "Domains" > "DNS System" > "Edit Zone".
Please note that you can only edit entries (zones) for domains that are managed by our system.
Author: Bettina Brauer
Last update: 01.04.2021 08:11
You have the possibility to transfer a domain from your old provider to us via the ZKM - for this you need an Auth-Code from your old provider.
As soon as you have this code, you can start a "Domain-Transfer In" in the ZKM under "Domain Overview" > "Register New Domain" > There you will ask for the auth-code from your domain.
Please note that you must create a handle for the domain before you transfer it.
Author: Bettina Brauer
Last update: 01.04.2021 08:08
You can create an SRV entry within our central customer management (ZKM) interface by clicking on the DNS system setup.
The SRV entry is structured as follows:
Host:
_Dienst._Protokoll.Domain
The host entry consists of the offerd service, the protocol used usually _tcp and the domain name from the offered services.
Example: _http._tcp.example.com
TTL Time to live Default value here is 300
TYPE SRV
Prefence leave blank
Data Priority weight Port Domain
The priority weight is used for load balancing when multiple services will be operated with the same priority.
The port is the destination port on the host.
Domain is the name of the destination domain.
Example:
10 8080 proxy.example.com now everything coherent
| Host | TTL | Type | Preference | Data |
| _http._tcp.beispiel.de | 300 | SRV | 10 8080 proxy.beispiel.de |
Additional information an be found at: http://www.zytrax.com/books/dns/ch8/srv.html
Author: Bettina Brauer
Last update: 01.04.2021 08:11
To offer HTTPS pages on your server you need an SSL certificate.
Since this certificate is usually bound to a separate IP address and a (sub)domain name, you need a separate IP address for each (sub)domain to be secured. The basis for creating a certificate is a Certificate Signing Request (CSR). You must create this on your server. Confixx from version 3.1.2 and Plesk offer their own functions for creating the request. However, you can also create the request manually:
To create a key pair consisting of a private key and a public certification request (CSR), enter the following command: (Linux systems)
openssl req -new -nodes -newkey rsa:2048 -keyout filename.key -out filename.csr
It is advisable to select the file name in such a way that you can assign it uniquely to the page later. We therefore recommend the use of the domain to be certified by replacing the dots with underscores as file names, for example www_example_net.key or www_example_net.csr.
The command creates two files. The file with the extension key contains the private key, so do not pass this file on to third parties. Please make a backup of your private key in any case, as there is no possibility of recovery after a loss. The private key serves as the basis for the certificate request (CSR) and is therefore also the basis for the certificate.
When creating the CSR, you will be asked for some details that will be included next to the public key in the CSR and make it unique. Some fields have a default value, to accept it simply press Enter, if you want to leave the field blank enter a dot (.).
Country Name (2 letter code) : DE
enter your country code here
State or Province Name (full name) Hesse
enter your state here
Locality Name (eg, city) <>: Fulda
enter your location here
Organization Name (eg, company) MyCompany
here you enter your company name / organisation name / first and last name, whichever is most appropriate for you
Organizational Unit Name (eg, section) <>: IT
here you can enter a department, but this field can also remain empty
Common Name (eg, YOUR name) <>: www.domain.de
here you enter the site to be secured, the information must contain a complete domain name, so if you want to use https://www.domain.de/... protect, enter www.domain.de, domain.de is not sufficient here, this only protects https://domain.de/. Files and subdirectories, on the other hand, are always included.
E-mail Address <>: info@domain.de
enter your e-mail address here. If necessary you will be asked for the following 'extra' information
A challenge password <>:
An optional company name <>:
please always leave this empty.
Your CSR will now be created. Then open the file filename.csr in a text editor and copy the content into a ticket with the request for a certificate.
We will sign the request as soon as possible and send you the finished certificate.
Please note that the e-mail address admin@<Domainname> must be available to check the accessibility of the domain name. <domain name> corresponds to the domain for which you have ordered the certificate. At this address you will first receive an e-mail in which you have to confirm the order of the certificate and then the created certificate will be sent to this address.
Please also make sure that the public key of your certificate has a key length of at least 2048 bit, otherwise we cannot sign the request.
Author: Bettina Brauer
Last update: 01.04.2021 08:13
an SPF record is always created as a TXT record. The record usually has the following form:
meinedomain.de. IN TXT "v=spf1 +a +mx +a:mail.mydomain.de -all"
In the DNS system, the domain name is entered in the Host field and the TXT record as above is entered in the Data field.
Author: Bettina Brauer
Last update: 09.04.2021 05:17
You can manage the reverse DNS (RDNS) entries of your server via the RDNS management in the central customer management (ZKM).
There you can set a separate value for each IP.
***Please note that this IP must be written out in full and an abbreviation ("::") will not work.***
Author: Bettina Brauer
Last update: 09.04.2021 05:21
We only go into the requirements of the Denic (.de domains) here. If there are other requirements for other Top Level Domains, we will continue this articel if necessary.
To set up a nameserver you need 2 nameservers with 2 different IP's.
What is not allowed?
- To register the nameservers, not only one IPv4 address may be entered twice
- There must be at least 1 IPv4 address, therefore 2 IPv6 addresses are not allowed
What is allowed?
- You don't have to use 2 IPv4 addresses, you may also use 1 IPv4 + 1 IPv6
- 2 IPv4 addresses are allowed, IPv6 is not a requirement
- It's possible, if you want to use only one nameserver, to store it with 2 IP addresses, with 2 different names like ns1.xyz.de and ns2.xyz.de (if it makes no more sense to use 2 name servers, so that the name resolution of the domain remains redundant, you have to decide for yourself)
Author: Bettina Brauer
Last update: 01.04.2021 08:19
To use your own domain on a server rented by us, you don't need our nameservers.
To set up the domain on the server, you have to change the "A-Record" in the DNS zone of the domain and if necessary the "MX-Record" to the IP of the rented server.
The MX-record may also be the domain itself, e.g. xyz.de (without IP of the server), for this the mail server would have to run on the same server accordingly.
Some domain providers don't provide you to access the DNS zone, in this case you should contact the support of the domain provider.
If it is not possible to change the IP, you can either move your domain to us or host your own name servers on the server (free of charge). Prerequisites for your own nameserver can be found in our FAQ, in this article.
After you have changed the A-record to the IP of the server, you can set up the web server (e.g. Apache2) on your server or the domain via the admin tool (e.g. Plesk or cPanel) accordingly.
Author: Bettina Brauer
Last update: 01.04.2021 08:48
In principle, this is possible if the domain was registered through us, is located with us and supports the entry in question.
To do this, you must create a ticket in the Central Customer Management (ZKM) at the point "Support" and send us the following information:
Domain
DS Entry
Flags (256 or 257)
Public key (base64)
Algorithm
Keytag
Digest Type
Digest
As soon as the entry has been set, you will receive feedback from us.
Author: Denis Kastner
Last update: 20.04.2023 15:30
If you have forgotten your password for the central customer management (ZKM) and the stored e-mail address is no longer valid, you must contact our support. This will then carry out with you a verification of your data so that our support can provide a new e-mail address. You will then receive a new password to this e-mail address. Please contact info@myloc.de
Author: Bettina Brauer
Last update: 01.04.2021 06:38
There are various reasons why your server might have been disabled, in any way we will always send you a notification before taking any action and advise on how to resolve the issue. Possible reasons for server disconnections might be legal matters, abuse cases or outstanding accounts.
If your server has been blocked and you are unaware of the reasons, please contact our Support Team at support@myloc.de , open a ticket through your customer control panel.
Author: Bettina Brauer
Last update: 01.04.2021 06:49
All our products contain a minimum contract term of 1 month. In addition, you are able to order our products at a contrct term of 3, 6, 12 or 24 months. Long term contracts are subject to additional discounts on the monthly server fee.
Author: Bettina Brauer
Last update: 01.04.2021 06:52
Yes of course. As an already existing customer you are able to order at our store easily.
Author: Bettina Brauer
Last update: 01.04.2021 06:53
You can change your address in our central customer management (ZKM) under the menu item "Personal Data". The change must then be confirmed by an employee before it is updated.
If you want to perform a change of contractual partner, you will find information in this regard in our FAQ entry "How can I transfer a contract to a third person?".
Author: Bettina Brauer
Last update: 01.04.2021 06:58
If both parties are already customers it is possible to move the contract between the accounts. Each party has to open a ticket and confirm the owner change. The contract id must be part of both tickets.
If the contract should be moved to a new customer, you have to fill out the draft and send it to:
+49 (0) 211 - 61 70 8 - 349
The transfer of the contract will be processed after acceptance by our billing & contract department.
Author: Bettina Brauer
Last update: 19.04.2023 10:50
You can change your bank details in our central customer management (ZKM) under the menu "Change Payment Method".
The change of information must then be confirmed by an employee before it is updated. The confirmation may take up to 2 working days. Please proceed with changes in a timely manner before receiving the next invoice.
Author: Bettina Brauer
Last update: 01.04.2021 07:01
We would appreciate it if you could let us know the reason for your cancellation.
Author: Bettina Brauer
Last update: 01.04.2021 07:03
The contract term is subject to the periods indicated. Contracts renew automatically - subject to agreement - to the minimum contract period unless either party terminates the contract in timely fashion.
A contract with a minimum contract term of one month can be at canceled atleast to the end of this month with a period of four weeks to the end of the contract. A contract with a minimum contract term of three months can be at canceled atleast to the end of three months with a period of four weeks to the end of the contract.
Contracts with a minimum term of three months renew for an additional three months, if not canceled in a timily fashion. A contract with a minimum term on at least twelve months may be canceled at the end of the twelfth month period within a period of three months to the end of the contract. A fixed-term contract with atleast twenty-four months can be canceled to the end of the twenty four months is to be canceled earlier or within a period of three months to the end of the contract period.
Contracts with a minimum term of twelve and twenty-four months get renewed for an addiotional twelve months if they were not canceled in a timely fashion. The right to terminate for cause shall remain unaffected. Ordered domains with us can be canceled to the next billing cycle with a period of four weeks to the end of the accounting period.
If you want to tranfer the canceled domain(s) to a new provider, you must transfer them in time to the new provider. If you do not want to take the domain you have to terminate the domain before the end of the paid period (CLOSE).
If neither one of the two steps are completed, you must obligated to pay for the additional annual fees until one of the two steps is successfully executed.
Author: Bettina Brauer
Last update: 01.04.2021 07:04
There are various reasons why your server might have been disabled, in any way we will always send you a notification before taking any action and advise on how to resolve the issue. Possible reasons for server disconnections might be legal matters, abuse cases or outstanding accounts.
If your server has been blocked and you are unaware of the reasons, please contact our Support Team at support@myloc.de , open a ticket through your customer control panel.
Author: Bettina Brauer
Last update: 01.04.2021 06:49
Currently we accept Paypal and SEPA payments. In the future, additional payment methods will be added. For further information, please contact us under billing@myloc.de.
Author: Bettina Brauer
Last update: 31.03.2021 15:19
There are two possibilities to receive a discount for offered products of myLoc managed IT AG.
1.) Select a long contract duration and secure up to 15% discount on the monthly fee
for your hosting server or cloud hosting product.
Or
2.) You beacome a reseller and sell the products on your behalf. Our reseller program can be found here: https://reseller.myloc.de/
Author: Bettina Brauer
Last update: 31.03.2021 15:34
No, the correction of invoices once issued is not possible for accounting reasons.
If we have charged you too much or too little, we will issue a corresponding credit note/invoice, which will then be sent to you separately.
Subsequent changes of address data are also not possible. Therefore, please make sure that the current data is always stored in your customer data.
Author: Bettina Brauer
Last update: 31.03.2021 15:37
If an invoice has been lost, you have the opportunity to download invoices through our central customer management (ZKM).
All invoices issued since contract start date can be found in your ZKM.
Author: Bettina Brauer
Last update: 31.03.2021 15:40
In the case of a debit note chargeback a 10,00 Euro processing fee will be charged.
The processing fee come from charges occured by reversal payments and chargeback fees from the bank. Please do not transfer the 10,00 Euro directly to our bank account. The fee will be added on to your next invoice.
You have 7 days, starting on the inital chargeback date, to transfer the relevant amount to our bank account stated as follows. Please not, servers will be deactivated due to unpaid invoices.
myLoc managed IT AG bank details :
Bank Stadtsparkasse Düsseldorf
SWIFT-BIC: DUSS DE DD
IBAN: DE90 3005 0110 0016 0360 89
Please enter your customer and invoice number before transfer.
Author: Bettina Brauer
Last update: 31.03.2021 15:41
When proceeding with a transfer, always enter your customer number and your invoice number. The relevant information can be found in your invoice.
Our bank details as follows:
Account Holder: myLoc managed IT AG
Bank: Stadtsparkasse Düsseldorf
SWIFT-BIC: DUSS DE DD
IBAN: DE90 3005 0110 0016 0360 89
Author: Bettina Brauer
Last update: 31.03.2021 15:43
Payment for our services is usually done, customers in Europe, by the direct debit method.
When entering a bank account during your order, you authorize us to have debit authorization for the specified bank.
Two to three days after the invoice has been issued, the corresponding amount will be debited from your account. The direct debit authorization expires with the termination of the contract.
If you don't have a European bank account, you can also proceed via credit card.
We accept VISA and MasterCard credit cards. In addition, we also offer payments via Instant Bank Transfer, Click and Buy PayPal oder Pay-Safe Card including Moneybrookers. Transaction fees apply to these payment methods.
All our payment options can be found here.
Author: Bettina Brauer
Last update: 31.03.2021 15:44
Your invoice will be sent via email as a PDF document to the email address entered. This PDF document should be printed for the internal revenue office and filed for your records.
If you have a seperate email address where the invoices should be sent to, you can enter the email address in our central customer management (ZKM) under the menu item "Personal Information".
In addition, you have the option to review all of your invoices in our ZKM under the menu item "Invoice Overview".
Author: Bettina Brauer
Last update: 31.03.2021 15:45
If you have questions about invoices or debit charges, you can proceed contacting the accounting department via E-Mail or through our Ticketsystem in our central customer management (ZKM).
Author: Bettina Brauer
Last update: 31.03.2021 15:46
If you own your own busniess abroad and you have a so-called UID number, you don't need to pay the German sales tax.
To ensure that no sales taxes are to be charged, you will need to notify us with the proper UID number before receiving the first invoice (billing@myloc.de).
A subsequent correction for invoices already issued is unfortunately not possible.
Author: Bettina Brauer
Last update: 31.03.2021 15:47
myLoc managed IT AG bank detailst:
Account holder: myLoc managed IT AG
Bank: Stadtsparkasse Düsseldorf
SWIFT-BIC: DUSS DE DD
IBAN: DE90 3005 0110 0016 0360 89
Please remember to enter your invoice and customer number when transferring.
Author: Bettina Brauer
Last update: 31.03.2021 15:48
The desired billing interval can be specified when ordering. Generaly, server and housing products are billed charged.
If you would like to change the billing interval, simply submit a ticket in our central customer management (ZKM).
Domains are billed 12 months in advanced.
Consumption-related costs (i.e. data transfer) will be billed later.
Author: Bettina Brauer
Last update: 31.03.2021 15:49
If you would like to request a change to the first and last name or the company details, we need a written agreement to proceed with this. The form and the necessary information can be found in your central customer management under the menu item "FAQ" -> "How can I transfer a contract to a third person?“?
To add a company we ask you to contact the support via our ticket system. Please use the category „contract- & accounting question“ and attach a business certificate of registration as pdf format.
If you have further questions you can contact us via the ticketsystem or or per telephone during our work hours.
Author: Bettina Brauer
Last update: 31.03.2021 15:51
An optimized protection of a server also includes the change of the standard SSH port of a server. This change is the first step to prevent unauthorized access to your server.
To change the SSH port, please make the following changes to the system:
Open SSH configuration:
root@server:~# nano /etc/ssh/sshd_config
Change the corresponding line (replace port if necessary):
# What ports, IPs and protocols we listen for

	Port 11111
Then restart the SSH server:
root@server:~# /etc/init.d/ssh restart
Now a connection to the standard port should no longer be possible the next time you log on to the system.
To connect to the server, the port must be specified. Under Putty this can be done via the field "Port". On Linux / Mac systems the specification is as follows (or comparable):
linux@home:~# ssh root@server -p11111
(Instead of 11111, enter the SSH port that has been changed at will.)
Author: Bettina Brauer
Last update: 15.04.2021 09:00
The many access attempts indicate that someone wants to gain unauthorized access to your system. On the one hand, it makes sense to change the default port of the SSH server, for this you can also find a FAQ entry in our system.
In addition to the port change you have the possibility to install a program which works in cooperation with "iptables" and keeps unwanted guests away.
The tool fail2ban notices unauthorized access attempts and blocks the connections from the attacking IP using added rules in iptables.
The installation of fail2ban does not require any further configuration and is ready to use. Under Debain / Ubuntu it runs as follows:
root@server:~# apt-get install fail2ban
For other operating systems, use the system's package manager. fail2ban is now preconfigured for incoming SSH connections.
Author: Bettina Brauer
Last update: 01.04.2021 06:20
Author: Bettina Brauer
Last update: 01.04.2021 06:25
This question is very difficult to answer. In extreme cases this is not recognizable at all or only with special analysis tools.
Unusual behavior of your server can be a sign, but it does not have to be. An increase in the amount of undeliverable emails sent back can be an indication that your server is being misused to send spam emails. The same phenomenon occurs, however, when someone uses the server address as the sender address to outwit an existence check of the sender domain. In the latter case, your server has nothing to do with the sending, but receives all emails returned as undeliverable.
A sure sign that an unauthorized person has tampered with your server is always the disappearance of log files or the modification of data.
If you suspect that an intruder has tampered with your system, checking the log files or using a test program usually helps. These programs usually search for so-called rootkits You can find more information on this at http://de.wikipedia.org/wiki/Rootkit.
The proven testing tools are Windows Blacklight (available at: http://www.f-secure.com/blacklight) and Linux checkrootkit (available at: http://www.chkrootkit.org).
A well-maintained list of current security vulnerabilities can be found at http://www.securityfocus.com/ under Bugtraq. If you want general information about computer security, we recommend the BSI Grundschutzhandbuch, which you can download free of charge at https://www.bsi.bund.de/DE/Themen/ITGrundschutz/itgrundschutz_node.html.
Author: Bettina Brauer
Last update: 01.04.2021 06:28
To say exactly how the intruder compromised your server is difficult. Usually this happens through security holes in programs or vulnerabilities in the programming of websites. You can investigate whether the programs you use are affected by such vulnerabilities, for example, in the Bugtraq on the page: http://www.securityfocus.com/ .
Please also note that the intruder can also penetrate via malware that you have unknowingly installed on the server or on your home computer. You should therefore first scan your private computer for possible viruses or Trojans.
If you find what you are looking for here, we recommend that you first reinstall this computer and change all the passwords you use (email, websites, server access, home banking, etc.).
Afterwards you should check your server for intrusion (if necessary via the rescue system).
Please also note that we always recommend a new installation for every hacked system, as it is never possible to say with certainty whether the intruder has not installed a back door to be able to take over the system again quickly.
To operate the Rescue System, please refer to the articles in our FAQ under Rescue System.
Author: Bettina Brauer
Last update: 01.04.2021 06:29
In case that from one of our rented server spam were sent, DDoS attacks caused or illegal content hosted, please contact abuse@myloc.de with an detailled description.
Author: Bettina Brauer
Last update: 01.04.2021 06:33
You can choose Proxmox as admin tool via our installation system for Debian installation or you can use the Proxmox ISO image in conjunction with an IPMI / ILO which you can download at https://www.proxmox.com
Author: Bettina Brauer
Last update: 01.04.2021 11:14
This article describes how to set up IPv6 on Proxmox.
Edit the /etc/network/interfaces file and add your IPv6 configuration.
iface vmbr0 inet6 static
address IPv6_Addresse
netmask 64
up ip -6 route add IPv6_Gateway dev vmbr0
up ip -6 route add default via IPv6_Gateway dev vmbr0
down ip -6 route del default via IPv6_Gateway dev vmbr0
down ip -6 route del IPv6_Gateway dev vmbr0
if you have done that, save the file.
and as next step edit the /etc/hosts file, and add your IP and the FQDN.
IPv6_Addresse FQDN Hostname
(Example "2001:4ba0:ffa4:1:beef::1 mail.domain.tld mail")
if this is entered correctly, save the file.
Open the /etc/resov.conf file and add the IPv6 name servers there.
nameserver 2001:4860:4860::8888
nameserver 2001:4860:4860::8844
Run the following command to edit the sysctl.conf file:
sysctl -w net.ipv6.conf.all.forwarding=1
Once everything is complete and successfully set up, reboot your system. IPv6 should now be working.
Author: Bettina Brauer
Last update: 21.05.2021 03:16
Note: For information about the gateway, netmask, and IP address, see your customer account.
A bridge is created in Proxmox to make the VMs on the host system accessible via an additional IP.
The network configuration for a VM on the host system is described here.
There are 2 ways to create a bridge in Proxmox:
1) Log in to your server via SSH.
2) Check which network interface is used. To do this, execute the command "ip r s | grep default".
ip r s | grep default
default via 192.168.178.1 dev eth0 proto static metric 100
eth0 -> the network interface used. The main IP of your server is also configured here.
3) Now the bridge is created via the file /etc/network/interfaces . The network configuration looks like this:
--- /etc/network/interfaces ---

auto lo
iface lo inet loopback

iface eth0 inet manual


auto vmbr0
iface vmbr0 inet static
        address <Main IPv4 of your server>
        netmask 255.255.255.255
        gateway <Gateway of the main IP of your server>
        bridge_ports eth0
        bridge_stp off
        bridge_fd 0
***Important***
Please note that you replace "eth0" in the example configuration with your previously queried network interface, otherwise you will lock yourself out of your system. Also the line "iface eth0 inet manual" (with your network interface) must be present, so that your server is accessible in the connection.
1) Open the Proxmox web interface: https://<Main-ipv4-IP>:8006/
2) Navigate on the left side to: datacenter -> "Your host system".
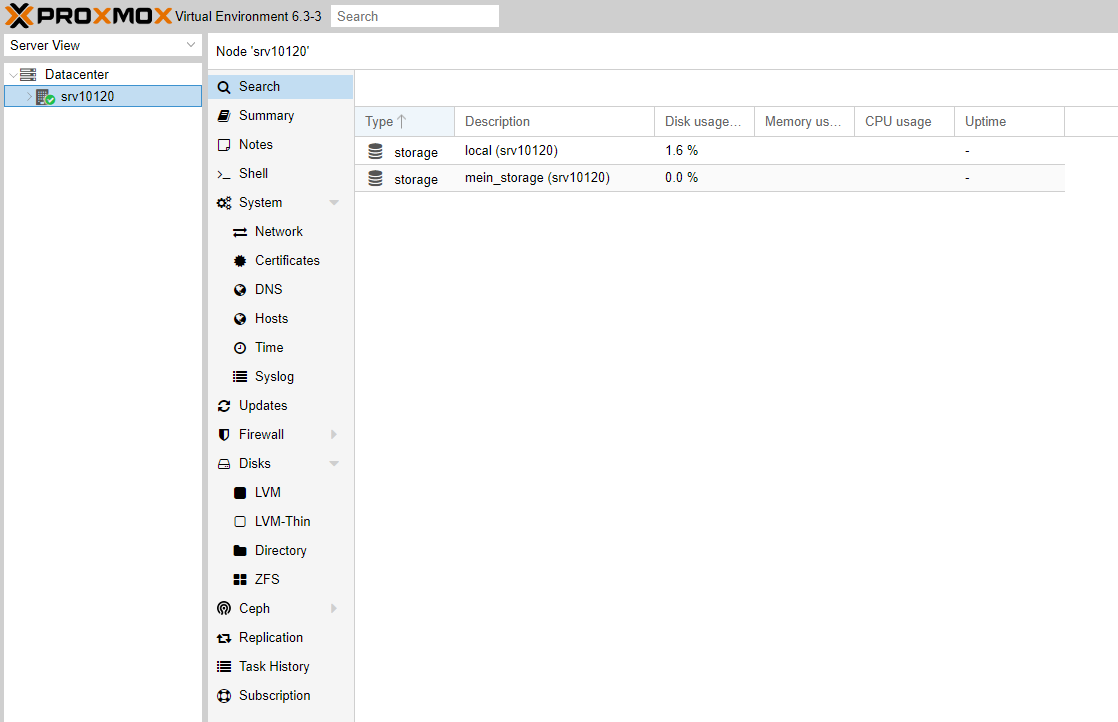
3) Now select "Network".
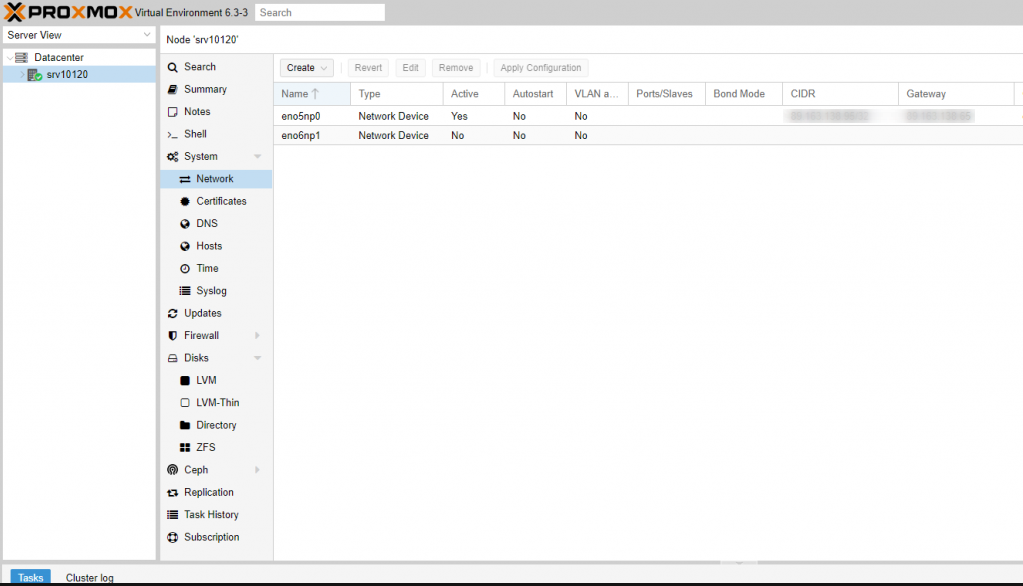
4) Now double-click on the network interface and delete all entries.
Do NOT save the change yet, because you would lock yourself out. Please follow the steps to the end.
5) Now the bridge is created. To do this, click on "Create" and select "Linux Bridge".
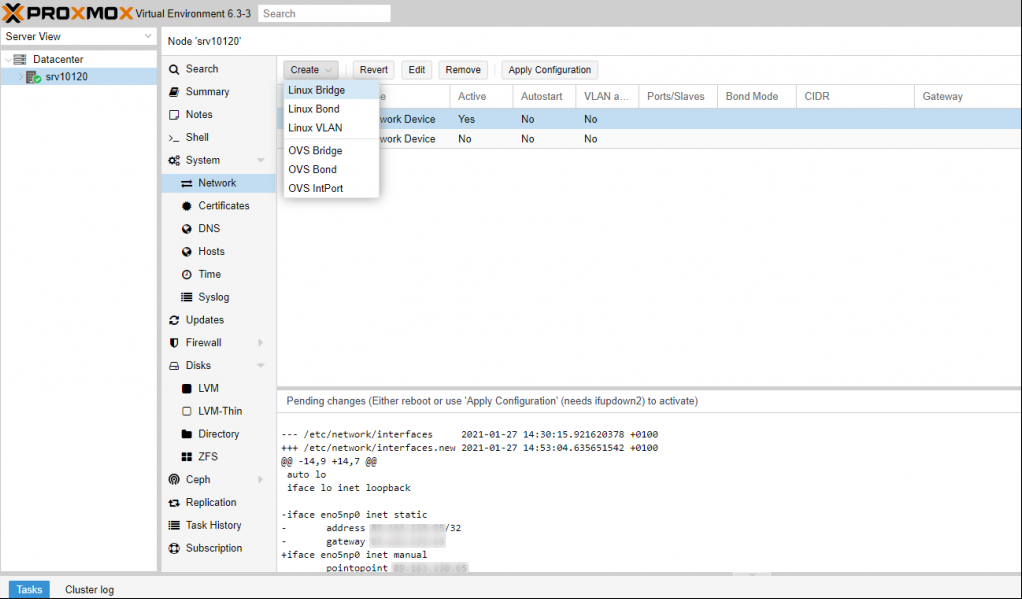
6) The following entries should be made there:
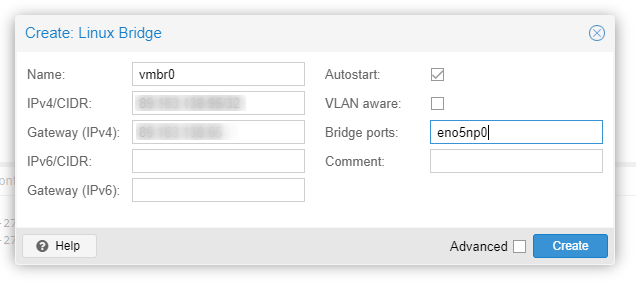
Name: vmbr0
IPv4/CIDR: Main-IP of the host system
Gateway (IPv4): Gateway of the host system
IPv6/CIDR: IPv6 Adresse of the host system
Gateway (IPv6): IPv6 Gateway of the host system
Autostart: enable
VLAN aware:
Bridge ports: Network interfaces of the host system
7) If you have now made all the settings and checked them again, restart the server via the "Restart" item at the top right of the screen.
The Server should be reachable now.
To make the Bridging setup to work, you need to change the routing of the additional ip you want to use in a virtual machine.
Go to the control center of your server in the customer panel and set the following setting for the correct additional ip:
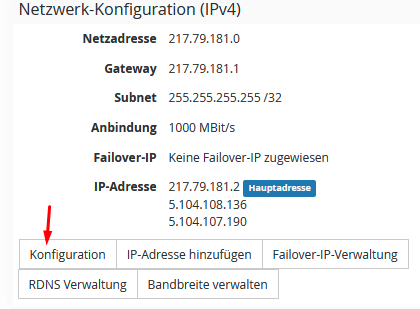
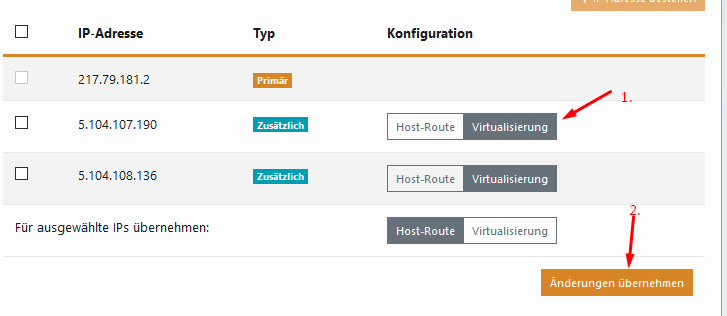
# The primary network interface
allow-hotplug ens18
iface ens18 inet static
address <additional IP>
netmask 255.255.255.255
up ip route add <host system gateway> dev ens18
up ip route add default via <gateway of host system>
down ip route del default
down ip route del <gateway of the host system>
Please make sure that you change the name of the interface ens18 to the interface name inside the virtual machine as well.
If you want to run VM's and CT's at the same time, change the following entry via SSH:
Datei: /etc/vz/vz.conf
Look for the following entry there:
NEIGHBOUR_DEVS=detect
and replace it with this
NEIGHBOUR_DEVS=all
Author: Bettina Brauer
Last update: 11.07.2023 14:49
Note: This article refers only to dedicated servers with a proxmox host system.
VM and CT are named vServer in the following.
There are two ways to set up Internet access on a VM or CT. Here, setting up an additional IP is the simplest and most recommended method.
To be able to set up an additional IP on the vServer, proceed as follows:
1.1. order additional IP
1.2. switch IP to virtualization
1.3. Setting up the additional IP on the vServer
You can order an additional IP address via the central customer management (CCM). To do this, navigate to "Dedicated Root Server".
Now select the corresponding server contract. You can now order additional IP addresses via the "Add IP address" button.
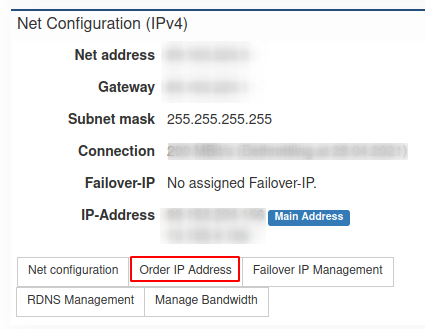
You can use the slider to set the number of IP addresses you need. You will be shown the price before ordering the IP addresses. Via the button "Order IP address" the additional IP addresses are ordered with costs.
Note: If you need more additional IP addresses than you can select, please contact support.

In order to be able to set up the additional IP on the vServer, this must be changed to "Virtualization" in the ZKM. To do this, navigate to the server contract and select the configuration of the IP addresses there via the "Configuration" button.
Now set the configuration of "Host route" to "Virtualization" for the additional IP address and save the setting via the "Apply changes" button.
Note: If the configuration is already set to virtualization, change this to host route, save the setting, and change the configuration back to virtualization.
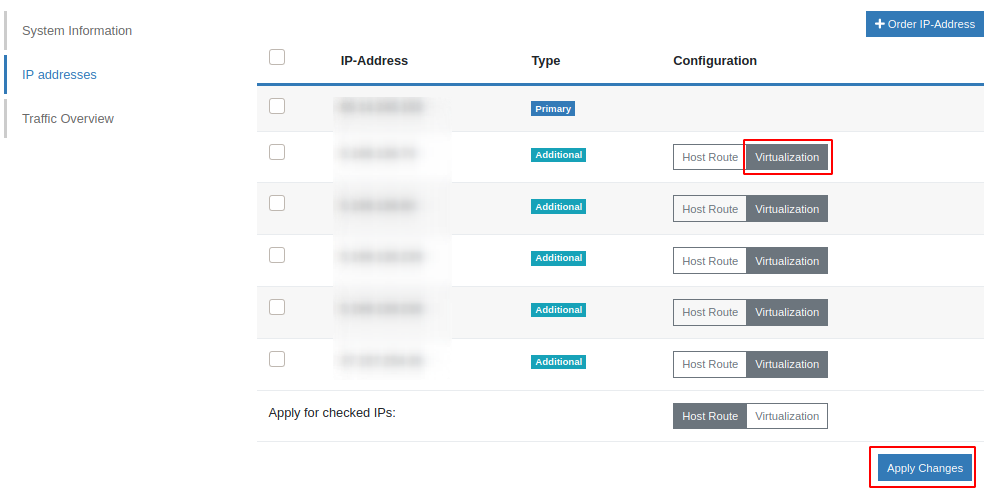
Important:
Please enter the correct network interface here. In the example, we use the network interface "eth0" here. The network interface of your server can be named differently.
The following settings are made directly in the vServer. Use the console via Proxmox to connect to the vServer.
The currently used default network interface can be read out with the following command:
ip r s | grep default
default via 192.168.178.1 dev eth0 proto static metric 100
eth0 -> network interface, this may vary with your server. Use your network interface in the following.
Now open the network configuration file. Usually this is stored under "/etc/network/interfaces". The network configuration must look like this:
auto eth0
iface eth0 inet static
   address <additional IP-Adresse>
   netmask 255.255.255.255
   gateway <Gateway of the host system>
   pointopoint <Gateway of the host system>
After the settings have been made, the network service is restarted.
service networking restart
Important:
Please enter the correct network interface here. In the example, we use the network interface "eth0" here. The network interface of your server can be named differently.
The following settings are made directly in the vServer. Use the console via Proxmox to connect to the vServer.
The currently used default network interface can be read out with the following command:
ip r s | grep default
default via 192.168.178.1 dev eth0 proto static metric 100
eth0 -> network interface, this may vary with your server. Use your network interface in the following.
Now call the file "/etc/sysconfig/network-scripts/ifcfg-<network-interface>:0.
example: /etc/sysconfig/network-scripts/ifcfg-eth0:0
The network configuration must look like this:
TYPE=Ethernet
DEVICE=eth0
BOOTPROTO=static
NAME=eth0
ONBOOT=yes
IPADDR=<additional IP-Adresse>
GATEWAY=<Gateway of the host system>
Now the network service is restarted:
/etc/init.d/network/restart
You can make the network settings in Windows via the graphical interface. To do this, navigate to: Network Card Properties -> Internet Protocol, Version 4 (TCP/IPv4) -> Properties.
Here you can now make the IP settings graphically.
Alternatively, this can also be done via the CMD (Windows key +r, enter "cmd" in the search).
In the CMD, run the following command to set the network settings.
netsh interface ipv4 set address name="Ethernet" static <additional IP-Adresse> 255.255.255.255 <Gateway of the host system>
To set the DNS servers, the following commands can be used:
netsh interface ip set dns "LAN-connection" static 62.141.32.5
netsh interface ip set dns "LAN-connection" static 62.141.32.4
Note: The commands and configurations on the operating systems were tested under Debian 8, CentOS 7, as well as Windows 2012 R2 Standard.
In order to use NAT, another internal bridge must be added to the previously created bridge. For this the file "/etc/network/interfaces" adapted accordingly. (On the Proxmox host)
example: /etc/network/interfaces
auto vmbr1
iface vmbr1 inet static
      address <private IP-Adresse>
      netmask <Netmask of the IP network>
      bridge-ports none
      bridge_stp off
      bridge_fd 0
      post-up echo 1 > /proc/sys/net/ipv4/ip_forward
This bridge is used by the vServers to connect to the host system.
Now when you create a vServer, the bridge (vmbr1) must be specified.
Last but not least, the required port shares for the vServer are configured on the host system.
Example: The vServer is to be reached via SSH. Here the SSH service on the vServer runs over the default port 22. We now change the forwarding over port 1024.
To do this, edit the "/etc/network/interfaces" file of the host system (proxmox host) and add the following lines at the end:
post-up iptables -t nat -A PREROUTING -i vmbr0 -p tcp --dport 1024 -j DNAT --to <private IP address of the vServer>:22
post-down iptables -t nat -D PREROUTING -i vmbr0 -p tcp --dport 1024 -j DNAT --to <private IP address of the vServer>:22
Note: All ports to be forwarded must be entered in this file.
Explanation of the two commands above:
-i vmbr0 = The interface with the main IP through which the vServer should be accessible.
-p tcp = The protocol to be used.
--dport 1024 = The port which is "received" by the host system.
--<private IP address of the vServer>:22 = To which internal IP this should be forwarded. After the ":" comes the port on which the service can be reached.
As an example, the internal bridge on the host system should now look like this:
auto vmbr1
iface vmbr1 inet static
      address <private IP-Adresse>
      netmask <Netmask of the IP network>
      bridge-ports none
      bridge_stp off
      bridge_fd 0
      post-up echo 1 > /proc/sys/net/ipv4/ip_forward
      post-up iptables -t nat -A PREROUTING -i vmbr0 -p tcp --dport 1024 -j DNAT --to <private IP address of the vServer>:22
      post-down iptables -t nat -D PREROUTING -i vmbr0 -p tcp --dport 1024 -j DNAT --to <private IP address of the vServer>:22
The network service is then restarted.
As a result, you should now be able to reach the host system via SSH at <main IP>:22 and the vServer at <main IP>:1024.
Author: Bettina Brauer
Last update: 21.05.2021 03:27
This article describes how to create a cluster with 4 servers.
In the following, the cluster is created from the following 4 servers:
f002 (AMD Opteron 3365 on this we create the cluster)
ca130 (Intel XEON E3-1270v3 Node)
srv1583 (HPE DL360 Gen10 Node)
srv10008 (HPE DL325 Gen10 Node)
Unfortunately the hostnames of the servers cannot be changed afterwards, so you should think about what you want to call them.
Below I renamed "f002" to "f002-Cluster":
# hostnamectl set-hostname f002-ClusterThe hostname in /etc/hosts must also be changed:
# nano /etc/hostsBefore: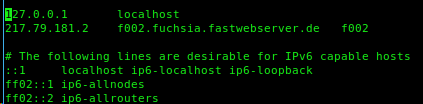
After: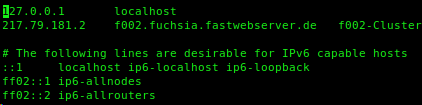
Now we can create the cluster with "pvecm create <Clustername>", in our example this is called "Testcluster":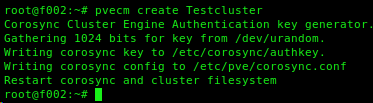
It is not possible for us to create a cluster with the standard setting with multicast without a own VLAN, for this we have to use unicast.
*** Update ***
As of Debian 10 + Proxmox 6 this setting is already automatically set to Unicast, so only Debian 8 and 9 have to be switched to Unicast.
***Update***
To change this, add "transport: udpu" to "/etc/pve/corosync.conf" as shown below:
# nano /etc/pve/corosync.conf
After restarting Corosync and executing the command "pvecm e 1", the nodes can now be added.
# service corosync restart
# pvecm e 1
No, please make sure that they have already been copied, as in the worst case data loss from the node can occur:
Log on to a node via SSH and add it to the cluster with "pvecm add <FQDN or IP>".
# pvecm add f002.fuchsia.fastwebserver.deThe output should look like this: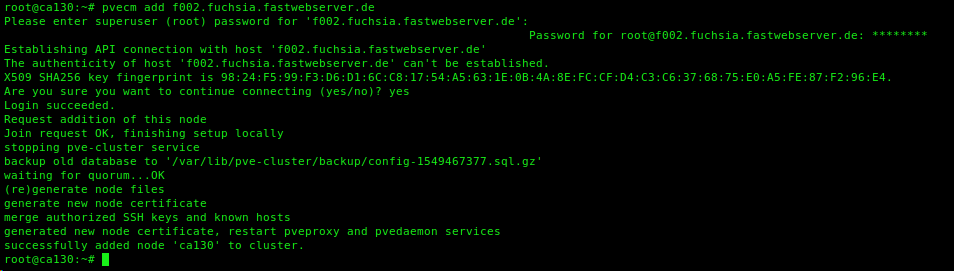
If everything worked, it should look like this inside the Proxmox interface:
Author: Bettina Brauer
Last update: 21.05.2021 03:34
You can download the manual of the Plesk interface offered by us directly from the manufacturer's website. You can reach it under:
https://docs.plesk.com/en-US/12.5/customer-guide/69259/
Author: Bettina Brauer
Last update: 09.04.2021 01:31
If you lost your Plesk Administrator Password, you can reset/see this with an SSH or Remotedesktop-Connection.
If you lost your password for your Parallels Plesk Control Panel. You can reset the password via SSH with an SSH client of your choice. When you are connected use this command:
plesk login
Two links are generated. Use the second link based on the IP address to log in to Plesk as an administrator. For example:
https://10.52.43.73:8443/login?secret=uT%2BlFXgNQ2dnec3HBdMafGd7ZFoXrVA5jWLATap5smQ%3D
Reset your password by running this command:
plesk bin admin --set-password -passwd <new_password>
/usr/local/psa/bin/admin --get-login-link
/usr/local/psa/bin/admin --show-password
"%plesk_bin%\\plesksrvclient" -get
plesk login
Author: Bettina Brauer
Last update: 09.04.2021 01:44
Author: Bettina Brauer
Last update: 09.04.2021 01:46
Author: Wolfram Heinen
Last update: 10.01.2019 14:13
An additionally ordered IP address must be set up on your server so that it can be reached. This article is only valid for Dedicated and Virtual Dedicated Server. With a VPS the network configuration is automatically configured. Proceed as follows:
Add the following entry to the file /etc/network/interfaces:
auto eth0:1iface eth0:1 inet staticaddress <additional IP-Address>
netmask 255.255.255.255
<additional IP-Adresse> The corresponding IP address is inserted here. The network service is then restarted using the following command:
service networking restart
In the file /etc/netplan/01-netcfg.yaml adapt the following line:
addresses: [ "<Haupt-IP-Adresse>/32", "<additional-IP-Adresse>/32"]
<additional-IP-Adresse> The corresponding IP address is inserted here. The network service is then restarted using the following command
netplan apply
If an error should have crept into the YAML file, it is immediately displayed and can then be directly edited again.
Note: When using Netplan, you must work with spaces. The use of "Tab" is not possible.
A permanent configuration is only possible by default via alias interfaces (eth0:1, eth0:2 etc.). For this purpose, a file must be created for each IP address.
Note: The network interface is called eth0 in the example. This may differ from your network interface. You can read out the currently used network interface with the following command:
ip r s | grep default
default via 192.168.178.1 dev eth0 proto static metric 100
eth0 -> the network interface used. The main IP of your server is also configured here.
/etc/sysconfig/network-scripts/ifcfg-eth0:1
These files must each contain the following information:
DEVICE=eth0:1


BOOTPROTO=none


ONBOOT=yes
IPADDR=<additional IP-Adresse>


NETMASK=255.255.255.255
Setting up an additional IP address can be done via the graphical user interface or via the CMD.
Switch to the properties of the network card:
Open the advanced settings and add the additional IP-address.
Important: The subnet mask of the additional IP is basically: 255.255.255.255
netsh interface ipv4 add address name="Ethernet" <zusätzliche IP-Adresse> 255.255.255.255
In order for the additional IP address to be used, the IP configuration in the ZKM must be adjusted and set to "host route". "Virtualisation" is used for virtualisation purposes.
To do this, log into the ZKM and navigate to the corresponding server contract. Now select "Configuration".
Now set the additional IP addresses to "Host-Route".
Author: Bettina Brauer
Last update: 25.07.2021 05:21
To set up Ipv6 on your server, you need the IPv6 information from your ZKM:
Attention: Please use only the IPv6 fe80::1 as gateway!
Log in on the server as user root and open the network configuration with:
nano /etc/netplan/config.yaml
Add the following line under "addresses" if your IPs are listed seperately:
- <IPv6 address>/64 # An address from your /64 IPv6 subnet
Add the the IP like this if your IPs are listed in square brackets:
addresses: [ 127.0.0.1/32, 2001:cccc:ffff:dddd::1/64 ]
Log in on the server as user root and open the network configuration with:
nano /etc/network/interfaces
Add the following lines there:
iface enp1s0f0 inet6 static
   address <Eine IP aus Ihrem /64 Subnetz>
   netmask 64
   gateway fe80::1
*** Important ***
Please change the name of the network device (enp1s0f0) if necessary. This is already in the configuration. You can find an example in the screenshot:
Save with CTRL + O and close nano with CTRL + X.
It is best to restart the entire server. If this is not possible, you can also restart only the network with the following command:
service networking restart
Log in to the server as root user and open the network configuration:
nano /etc/sysconfig/network-scripts/ifcfg-eth0
*** Important: The name of the device eth0 can be different, please check this with "ip addr" ***
There you compare all the already preset settings with the ones below and adjust them if necessary. All missing lines must be added and others that start with IPV6 can be removed.
IPV6INIT=yes

IPV6ADDR=<IPV6 Adresse><Prefix z.B. /64>

IPV6_DEFAULTGW= fe80::1

IPV6_DEFAULTDEV=<Interface z.B. enp5s0 oder eth0>
Save with CTRL + O, close with CTRL + X
It is best to restart the entire server afterwards, or at least the network if this is not possible:
service network restart
The configuration can be checked with the command ifconfig.
Log in to the server as user administrator.
Please press START at the bottom left of your task bar. There you will find the item "Run". Enter cmd there.
A black window with white text opens (command prompt or also called Windows shell). Enter the following commands there:
netsh interface ipv6 add address store=persistent

			netsh interface ipv6 add route ::/0 fe80::1 store=persistent
Check the setting with the following command:
ipconfig -all
To test if the IP address is correctly reachable you can proceed as follows:
1. ping the configured IP address on your server. If the server cannot reach the address configured on it, something is wrong. A ping on the IP v6 address can be done with the console command:
ping -6 <IP address>
2. ping the IP address of the gateway from the server, as this is usually outside of your own network, so you can see if there is a problem with the routing.
3. ping an external address e.g. 2a00:1450:4001:814::200e this is an address from Google that was set up exactly for this test purpose.
4. try to reach your server from outside via IPv6 If your computer does not have an IPv6 address at home, you can use an online ping service such as www.subnetonline.com/pages/ipv6-network-tools/online-ipv6-ping.php.
Author: Bettina Brauer
Last update: 25.07.2021 05:02
The following programs are required for this FAQ article:
Putty (SSH Client) (http://www.chiark.greenend.org.uk/~sgtatham/putty/latest.html)
TightVNC (VNC Client) (http://www.tightvnc.com/download.php)
1) Start the rescue mode in the central customer management.
2) Use the Putty program to connect to the server that is in rescue.
3) Enter the following command: (HDD and SSD)
-------> without raid <-------:
apt-get updateapt-get install qemu -fy
curl -O -J
https://fileshare.myloc.de/index.php/s/Fix7xxQPSQeQMQ2/download
qemu-system-x86_64 -enable-kvm -hda /dev/sda -vnc :12 -m 1024
-cpu host,+nx -cdrom pwrecover.iso -boot d
-------> with raid <-------:
apt-get updateapt-get install qemu -fy
curl -O -J
https://fileshare.myloc.de/index.php/s/Fix7xxQPSQeQMQ2/download
qemu-system-x86_64 -enable-kvm -hda /dev/sda -hdb /dev/sdb
-vnc :12 -m 1024 -cpu host,+nx -cdrom pwrecover.iso -boot d
NVME
-------> without Raid <-------:
apt-get update
apt-get install qemu -fy
curl -O -J


 https://fileshare.myloc.de/index.php/s/Fix7xxQPSQeQMQ2/download
qemu-system-x86_64 -enable-kvm -hda /dev/nvme0n1 -vnc :12 -m 1024


 -cpu host,+nx -cdrom pwrecover.iso -boot d
4) Now connect to the server via VNC (e.g. with TightVNC). As "Remote Host" enter the IP of the server and the port of VNC (5912) like 127.0.0.1:5912.
5) Click "Open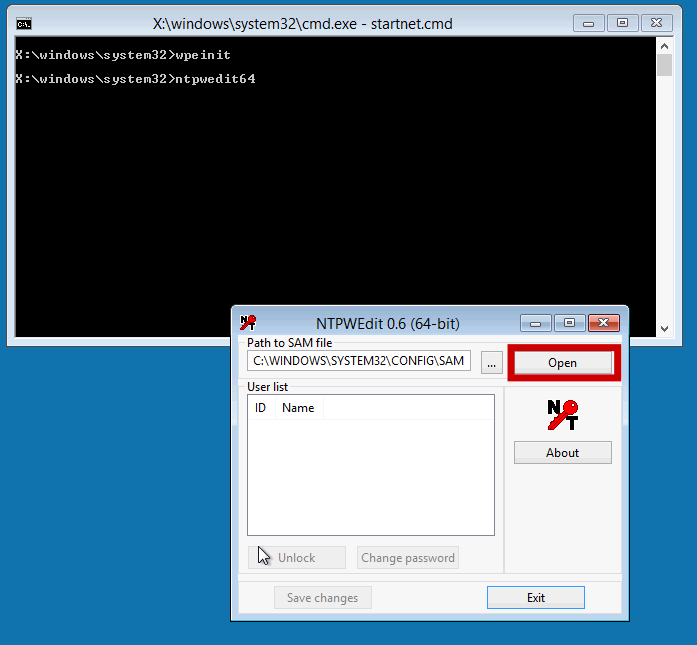
6) Click on the user name (by default "Administrator").
7) Now click on "Unlock" and directly after that on "Change password".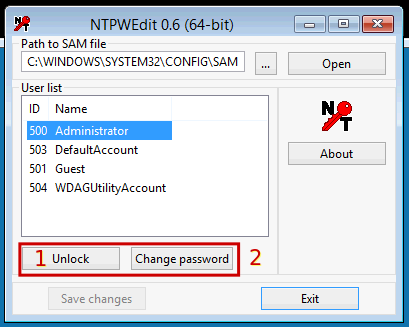
8) Now enter your new password and confirm it by clicking "OK"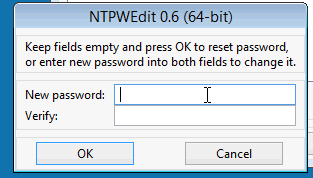
9) Now save the changes.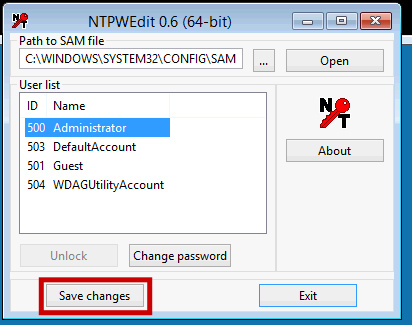
10) Close TightVNC
11) Press "Ctrl + C" in the Putty window.
12) Switch off the rescue mode in the central customer management (ZKM) again.
13) Execute the command "reboot" in Putty.
Now the server will be restarted in normal mode and you can connect to remote desktop with the password specified in step 8).
---------------------> Root-Server <---------------------
This part of the FAQ follows, please contact support.
Author: Bettina Brauer
Last update: 09.04.2021 04:24
The second hard disk is only used for an installation with RAID. If you have ordered an installation without RAID, the second hard disk is not used. If you want to use it, you must partition the hard disk, format it and integrate it into your system.
fdisk /dev/sdb
Press the following keys within the command interface:
create a new partition key n
Partition number Key 1
Accept the default of the start cylinder Return
Accept the default of the end cylinder Return
Write partitioning Key w
mkfs.ext4 /dev/sdb1
Now the mount point of the hard disk (the directory under which it should be accessible) must be entered in /etc/fstab. Please note that the directory must exist beforehand. The entry could look like this, for example:
/dev/sdb1 /Zweite-Festplatte ext4 acl,user_xattr 1 2
Further information can be found, for example, on the page:
http://www.linux-ag.de/linux/LHB/node153.html
Under Windows, you can perform partitioning and formatting via the item:
Start => Computer management => Disk management.
Right-click on the unallocated memory and create a new simple volume.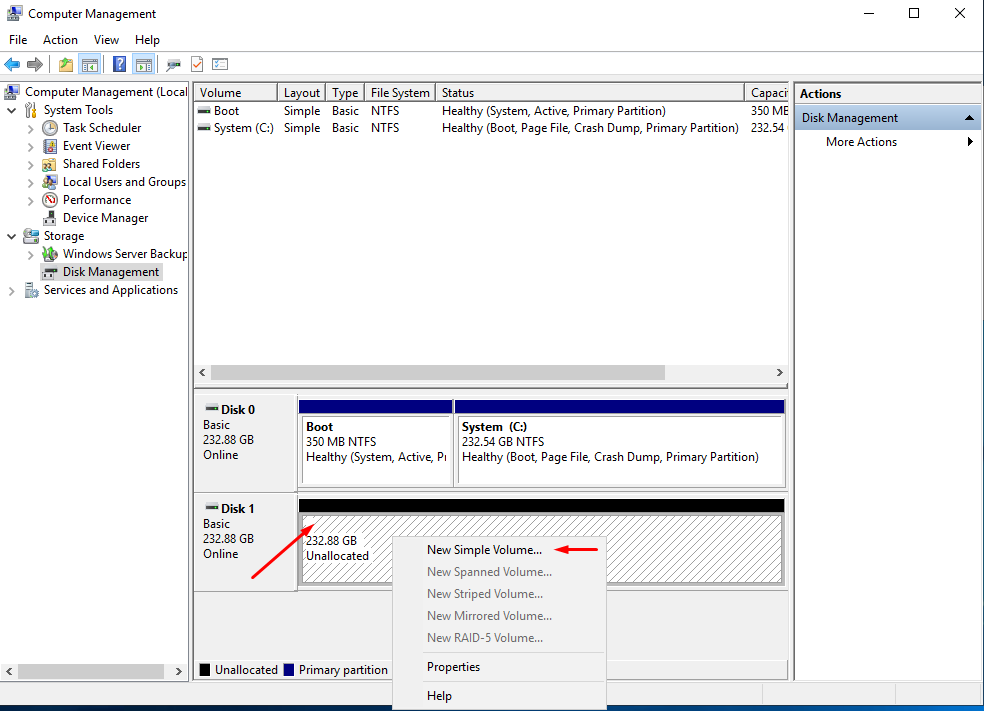
Author: Bettina Brauer
Last update: 09.04.2021 04:28
In the case of a Windows installation, we only install the Remote Desktop Service (if no admin tool has been selected).
A login to this is possible via the Remote Desktop Client, which can usually be found under Start => All Programs or Programs and then Accessories.
Login is possible via the IP address or the administration domains by entering the user name "Administrator" and the administrator password, which you should retrieve with a token (sent by e-mail after installation).
Author: Bettina Brauer
Last update: 09.04.2021 04:31
You have two options to install the License Agent on your server:
- Independent integration of the License Agent
- Integration of the license agent by the myLoc technical team
To complete the agent setup independently, proceed as follows:
- Download file: http://static.myloc.de/licenseAgent/latest/MS_LA_setup.msi
- Execute the file as administrator
- Restart the server if necessary
If you would like our technical team to integrate the agent, please open a ticket with the following information:
- Server on which the installation should be executed
- an admin user with password for us, for the installation
- a time frame, when the installation can be performed
Author: Bettina Brauer
Last update: 01.08.2021 00:31
Due to an update from Microsoft, the RDP port may be blocked.
We recommend changing the RDP port and adjusting the firewall accordingly. Please note that you can lock yourself out completely without changing the firewall.
You can change the RDP port via the registry. To do this, open the registry via the search as administrator. To do this, enter "regedit" in the search field. With a right click you can "run as administrator" the registry.
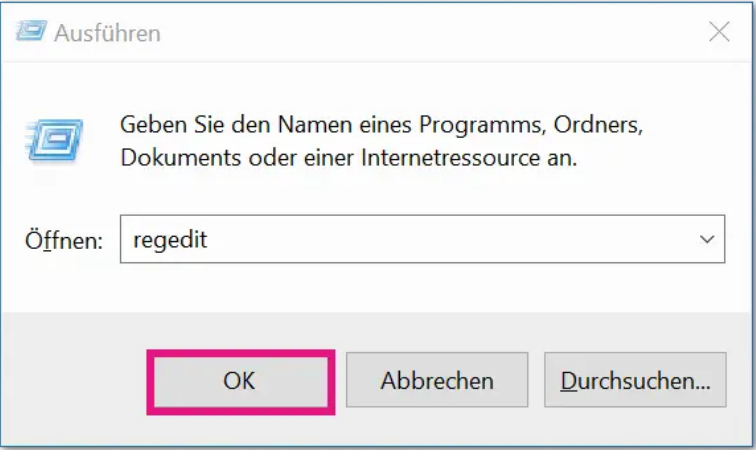
Now navigate to: "Computer\HKEY_LOCAL_MACHINE\SYSTEM\CurrentControlSet\Control\Terminal Server\WinStations\RDP-Tcp".
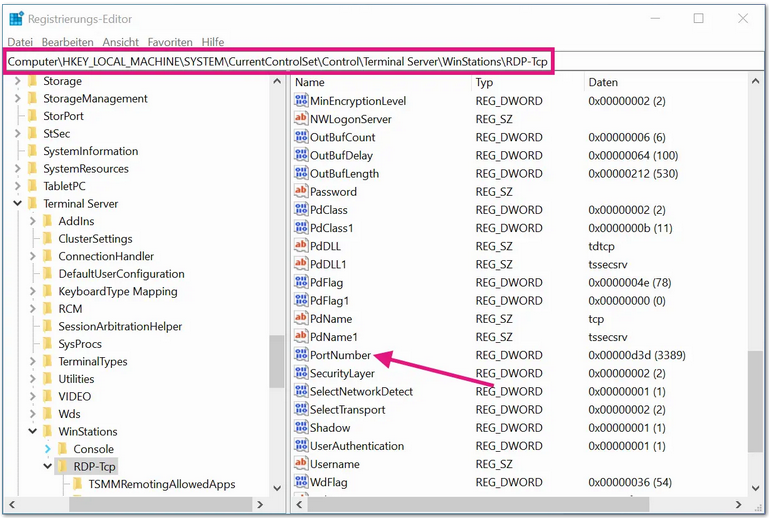
Double-click on the "PortNumber" field to change the entry to "decimal". You can now set the new value for the RDP port.
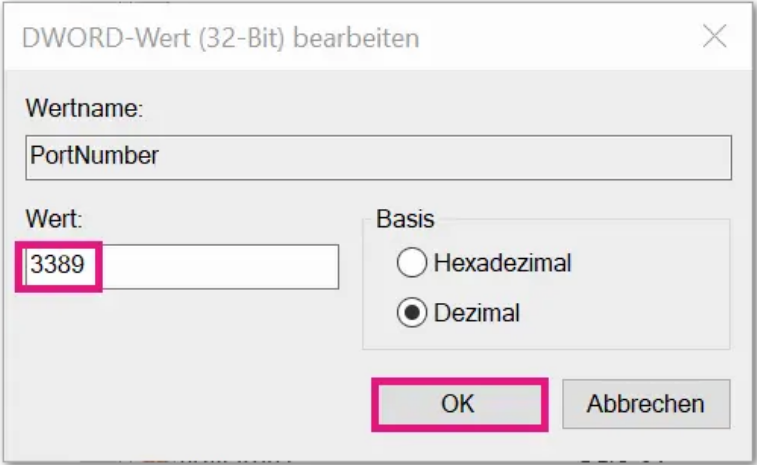
Navigate to "incoming rules". Here there is an entry for "Remote Desktop (TCP incoming)". Here, the port TCP3389 is set by default and, due to the predefined rule, cannot be changed. To assign a new port number for the RDP port, you have to create a new rule. To do this, you can create an additional rule for TCP via "New rule". Here you then enter your previously newly defined port number.
Subsequently, the default rule for port 3389 can be deactivated if you no longer need this port.
After creating a new rule in the firewall, the RDP service must be restarted.
Important: Do not stop the RDP service because you would lock yourself out. You must RESTART the RDP service here.Im Anschluss der
After the adjustments have been made and the default rule for port 3389 has been deactivated, a login via RDP is only possible via the previously defined port. To do this, enter the IP address and the new port when connecting:
<IP-Adresse>:Port
You can also make the changes in the shell. To do this, open a shell as administrator and enter the following:
Set-ItemProperty -Path 'HKLM:\SYSTEM\CurrentControlSet\Control\Terminal Server\WinStations\RDP-Tcp' -name "PortNumber" -Value 3390
Sets the port to "3390".
New-NetFirewallRule -DisplayName 'RDP TCP IN' -Profile 'Public' -Direction Inbound -Action Allow -Protocol TCP -LocalPort 3390


New-NetFirewallRule -DisplayName 'RDP UDP IN' -Profile 'Public' -Direction Inbound -Action Allow -Protocol UDP -LocalPort 3390
Sets the firewall rule.
Subsequently, the RDP service is restarted:
restart-service termservice
Author: Marie Burggraf
Last update: 22.03.2021 17:51
Now, to run multiple domains on one web server, you need to create a so-called virtual host. When a browser calls your web server, the browser also transmits the exact domain name and based on this information, the web server then displays a directory set for this domain.
To provide this functionality, you must create a virtual host for the domain in the Apache configuration.
Under Debian GNU/Linux, these are managed in individual text files under /etc/apache2/sites-available/. Here you can see a VHost declaration for the named domain, "example.org", this is representative for the domain you want to create and you have to replace it with your domain:
<VirtualHost *>

	ServerName example.org

	ServerAlias www.example.org


	DocumentRoot /var/www/example.org


	<Directory />

	Options FollowSymLinks

	AllowOverride None

	</Directory>


	<Directory /var/www/example.org>

	Options FollowSymLinks MultiViews

	AllowOverride None

	Order allow,deny

	allow from all

	</Directory>


	ErrorLog /var/log/apache2/error_example.org.log

	LogLevel warn

	CustomLog /var/log/apache2/access.example.org.log combined

	ServerSignature On


	</VirtualHost>
Save this file under the name "example.org". After that you can activate it with the following command:
# a2ensite example.org
...and finally restart the web server with the following command:
# service restart apache2
Author: Bettina Brauer
Last update: 15.04.2021 08:48
Author: Bettina Brauer
Last update: 15.04.2021 08:51
Author: Wolfram Heinen
Last update: 10.01.2019 14:13
This example assumes that a dedicated server and a virtual server are available. The dedicated server will contain all regular web pages, whether the web server is managed manually or via Plesk is irrelevant. The V-Server will contain the fault page, which will be displayed if the dedicated server fails. The V-Server is installed without Plesk, in this example the Debian operating system is used.
The A-records of the domain must be set to the failover IP. This is possible via the central customer management ( https://zkm.webtropia.com > DNS System > Edit Zone ).
For the dedicated server, the failover IP must be configured in the system and in Plesk. If you do not use Plesk, make sure that the failover IP is configured on the web server you are using. Now set the failover IP on your dedicated server, this is possible via the Central Customer Management (CCM) > Dedicated Root Server > Failover IP Management.
On the V-Server, first install the Apache web server, which will deliver the fault page.
apt-get update && apt-get install apache2
The script also requires the bc package.
apt-get install bc
Connect to the V-Server via SSH ( or SCP ) and store the error page ( index.html ) under /var/www. If you type the IP of the V-Server into the browser, you should already see the error page.
Next, you need to install a script that will switch the IP if the dedicated server fails. The script could look like this:
#!/bin/bashhttps://zkm.fastit.net/Api/Failover/FailoverAssign?job=example123
PATH=/bin:/usr/bin
REMOTE_IP="192.168.100.101"
API_LINK=""
while [ 1 ]; do
IS_ONLINE=$(ping -W 10 -c 1 -n $REMOTE_IP | grep "64 bytes from $REMOTE_IP:" | wc -l | bc)
if [ $IS_ONLINE = 0 ]; then
IS_ONLINE_DEEP=$(ping -W 10 -c 1 -n $REMOTE_IP | grep "64 bytes from $REMOTE_IP:" | wc -l | bc)
if [ $IS_ONLINE_DEEP = 0 ]; then
echo "Could not reach remote host. Take over IP." echo "$(date) [failover] Could not reach remote host. Take over IP." >> /var/log/overtake-ip.log wget -O /dev/null "$API_LINK"
# With a dedicated server, the IP would still have to be booted up here.
fi
fi
done
exit 0
The script runs in an endless loop. If a ping is lost, a second ping is sent, if this is also lost, the API is triggered and the script terminates. Make sure that the IP in REMOTE_IP is the main IP of the dedicated server and not the failover IP.
It is best to save the script to /root/overtake-ip.sh , it is sufficient to start the script via the file /etc/rc.local. So enter the following line in the file:
/root/overtake-ip.sh &
The & at the end starts the process in the background. Be sure to make the entry before the line "exit 0".
If the case occurs that the dedicated server is no longer reachable, the failover IP - by the script - is brought up via the Api on the V-Server, thereby the fault page is visible via the failover IP. When the failure of the dedicated server is resolved, you can route the failover IP back to the dedicated server via the central customer management (ZKM) Dedicated Root Server > Failover IP Management ). After that, you need to restart the script on the V-Server, as it was terminated when the IP was taken over. The command is:
/root/overtake-ip.sh &
Author: Bettina Brauer
Last update: 15.04.2021 08:57
An optimized protection of a server also includes the change of the standard SSH port of a server. This change is the first step to prevent unauthorized access to your server.
To change the SSH port, please make the following changes to the system:
Open SSH configuration:
root@server:~# nano /etc/ssh/sshd_config
Change the corresponding line (replace port if necessary):
# What ports, IPs and protocols we listen for

	Port 11111
Then restart the SSH server:
root@server:~# /etc/init.d/ssh restart
Now a connection to the standard port should no longer be possible the next time you log on to the system.
To connect to the server, the port must be specified. Under Putty this can be done via the field "Port". On Linux / Mac systems the specification is as follows (or comparable):
linux@home:~# ssh root@server -p11111
(Instead of 11111, enter the SSH port that has been changed at will.)
Author: Bettina Brauer
Last update: 15.04.2021 09:00
This article describes how to mount the iSCSI storage of a moonshot in rescue mode.
Note: Information about IP, user name as well as password of the iSCSI storage, can be found in the ZKM under the item "Network hard disk".
auto eth0:0
iface eth0:0 inet static
address
netmask 255.255.252.0
ifup eth0:0
apt-get install open-iscsi -y
The following entries are checked in the file:
node.startup = automatic
node.session.auth.authmethod = CHAP
node.session.auth.username =
node.session.auth.password =
ping -c 3
/etc/init.d/open-iscsi restart
iscsiadm -m discovery -t sendtargets -p
iscsiadm -m node --login
You should now be able to see the storage with fdisk -l .
mount /dev/sdb1 /storage
If no sda was displayed with "fdisk -l", the specification in the mount command is not "sdb1" but "sda1".
Author: Bettina Brauer
Last update: 28.06.2021 04:35
An additionally ordered IP address must be set up on your server so that it can be reached. This article is only valid for Dedicated and Virtual Dedicated Server. With a VPS the network configuration is automatically configured. Proceed as follows:
Add the following entry to the file /etc/network/interfaces:
auto eth0:1iface eth0:1 inet staticaddress <additional IP-Address>
netmask 255.255.255.255
<additional IP-Adresse> The corresponding IP address is inserted here. The network service is then restarted using the following command:
service networking restart
In the file /etc/netplan/01-netcfg.yaml adapt the following line:
addresses: [ "<Haupt-IP-Adresse>/32", "<additional-IP-Adresse>/32"]
<additional-IP-Adresse> The corresponding IP address is inserted here. The network service is then restarted using the following command
netplan apply
If an error should have crept into the YAML file, it is immediately displayed and can then be directly edited again.
Note: When using Netplan, you must work with spaces. The use of "Tab" is not possible.
A permanent configuration is only possible by default via alias interfaces (eth0:1, eth0:2 etc.). For this purpose, a file must be created for each IP address.
Note: The network interface is called eth0 in the example. This may differ from your network interface. You can read out the currently used network interface with the following command:
ip r s | grep default
default via 192.168.178.1 dev eth0 proto static metric 100
eth0 -> the network interface used. The main IP of your server is also configured here.
/etc/sysconfig/network-scripts/ifcfg-eth0:1
These files must each contain the following information:
DEVICE=eth0:1


BOOTPROTO=none


ONBOOT=yes
IPADDR=<additional IP-Adresse>


NETMASK=255.255.255.255
Setting up an additional IP address can be done via the graphical user interface or via the CMD.
Switch to the properties of the network card:
Open the advanced settings and add the additional IP-address.
Important: The subnet mask of the additional IP is basically: 255.255.255.255
netsh interface ipv4 add address name="Ethernet" <zusätzliche IP-Adresse> 255.255.255.255
In order for the additional IP address to be used, the IP configuration in the ZKM must be adjusted and set to "host route". "Virtualisation" is used for virtualisation purposes.
To do this, log into the ZKM and navigate to the corresponding server contract. Now select "Configuration".
Now set the additional IP addresses to "Host-Route".
Author: Bettina Brauer
Last update: 25.07.2021 05:21
To set up Ipv6 on your server, you need the IPv6 information from your ZKM:
Attention: Please use only the IPv6 fe80::1 as gateway!
Log in on the server as user root and open the network configuration with:
nano /etc/netplan/config.yaml
Add the following line under "addresses" if your IPs are listed seperately:
- <IPv6 address>/64 # An address from your /64 IPv6 subnet
Add the the IP like this if your IPs are listed in square brackets:
addresses: [ 127.0.0.1/32, 2001:cccc:ffff:dddd::1/64 ]
Log in on the server as user root and open the network configuration with:
nano /etc/network/interfaces
Add the following lines there:
iface enp1s0f0 inet6 static
   address <Eine IP aus Ihrem /64 Subnetz>
   netmask 64
   gateway fe80::1
*** Important ***
Please change the name of the network device (enp1s0f0) if necessary. This is already in the configuration. You can find an example in the screenshot:
Save with CTRL + O and close nano with CTRL + X.
It is best to restart the entire server. If this is not possible, you can also restart only the network with the following command:
service networking restart
Log in to the server as root user and open the network configuration:
nano /etc/sysconfig/network-scripts/ifcfg-eth0
*** Important: The name of the device eth0 can be different, please check this with "ip addr" ***
There you compare all the already preset settings with the ones below and adjust them if necessary. All missing lines must be added and others that start with IPV6 can be removed.
IPV6INIT=yes

IPV6ADDR=<IPV6 Adresse><Prefix z.B. /64>

IPV6_DEFAULTGW= fe80::1

IPV6_DEFAULTDEV=<Interface z.B. enp5s0 oder eth0>
Save with CTRL + O, close with CTRL + X
It is best to restart the entire server afterwards, or at least the network if this is not possible:
service network restart
The configuration can be checked with the command ifconfig.
Log in to the server as user administrator.
Please press START at the bottom left of your task bar. There you will find the item "Run". Enter cmd there.
A black window with white text opens (command prompt or also called Windows shell). Enter the following commands there:
netsh interface ipv6 add address store=persistent

			netsh interface ipv6 add route ::/0 fe80::1 store=persistent
Check the setting with the following command:
ipconfig -all
To test if the IP address is correctly reachable you can proceed as follows:
1. ping the configured IP address on your server. If the server cannot reach the address configured on it, something is wrong. A ping on the IP v6 address can be done with the console command:
ping -6 <IP address>
2. ping the IP address of the gateway from the server, as this is usually outside of your own network, so you can see if there is a problem with the routing.
3. ping an external address e.g. 2a00:1450:4001:814::200e this is an address from Google that was set up exactly for this test purpose.
4. try to reach your server from outside via IPv6 If your computer does not have an IPv6 address at home, you can use an online ping service such as www.subnetonline.com/pages/ipv6-network-tools/online-ipv6-ping.php.
Author: Bettina Brauer
Last update: 25.07.2021 05:02
The second hard disk is only used for an installation with RAID. If you have ordered an installation without RAID, the second hard disk is not used. If you want to use it, you must partition the hard disk, format it and integrate it into your system.
fdisk /dev/sdb
Press the following keys within the command interface:
create a new partition key n
Partition number Key 1
Accept the default of the start cylinder Return
Accept the default of the end cylinder Return
Write partitioning Key w
mkfs.ext4 /dev/sdb1
Now the mount point of the hard disk (the directory under which it should be accessible) must be entered in /etc/fstab. Please note that the directory must exist beforehand. The entry could look like this, for example:
/dev/sdb1 /Zweite-Festplatte ext4 acl,user_xattr 1 2
Further information can be found, for example, on the page:
http://www.linux-ag.de/linux/LHB/node153.html
Under Windows, you can perform partitioning and formatting via the item:
Start => Computer management => Disk management.
Right-click on the unallocated memory and create a new simple volume.
Author: Bettina Brauer
Last update: 09.04.2021 04:28
To create a backup of a MySQL database, you usually use the tool "mysqldump". Save a backup of a database to a *.sql file:
root@server:~# mysqldump -u username -p database name > /path/to/backup.sql
The tool "mysqldump" is started with the usual parameters and the result is saved in a *.sql file. With this file you are able to restore your databases on this or another server.
root@server:~# mysql -u username -p database name < /path/to/backup.sql
If the target database does not yet exist, it must be created beforehand. To do this, log on to the MySQL console and create the database:
root@server:~# mysql -u root -p

	Enter Password:


	mysql> CREATE DATABASE ‘database name’;
Author: Bettina Brauer
Last update: 15.04.2021 09:10
Tags: RAID, Software-RAID, mdadm, md0, degraded, raid1, active
When using a software RAID, it is necessary to check for proper functionality, since in case of failure, the redundancy is no longer provided by the RAID. An incomplete RAID should be completed and synchronized as soon as possible.
To perform a manual check, login to your server via SSH. You have two options to check the RAID state:
root@server:~# cat /proc/mdstat


			Personalities : [raid1]


			md0 : active raid1 sda2[0] sdb2[1]


			70337464 blocks super 1.2 [2/2] [UU]


			unused devices: <none>
This shows which disks are in RAID (here: sda2 and sdb2). If a drive is not shown as "active" it is not part of the RAID anymore.
mdadm --detail /dev/md0
(/dev/md0 may need to be replaced with the correct path to the device.)
You can also setup mdadm to send you a mail if any issue with the RAID occours. For this you will have to adapt /etc/mdadm/mdadm.conf . Add the following line (replace e-mail address)
MAILADDR meine@adresse.tld
and restart mdadm
/etc/init.d/mdadm restart
Author: Kevin Krienke
Last update: 10.01.2019 15:41
When using a software RAID, it is necessary to check for proper functionality, since in case of failure, the redundancy is no longer provided by the RAID. An incomplete RAID should be completed and synchronized as soon as possible.
To perform a manual check, login to your server via SSH. You have two options to check the RAID state:
root@server:~# cat /proc/mdstat


			Personalities : [raid1]


			md0 : active raid1 sda2[0] sdb2[1]


			70337464 blocks super 1.2 [2/2] [UU]


			unused devices: <none>
This shows which disks are in RAID (here: sda2 and sdb2). If a drive is not shown as "active" it is not part of the RAID anymore.
mdadm --detail /dev/md0
(/dev/md0 may need to be replaced with the correct path to the device.)
You can also setup mdadm to send you a mail if any issue with the RAID occours. For this you will have to adapt /etc/mdadm/mdadm.conf . Add the following line (replace e-mail address)
MAILADDR meine@adresse.tld
and restart mdadm
/etc/init.d/mdadm restart
Author: Kevin Krienke
Last update: 15.04.2021 09:11
SSH is an access to your Linux server. You are working on a console as if you were sitting locally on your server.
Windows:
For using SSH on your Windows computer we recommend the SSH client Putty which can be found on this page.
http://www.chiark.greenend.org.uk/~sgtatham/putty/download.html
After downloading and starting Putty, simply enter the IP or hostname of your server, port 22 is already preset, this is also the default port used by SSH.
If you now click "Open" a message window opens which you can confirm with "YES" now the actual terminal window opens where you are asked for the login name.
This is usually "root" then you have to enter the password for the user root.
Now you are connected to your server via SSH. Here you can use any commands you need.
Please make yourself familiar with the commands before with the commands since by certain commands the operating system can be irreparably damaged.
Linux:
If you are using a Linux operating system such as Ubuntu as your client operating system, you only need to open a console/terminal and enter the following command.
ssh root@1.2.3.4
root is the username you want to connect to on the server.
1.2.3.4 stands for the IP or hostname of your server.
now you are asked for the password for "root" in this case
Afterwards you are connected via SSH to your server where you can use any commands you need.
Please make yourself familiar with the commands of Linux before, because certain commands can irreparably damage the operating system.
Author: Bettina Brauer
Last update: 01.04.2021 09:43
There can be many reasons why an e-mail does not reach the recipient. Usually, the sending of an e-mail is documented in the log files of your server under /var/log.
The following excerpt from /var/log/mail.info shows the successful sending of an e-mail from test@myloc.de to support@zkm.fastit.net
Apr 5 10:34:22 testserver sendmail<29927>: l358XSQG028484:
to=support@myloc.de, ctladdr=test@myloc.de (0/0), delay=00:00:13,
xdelay=00:00:04, mailer=local, pri=30446, dsn=2.0.0, stat=Sent
The status stat=Relaying denied would indicate that you are trying to send this e-mail without prior authentication. However, your e-mail client should also display this as an error message.
The status Sent in the above example means that the e-mail has been successfully delivered. If the e-mail does not arrive in this case, the error is on the recipient's side.
If the receiving server sends back a message (e-mails from mailer Deamon), it is either delivered to the sender or ends up in the root mailbox under /var/mail/root.
If your mail is classified as spam, there is normally no notification. The following actions can happen here.
In this case, the recipient can move the e-mail to his/her inbox by simply copying/moving it.
In this case, the e-mail is lost and may have to be resent.
Why the e-mail is classified as spam depends, among other things, on the configuration of the mail server. There are several approaches:
The most common are the evaluation of the DNS entries, in particular the RDNS address of the server is compared with the name of the mail server, as well as the comparison with so-called blacklists. You can check whether your server is listed on these blacklists, for example, at http://mxtoolbox.com under the item Blacklist.
In this case, your SMTP server is not bound to a fixed IP address and chooses an address at random. This then leads to problems when resolving the RDNS entry, which is usually no longer compatible with the name of the mail server if the main IP is not used.
You can bind Postfix to a fixed IP with the following two lines:postconf -e "inet_interfaces = 192.168.178.1"
/etc/init.d/postfix restart
For Qmail, you can set the outgoing IP as follows:echo "192.168.178.1" > /var/qmail/control/outgoingip
/etc/init.d/qmail restart
Replace 192.168.178.1 with the IP you want your mail server to use.
Author: Bettina Brauer
Last update: 09.04.2021 05:14
an SPF record is always created as a TXT record. The record usually has the following form:
meinedomain.de. IN TXT "v=spf1 +a +mx +a:mail.mydomain.de -all"
In the DNS system, the domain name is entered in the Host field and the TXT record as above is entered in the Data field.
Author: Bettina Brauer
Last update: 09.04.2021 05:17
You can manage the reverse DNS (RDNS) entries of your server via the RDNS management in the central customer management (ZKM).
There you can set a separate value for each IP.
***Please note that this IP must be written out in full and an abbreviation ("::") will not work.***
Author: Bettina Brauer
Last update: 09.04.2021 05:21
You can find the manual of the Tekbase user interface offered by us directly on the manufacturer's website at https://teklab.de/forum/thread/2-handbuch/
Further information can also be found in the Foum on the website: http://support.teklab.de/
Author: Bettina Brauer
Last update: 09.04.2021 05:24
After successful installation of your server, take your server IP address and enter it in your browser with the addition /tekbase/admin.php. This will take you to your customer interface.
First, we recommend that you enter a name for your dedicated server and the URL of your server under "Settings". If you have not yet registered a domain or if your existing domain is still in transit, you can also use the IP address of your server. Please note that the URL will be sent to the customers you will create by mail after successful creation.
After you have entered the first information of your server under "Settings", please go to the menu item "Email accounts". Here you must enter the sender as well as an email address that will send the corresponding information such as login and username to the customers. Without a stored email address, you cannot create a customer later and thus cannot create a game server.
Now you have to set up your dedicated server in general under the menu item "Server Module". Go to the item "Server Templates" and enter your desired information.
The next step is to create the general root server that will later be available to your customers as a dedicated game server. To do this, please select the category Root server and add your dedicated game server to Tekbase under the item "Enter root server".
Now you can start creating your customers in the customer module. After setting up the account, the customer will automatically receive an email with the email address you entered as well as the access data to your customer interface. The customer interface for your customers is stored under "Domain_or_IP"/tekbase/members.php.
Now go to the game server administration and create your game servers according to your and your customer's wishes. In the game server module, you can provide each customer with his or her desired server. Afterwards, your customers can start "gambling" immediately.
Further information can be found in the Teklab Administrator Manual: http://teklab.de/downloads/tekbase.pdf
Author: Bettina Brauer
Last update: 09.04.2021 05:26
To check the current status of your cPanel license, you can enter your IP address on the https://verify.cpanel.net/app/verify page.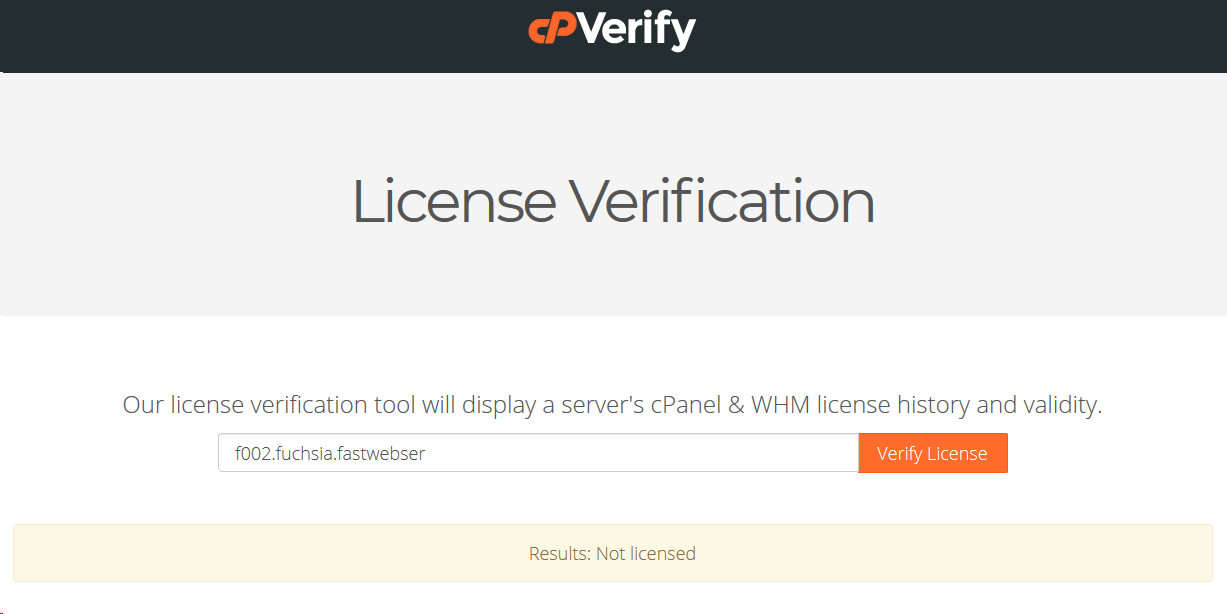
Author: Bettina Brauer
Last update: 09.04.2021 05:37
If the installation of cPanel is finished, you first have to log into the WHM under <Your-IP>:2087 with the user name "root" and your password retrieved in the ZKM.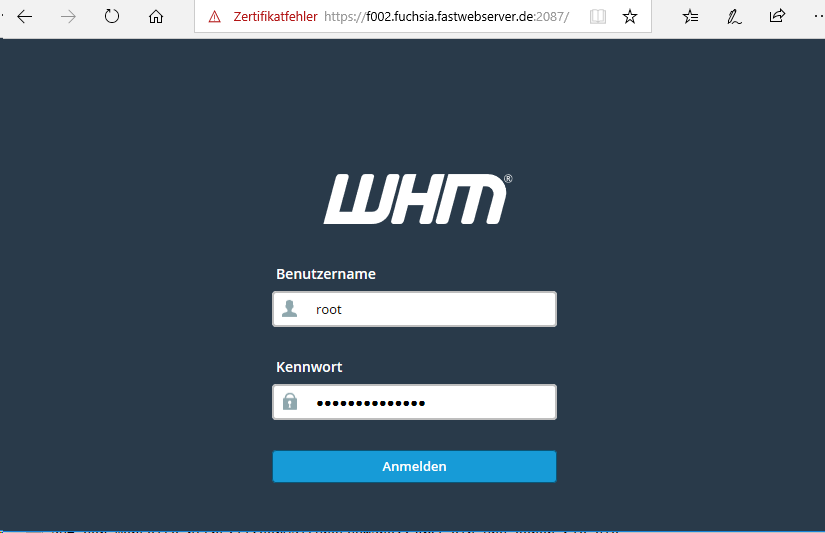
There you can enter your e-mail address and our name servers if you do not want to use your own.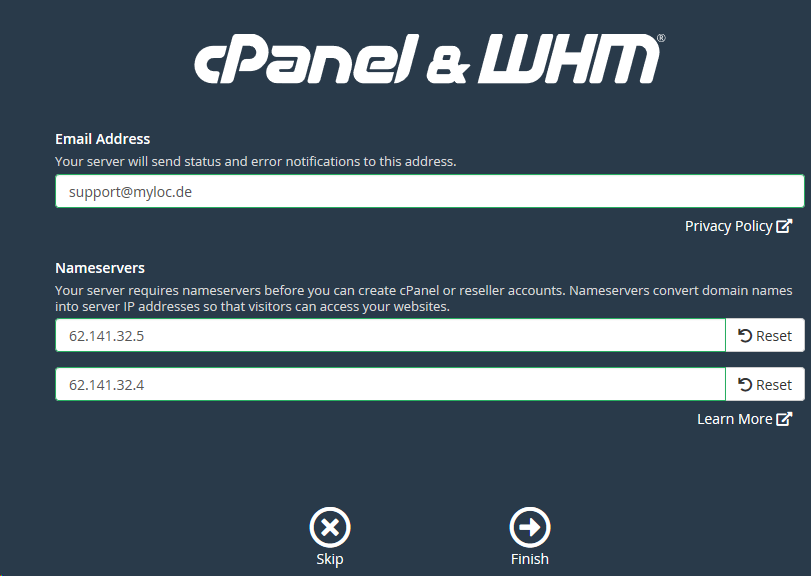
If there is no more test version available for this IP, unfortunately we can not reset this and a license must be ordered over the ZKM.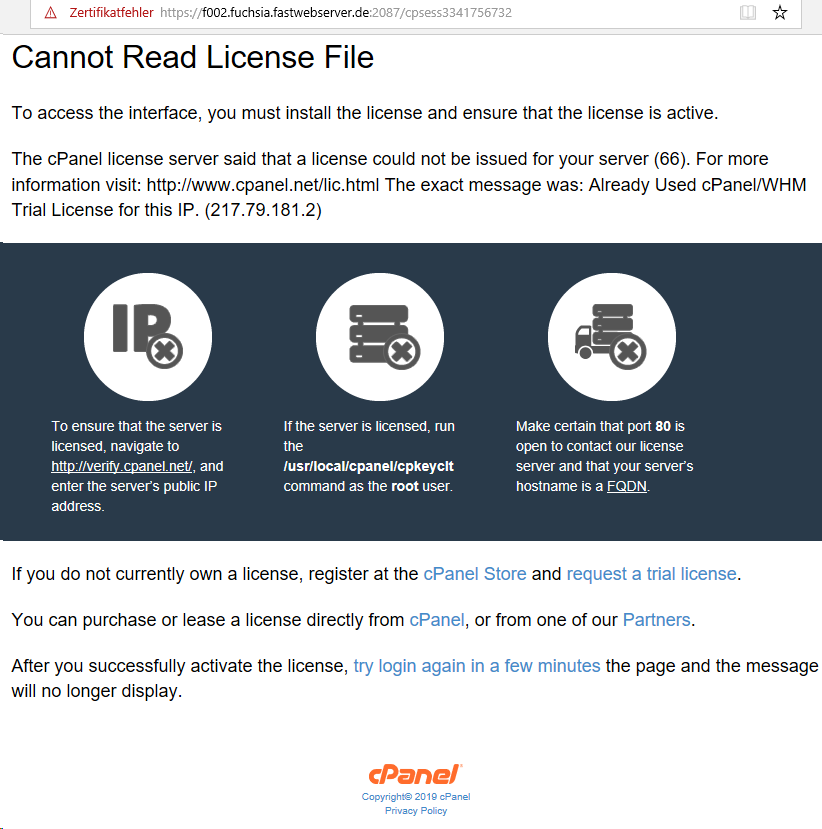
A license for the corresponding server can be ordered in the ZKM under "License Management":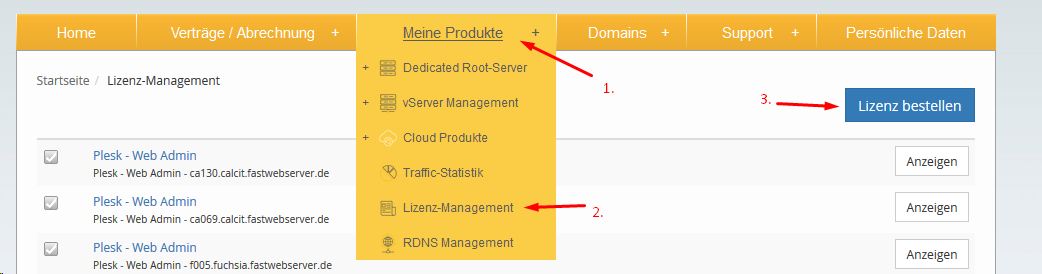
As soon as a user has been successfully created, you can login under "https://<Your IP>:2083/".
The initial configuration is now complete, so that you can setup your domains/webspace etc. now: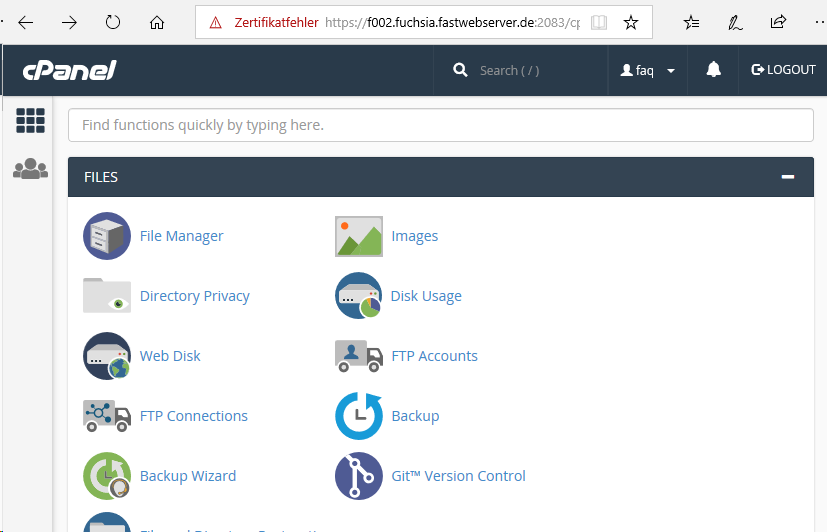
Author: Bettina Brauer
Last update: 09.04.2021 05:38
To change the language from English to e.g. German, log into the cPanel web interface (<your-IP>:2083).
Now click on "Change Language" under "PREFERENCES"

There you can now select the appropriate language under "Select a Language" in the dropdown menu and click on "Change":
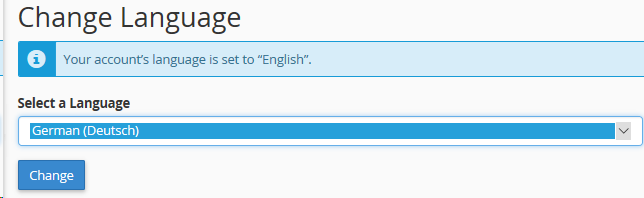
Author: Bettina Brauer
Last update: 09.04.2021 05:40
The complete manual of cPanel can be found at https://documentation.cpanel.net/display/68Docs/cPanel+User+Documentation.
There you can also find YouTube videos with tutorials.
Author: Bettina Brauer
Last update: 09.04.2021 05:41
You can choose Proxmox as admin tool via our installation system for Debian installation or you can use the Proxmox ISO image in conjunction with an IPMI / ILO which you can download at https://www.proxmox.com
Author: Bettina Brauer
Last update: 01.04.2021 11:14
This article describes how to set up IPv6 on Proxmox.
Edit the /etc/network/interfaces file and add your IPv6 configuration.
iface vmbr0 inet6 static
address IPv6_Addresse
netmask 64
up ip -6 route add IPv6_Gateway dev vmbr0
up ip -6 route add default via IPv6_Gateway dev vmbr0
down ip -6 route del default via IPv6_Gateway dev vmbr0
down ip -6 route del IPv6_Gateway dev vmbr0
if you have done that, save the file.
and as next step edit the /etc/hosts file, and add your IP and the FQDN.
IPv6_Addresse FQDN Hostname
(Example "2001:4ba0:ffa4:1:beef::1 mail.domain.tld mail")
if this is entered correctly, save the file.
Open the /etc/resov.conf file and add the IPv6 name servers there.
nameserver 2001:4860:4860::8888
nameserver 2001:4860:4860::8844
Run the following command to edit the sysctl.conf file:
sysctl -w net.ipv6.conf.all.forwarding=1
Once everything is complete and successfully set up, reboot your system. IPv6 should now be working.
Author: Bettina Brauer
Last update: 21.05.2021 03:16
Note: For information about the gateway, netmask, and IP address, see your customer account.
A bridge is created in Proxmox to make the VMs on the host system accessible via an additional IP.
The network configuration for a VM on the host system is described here.
There are 2 ways to create a bridge in Proxmox:
1) Log in to your server via SSH.
2) Check which network interface is used. To do this, execute the command "ip r s | grep default".
ip r s | grep default
default via 192.168.178.1 dev eth0 proto static metric 100
eth0 -> the network interface used. The main IP of your server is also configured here.
3) Now the bridge is created via the file /etc/network/interfaces . The network configuration looks like this:
--- /etc/network/interfaces ---

auto lo
iface lo inet loopback

iface eth0 inet manual


auto vmbr0
iface vmbr0 inet static
        address <Main IPv4 of your server>
        netmask 255.255.255.255
        gateway <Gateway of the main IP of your server>
        bridge_ports eth0
        bridge_stp off
        bridge_fd 0
***Important***
Please note that you replace "eth0" in the example configuration with your previously queried network interface, otherwise you will lock yourself out of your system. Also the line "iface eth0 inet manual" (with your network interface) must be present, so that your server is accessible in the connection.
1) Open the Proxmox web interface: https://<Main-ipv4-IP>:8006/
2) Navigate on the left side to: datacenter -> "Your host system".
3) Now select "Network".
4) Now double-click on the network interface and delete all entries.
Do NOT save the change yet, because you would lock yourself out. Please follow the steps to the end.
5) Now the bridge is created. To do this, click on "Create" and select "Linux Bridge".
6) The following entries should be made there:
Name: vmbr0
IPv4/CIDR: Main-IP of the host system
Gateway (IPv4): Gateway of the host system
IPv6/CIDR: IPv6 Adresse of the host system
Gateway (IPv6): IPv6 Gateway of the host system
Autostart: enable
VLAN aware:
Bridge ports: Network interfaces of the host system
7) If you have now made all the settings and checked them again, restart the server via the "Restart" item at the top right of the screen.
The Server should be reachable now.
To make the Bridging setup to work, you need to change the routing of the additional ip you want to use in a virtual machine.
Go to the control center of your server in the customer panel and set the following setting for the correct additional ip:
# The primary network interface
allow-hotplug ens18
iface ens18 inet static
address <additional IP>
netmask 255.255.255.255
up ip route add <host system gateway> dev ens18
up ip route add default via <gateway of host system>
down ip route del default
down ip route del <gateway of the host system>
Please make sure that you change the name of the interface ens18 to the interface name inside the virtual machine as well.
If you want to run VM's and CT's at the same time, change the following entry via SSH:
Datei: /etc/vz/vz.conf
Look for the following entry there:
NEIGHBOUR_DEVS=detect
and replace it with this
NEIGHBOUR_DEVS=all
Author: Bettina Brauer
Last update: 11.07.2023 14:49
Note: This article refers only to dedicated servers with a proxmox host system.
VM and CT are named vServer in the following.
There are two ways to set up Internet access on a VM or CT. Here, setting up an additional IP is the simplest and most recommended method.
To be able to set up an additional IP on the vServer, proceed as follows:
1.1. order additional IP
1.2. switch IP to virtualization
1.3. Setting up the additional IP on the vServer
You can order an additional IP address via the central customer management (CCM). To do this, navigate to "Dedicated Root Server".
Now select the corresponding server contract. You can now order additional IP addresses via the "Add IP address" button.
You can use the slider to set the number of IP addresses you need. You will be shown the price before ordering the IP addresses. Via the button "Order IP address" the additional IP addresses are ordered with costs.
Note: If you need more additional IP addresses than you can select, please contact support.
In order to be able to set up the additional IP on the vServer, this must be changed to "Virtualization" in the ZKM. To do this, navigate to the server contract and select the configuration of the IP addresses there via the "Configuration" button.
Now set the configuration of "Host route" to "Virtualization" for the additional IP address and save the setting via the "Apply changes" button.
Note: If the configuration is already set to virtualization, change this to host route, save the setting, and change the configuration back to virtualization.
Important:
Please enter the correct network interface here. In the example, we use the network interface "eth0" here. The network interface of your server can be named differently.
The following settings are made directly in the vServer. Use the console via Proxmox to connect to the vServer.
The currently used default network interface can be read out with the following command:
ip r s | grep default
default via 192.168.178.1 dev eth0 proto static metric 100
eth0 -> network interface, this may vary with your server. Use your network interface in the following.
Now open the network configuration file. Usually this is stored under "/etc/network/interfaces". The network configuration must look like this:
auto eth0
iface eth0 inet static
   address <additional IP-Adresse>
   netmask 255.255.255.255
   gateway <Gateway of the host system>
   pointopoint <Gateway of the host system>
After the settings have been made, the network service is restarted.
service networking restart
Important:
Please enter the correct network interface here. In the example, we use the network interface "eth0" here. The network interface of your server can be named differently.
The following settings are made directly in the vServer. Use the console via Proxmox to connect to the vServer.
The currently used default network interface can be read out with the following command:
ip r s | grep default
default via 192.168.178.1 dev eth0 proto static metric 100
eth0 -> network interface, this may vary with your server. Use your network interface in the following.
Now call the file "/etc/sysconfig/network-scripts/ifcfg-<network-interface>:0.
example: /etc/sysconfig/network-scripts/ifcfg-eth0:0
The network configuration must look like this:
TYPE=Ethernet
DEVICE=eth0
BOOTPROTO=static
NAME=eth0
ONBOOT=yes
IPADDR=<additional IP-Adresse>
GATEWAY=<Gateway of the host system>
Now the network service is restarted:
/etc/init.d/network/restart
You can make the network settings in Windows via the graphical interface. To do this, navigate to: Network Card Properties -> Internet Protocol, Version 4 (TCP/IPv4) -> Properties.
Here you can now make the IP settings graphically.
Alternatively, this can also be done via the CMD (Windows key +r, enter "cmd" in the search).
In the CMD, run the following command to set the network settings.
netsh interface ipv4 set address name="Ethernet" static <additional IP-Adresse> 255.255.255.255 <Gateway of the host system>
To set the DNS servers, the following commands can be used:
netsh interface ip set dns "LAN-connection" static 62.141.32.5
netsh interface ip set dns "LAN-connection" static 62.141.32.4
Note: The commands and configurations on the operating systems were tested under Debian 8, CentOS 7, as well as Windows 2012 R2 Standard.
In order to use NAT, another internal bridge must be added to the previously created bridge. For this the file "/etc/network/interfaces" adapted accordingly. (On the Proxmox host)
example: /etc/network/interfaces
auto vmbr1
iface vmbr1 inet static
      address <private IP-Adresse>
      netmask <Netmask of the IP network>
      bridge-ports none
      bridge_stp off
      bridge_fd 0
      post-up echo 1 > /proc/sys/net/ipv4/ip_forward
This bridge is used by the vServers to connect to the host system.
Now when you create a vServer, the bridge (vmbr1) must be specified.
Last but not least, the required port shares for the vServer are configured on the host system.
Example: The vServer is to be reached via SSH. Here the SSH service on the vServer runs over the default port 22. We now change the forwarding over port 1024.
To do this, edit the "/etc/network/interfaces" file of the host system (proxmox host) and add the following lines at the end:
post-up iptables -t nat -A PREROUTING -i vmbr0 -p tcp --dport 1024 -j DNAT --to <private IP address of the vServer>:22
post-down iptables -t nat -D PREROUTING -i vmbr0 -p tcp --dport 1024 -j DNAT --to <private IP address of the vServer>:22
Note: All ports to be forwarded must be entered in this file.
Explanation of the two commands above:
-i vmbr0 = The interface with the main IP through which the vServer should be accessible.
-p tcp = The protocol to be used.
--dport 1024 = The port which is "received" by the host system.
--<private IP address of the vServer>:22 = To which internal IP this should be forwarded. After the ":" comes the port on which the service can be reached.
As an example, the internal bridge on the host system should now look like this:
auto vmbr1
iface vmbr1 inet static
      address <private IP-Adresse>
      netmask <Netmask of the IP network>
      bridge-ports none
      bridge_stp off
      bridge_fd 0
      post-up echo 1 > /proc/sys/net/ipv4/ip_forward
      post-up iptables -t nat -A PREROUTING -i vmbr0 -p tcp --dport 1024 -j DNAT --to <private IP address of the vServer>:22
      post-down iptables -t nat -D PREROUTING -i vmbr0 -p tcp --dport 1024 -j DNAT --to <private IP address of the vServer>:22
The network service is then restarted.
As a result, you should now be able to reach the host system via SSH at <main IP>:22 and the vServer at <main IP>:1024.
Author: Bettina Brauer
Last update: 21.05.2021 03:27
This article describes how to create a cluster with 4 servers.
In the following, the cluster is created from the following 4 servers:
f002 (AMD Opteron 3365 on this we create the cluster)
ca130 (Intel XEON E3-1270v3 Node)
srv1583 (HPE DL360 Gen10 Node)
srv10008 (HPE DL325 Gen10 Node)
Unfortunately the hostnames of the servers cannot be changed afterwards, so you should think about what you want to call them.
Below I renamed "f002" to "f002-Cluster":
# hostnamectl set-hostname f002-ClusterThe hostname in /etc/hosts must also be changed:
# nano /etc/hostsBefore:
After:
Now we can create the cluster with "pvecm create <Clustername>", in our example this is called "Testcluster":
It is not possible for us to create a cluster with the standard setting with multicast without a own VLAN, for this we have to use unicast.
*** Update ***
As of Debian 10 + Proxmox 6 this setting is already automatically set to Unicast, so only Debian 8 and 9 have to be switched to Unicast.
***Update***
To change this, add "transport: udpu" to "/etc/pve/corosync.conf" as shown below:
# nano /etc/pve/corosync.conf
After restarting Corosync and executing the command "pvecm e 1", the nodes can now be added.
# service corosync restart
# pvecm e 1
No, please make sure that they have already been copied, as in the worst case data loss from the node can occur:
Log on to a node via SSH and add it to the cluster with "pvecm add <FQDN or IP>".
# pvecm add f002.fuchsia.fastwebserver.deThe output should look like this:
If everything worked, it should look like this inside the Proxmox interface:
Author: Bettina Brauer
Last update: 21.05.2021 03:34
When a virtual machine is created on the host system, the network configuration of the VM is always as follows:
IP: <Additionally ordered IP address>
Netmask: 255.255.255.255
Gateway: <Same gateway as the host system such as: 192.168.0.1>
An additional IP can be ordered from ZKM. See more information here.
Author: Bettina Brauer
Last update: 15.04.2021 10:35
After the installation of a vSphere/ESXi environment, a port group for the creation of virtual machines must be created on the vswitch then available.
- tested with vSphere 6.5
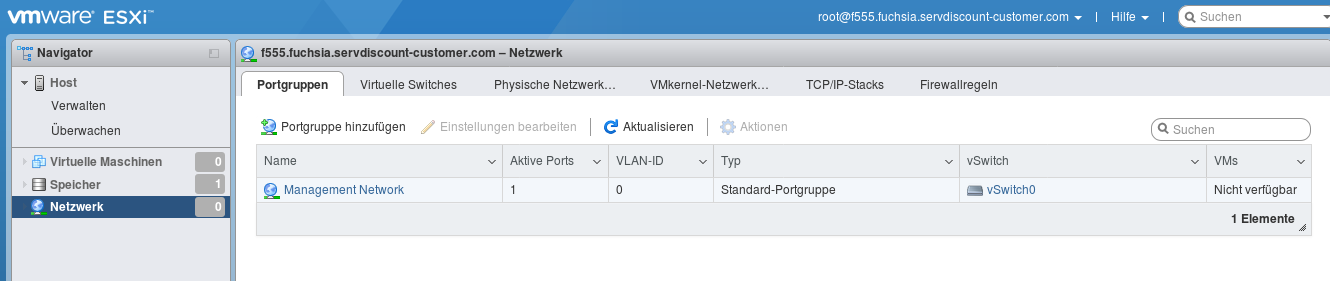
You can keep the default settings when setting up the port group, you only have to give the port group a unique name.
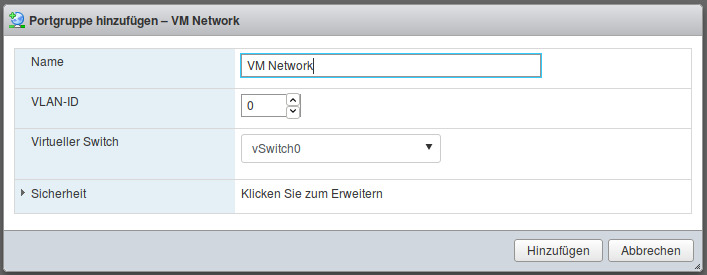
After the setup, the new port group is displayed in the overview and you can then start setting up your VM.

Author: Bettina Brauer
Last update: 15.04.2021 09:37
1. Login to central customer management
Once we unlocked and successfully provisioned your order, you will be able to login with your before settled username and password in the Customer-Control-Panel (https://zkm.myloc.de/single.html).
2. Setup Cloud Backup in central customer management
After successfully login, you can select your Cloud Backup products from the Mainpage under "Cloud Products" or from the menu under "My Products". When you have accessed Cloud Backup Management, select the User Management menu item and create a user.
3. Create a Backup-User
Fill in the user data. At the end of the process, you can check the added user again. If the data is correct, you can complete the process by clicking on "Finish". The newly created service user is now displayed as successfully created under the menu item User and receives an activation request by e-mail. Please confirm the activation email and set your personal password for backup management.
4. Download of client and setup for server
After successful login, you will need to download the client for your server in backup management at backup.cloud-hosting.expert and upload the file to your server. If this is done, you can continue with the further setup. Now connect to the server via SSH and change to the directory where you stored the backup client. Important! Please continue below the right system to continue with the instructions.
--------------- Linux Systeme ----------------------
-----OpenSuse-----
With OpenSuse you proceed as follows:
make file executable with the command:
chmod +x Backup_Agent_for_Linux_x86_64.bin
Next, you must leave the following dependencies Install:
zypper install kernel-devel gcc make
Once this is done, you can use the command:
./Backup_Agent_for_Linux_x86_64.bin
install the server client, the installation process you will be prompted for the access, it is the login information that you have previously created the Backup User. It just takes a little until the installation finishs, the installation should end with a message as follows:
| Congratulation!
| Backup Agent has been successfully installed on your system
Upon successful completion of your system is displayed on the Backup Management website, now you can back up and restore your system through the cloud backup management.
-----Debian / Ubuntu-----
In Debian / Ubuntu proceed as follows:
make file executable with the command:
chmod +x Backup_Agent_for_Linux_x86_64.bin
Next, you must leave the following dependencies Install:
apt-get install alien gcc make perl linux-headers-$(uname -r) linux-image-$(uname -r)
Once this is done, you can use the command:
./Backup_Agent_for_Linux_x86_64.bin
install the server client, the installation process you will be prompted for the access, it is the login information that you have previously created the backup user.It just takes a little until the installation finishs, the installation should end with a message as follows:
│ Congratulations!
│ Backup Agent has been successfully installed on your system.
│ Warning: In the system, a firewall is detected.
│ Configure the firewall so that connections
│ are allowed with BackupAgent.
| Congratulation!
| Backup Agent has been successfully installed on your system
Upon successful completion of their system is displayed on the Backup Management website, now you can back up and restore your system through the cloud backup management.
-----Windows Server-----
Download Client for Windows Server and upload it on your server (you can also use the Windows Server access the panel, and directly from there download). After you have downloaded the client, start the setup process by running the .exe file. You will be prompted for credentials, you enter the credentials of the backup user to which you have previously applied according to this manual. It now takes a little while until the system has completed the installation. Upon successful completion of your system is displayed on the Backup Management website, now you can back up and restore your system through the cloud backup management.
Author: Wolfram Heinen
Last update: 29.04.2020 06:48
The following guide will make it easier for you to get a fast entry in our new Cloud Backup product.
1. Login to central customer management
Once we unlocked and successfully provisioned your order, you will be able to login with your before settled username and password in the Customer-Control-Panel (https://zkm.myloc.de/single.html).

2. Setup Cloud Backup in central customer management
After successfully login, you can select your Cloud Backup products from the Mainpage under "Cloud Products" or from the menu under "My Products". When you have accessed Cloud Backup Management, select the User Management menu item and create a user.

3. Create a Backup-User
Fill in the user data. At the end of the process, you can check the added user again. If the data is correct, you can complete the process by clicking on "Finish". The newly created service user is now displayed as successfully created under the menu item User and receives an activation request by e-mail. Please confirm the activation email and set your personal password for backup management.


You have now created all required information and can use your Cloud Backup product at: https://eu2-cloud.acronis.com/login. Here you have to log in with the data of the created user and can now use your CloudBackup product conveniently and simply. Download the client for your operating system, install it and connect to your backup product. After your installation, your workstation will appear in backup management, so you can now create the appropriate backup plans.
If you need further help, please do not hesitate to contact us.
Author: Wolfram Heinen
Last update: 20.11.2019 14:38
1. Login in central customer management
After your order has been activated and successfully provisioned by us, you can log into the central customer management (https://zkm.myloc.de) with the access data transmitted by us.
2. Create user
After the successful login you can select your Cloud Backup products on the homepage under "Cloud Products".
Once you have accessed Cloud Backup Management, select the User Management menu item and create a user.

3. User data and subscription
Fill in the user data. At the end of the process, you have the option of checking the added user again. If the data is correct, you can complete the process by clicking on "Finish". Under the menu item "User", the newly created service user is now displayed and the new user receives an activation request by e-mail. Please confirm the activation mail and define your personal password for the backup administration.
Please note that you can currently only set the backup notifications when creating the user:
4. Setting up the backup
Install the Acronis Backup app on your phone via PlayStore (Android) or App Store (iOS).
Start the app and click "Login".
Now enter the user name from the ZKM under "Login" and the set password under "Password".
Now you need to grant the necessary permissions and then click "Backup":
*** Note ***
If you are not in the WLAN during setup, you will be asked during or after the authorization request whether you only want to perform the backup with WLAN or also with mobile data:
*** Note ***


You will then be asked if you want encryption (we always recommend encrypting the data additionally):
If you have selected "Use encryption", you must enter the password for the backup in the next step:
*** Attention ***
A password other than the selected password in the ZKM is meant.
This password additionally protects your data from this device and can be selected separately for each device.
*** Attention ***
After entering a password and clicking "Backup", the backup will start immediately, which you can also find in the Acronis web interface (mycybercloud.de):

*** Note ***
If you have completed the setup while in a WLAN, no mobile data backups will be performed. To change this, please go to Navigation -> Settings -> Connections for backup:


There you can adjust when your backups should be performed:
Author: Kevin Krienke
Last update: 25.11.2019 09:03
1. Login in central customer management
After your order has been activated and successfully provisioned by us, you can log into the central customer management (https://zkm.myloc.de) with the access data transmitted by us.
2. Create user
After the successful login you can select your Cloud Backup products on the homepage under "Cloud Products".
Once you have accessed Cloud Backup Management, select the User Management menu item and create a user.
3. User data and subscription
Fill in the user data. At the end of the process, you have the option of checking the added user again. If the data is correct, you can complete the process by clicking on "Finish". Under the menu item "User", the newly created service user is now displayed and the new user receives an activation request by e-mail. Please confirm the activation mail and define your personal password for the backup administration.
Please note that you can currently only set the backup notifications when creating the user:
4. Setting up the backup
Log into the Plesk web interface of your server and click on "Extensions".
Locate "Acronis Backup" in the top right corner of the search bar, select "Free" and click "Get it free".
Once the installation is complete, Acronis Backup will be located under My Extensions. Click "Open" there.
Since you have already ordered the product through us, you can click on "I have an Acronis account" in the next window.
Enter your Acronis data there.
The service URL is: https://mycybercloud.de/
You can find the login name in the ZKM under the user already created:
Enter the password you set as your password.
After you have clicked on "Login and Activate", further packages have to be installed. You can agree to the installation with "Enable".
After the installation is finished, you can now create/manage the backup plan etc. via Plesk:

Author: Kevin Krienke
Last update: 21.11.2019 16:34